The 9th Age: Fantasy Battles is a turn based game. A standard game lasts for 6 Game Turns, each divided into two
Player Turns. At the beginning of the game, one player has the first Player Turn, in which they use their units to
perform various actions, such as moving, casting spells, or Charging, while their opponent gets to react. After this,
the other player has their first Player Turn. When this comes to an end, Game Turn 1 is complete. In Game Turn 2,
the first player now has their second Player Turn, and so on, until both players have completed 6 Player Turns. This
marks the end of the game.
2.A.a Player Turn
Each Player Turn is divided into five phases, performed in the following order:
1
2
3
4
5
Charge Phase
Movement Phase
Magic Phase
Shooting Phase
Melee Phase
2.A.b Active and Reactive Player
The Active Player is the player whose Player Turn it currently is.
The Reactive Player is the player whose Player Turn it currently is not.
2.A.c.2.A.c Simultaneous Effects
Whenever two or more effects occur at the same time, resolve effects controlled by the Active Player first. If there is
a choice involved (such as abilities that may or may not be activated), the Active Player must declare the use of their
abilities before the Reactive Player. Each player is free to decide in which order they resolve their own simultaneous
abilities. Once both players have declared the use and order of their abilities, resolve their effects, starting with
those of the Active Player.
- During the Pre-Game Sequence, consider the player that chose their Deployment Zone to be the Active Player.
- During the Deployment Phase, consider the player that finished deploying first to be the Active Player.
For example, if both players have abilities that may be activated at the beginning of the Magic Phase, the player
whose Magic Phase it is must choose first whether or not they are using their abilities and in which order. Then the
Reactive Player may choose to use their abilities or not. After that, the effects of the abilities from both sides are
resolved, starting with the Active Player's abilities.
2.A.dThe terms Friendly and Enemy
The rules often refer to a friendly or enemy Player Turn, friendly or enemy models, friendly or enemy units, etc. In
this context, the term enemy
refers to your opponent's Player Turns, models, units, etc., while friendly
refers to
yours.
2.B.aRolling Dice
In The 9th Age: Fantasy Battles, dice are often used to determine random outcomes. The most commonly used type
is the six-sided dice, referred to as a D6, with a range from 1 to 6. The effects of a dice roll are often dependent on
whether the rolled value is equal to or higher than a set value (such as a dice roll that is successful if the dice rolls '3'
or higher). This is often referred to as a 3+ (or 2+, 4+, 6+, etc.).
Multiple Dice: Sometimes you need to roll more than one of these dice at the same time. This is represented by a
number before the type of dice rolled, such as 3D6, which means to roll 3 six-sided dice and add the results together.
Modified Dice Rolls: On other occasions, a dice roll may be modified by adding or subtracting a number, such as
D6+1. In such cases, simply add the relevant number to, or subtract it from, the result of the roll.
Natural Roll: A natural roll on a D6 refers to the value of the dice, before any modifiers are applied.
Rerolling Dice: Lastly, some effects in the game call for rerolling certain dice, such as failed to-wound rolls
, or
Aegis Save results of '1'
. When you encounter such situations, reroll the relevant dice. Dice can only be rerolled
once. The second result is final, no matter the cause, source, or result, and the initial result is ignored for all rules
purposes, unless specifically stated otherwise. Note that rerolling a dice is not considered a modifier.
2.B.a.1Rolling a D3
The game sometimes requires the roll of a D3. This is performed by rolling a D6 and then halving the result, rounding
up, so that the result can only be 1, 2, or 3. If the game requires a natural '1' or a natural '6' when rolling a D3, it
always refers to the value of the D6 before halving.
2.B.a.2Maximised Roll and Minimised Roll
For dice rolls subject to Maximised Roll, roll one additional D6 and discard the lowest D6 rolled. For dice rolls subject
to Minimised Roll, roll one additional D6 and discard the highest D6 rolled. These rules are cumulative (e.g. for a
roll affected by two instances of Maximised Roll, you roll two additional D6 and discard the two lowest D6 rolled).
The results of the discarded D6 are ignored for all intents and purposes.
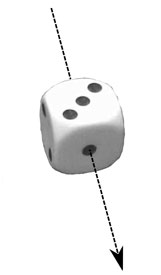
2.B.bThe Direction Dice and Random Directions
The Direction Dice is a special six-sided dice with all sides marked with an arrow. Certain rules may ask the player to
determine a random direction. In such cases, roll the Direction Dice and then use the direction in which the arrow
points.
Representing the Direction Dice with a Standard D6
Alternatively the Direction Dice can be represented by rolling a standard six-sided dice and using the side with a
single dot (i.e. the '1') to represent the direction of an arrow as depicted in figure 1 . If rolling a result of '1' or '6' ('1'
and '6' are on opposite faces on a standard dice), use the central dot in the '5' to represent the direction of the arrow
instead.
Figure 1: Representing the Direction Dice with a standard D6.
3 Models and Units
Models in The 9th Age: Fantasy Battles represent epic warriors, ferocious monsters, and lethal spell casters. Every
miniature that stands on the same base is considered the same model (e.g. a dragon and its rider or a cannon and its
crewmen are considered a single model).
The scale of miniatures most commonly used for The 9th Age ranges from 1:70 to 1:50 when compared to real-life
sized equivalents for human-sized creatures. Many units are commonly represented by miniatures with a scale in
the range of 25 mm to 32 mm (a common form of measuring human miniature size is measuring the model's height
to the eyes). Players are welcome to interpret the scale as they like, as the distances used in the rules do not seem
realistic if the scale of 1:1 compared to the actual size of the miniatures is used for the game.
The 9th Age does not officially support any particular product line, and you are welcome to play with whatever scale
and miniatures you and your opponent have agreed upon. However, it is very important to make sure you mount
your models (regardless of scale or size) on the correct base size for the unit entry.
Just as we can imagine that the combatants in the game are actually smaller than the miniatures that represent them,
we can also imagine that a single miniature does not have to represent a single warrior. We could imagine a unit of
10 elite elven warriors representing exactly 10 elves or some other group size like 20, 50, or 100. At the same time a
unit of 10 Goblin Raiders could just represent 10 goblins, but is more likely to represent some larger group of 100,
200, or 500.
Characters and monsters are meant to represent exceptional individuals and especially potent creatures that are
worth entire regiments on their own. It may be easier to come to terms with a miniature of a character representing
not just the character itself but also their bodyguards and assorted staff that might follow such a hero into battle.
3.A.a Bases
All models are placed on a rectangular or round base. Base sizes are given as two measurements in millimetres:
front-width × side-length (e.g. most horse riders' bases are 25×50 mm). In some rare cases models have round
bases. In these cases, only a single measurement is given: the diameter of the base (e.g. a common War Machine
base is a round 60 mm base). For all rules purposes, only the base of a model is relevant and determines the model's
location on the battlefield, while the miniature itself is not taken into consideration.
3.A.b Multipart Models
Models with more than one Offensive Profile are called Multipart Models (see "Characteristic Profiles ", page 14 ).
Each part of such a model has its own Offensive Profile and is referred to as a model part. For example, a cavalry
model has two parts (the rider and its mount), while a normal foot soldier has a single part.
Sometimes a model has multiple identical parts. In this case, the name of the model part in the unit profile is followed
by a number in brackets. For example, a chariot might have three charioteers, which would be noted as "Charioteer
(3)".
Whenever a rule, ability, spell, and so on affects a model, all parts of the model are affected, unless the rule specifically
states it only affects a specific model part. When attacking or shooting, each part of a Multipart Model uses its own
Characteristics and weapons.
3.A.c Model Facings
A model has 4 Facings: Front, Rear, and two Flanks. The Facings are the edges of the model's base. Models on round
bases only have a single Facing, which is considered to be their Front Facing.
Contents Index 7 Model Rules Summaries
3.A.d Model Arcs
A model has 4 Arcs: Front, Rear, Left Flank, and Right Flank. Each Arc is determined by extending a straight line
from the corners of the model's base, in a 135° angle from the model's Facings. Any object at least touching the line
that separates two Arcs (even if only in a single point) is considered to be inside those Arcs. For rules purposes,
models on round bases have a single 360° Arc all around, which is considered to be their Front Arc.
3.B Units
All models are part of a unit. A unit is either a group of models deployed in a formation consisting of ranks (along
the width of the unit) and files (along the length of the unit) or a single model operating on its own.
When forming a unit, all models in the unit must be perfectly aligned in base contact with each other and face the
same direction. Models in a unit that are not in the first rank must be positioned so that another model is directly in
front of them. All ranks must always have the same width, except the rear rank which can be shorter than the other
ranks; this is called an incomplete rear rank. Note that it's perfectly fine for the rear rank to have gaps in it, as long
as the models are aligned with those of the other ranks. Following these rules, you are free to field your units in
whatever formation, as few or as many files wide as you wish, but this may affect rules that interact with the unit
(see 3.B.b "Full Ranks " and 3.B.c "Close Formation & Line Formation " for examples).
Whenever a rule, ability, spell, and so on affects a unit, all models in the unit are affected.
3.B.a Rank-and-File
Normal models in a unit are called Rank-and-File models (R&F). All models except Characters are R&F models.
3.B.b Full Ranks
The Height of a unit determines how many models are needed in a rank in order to form a Full Rank (see "Model
Classification ", page 87 ). Units of Standard Height need 5 models, Large units need 3 models, and Gigantic units
need 1 model.
3.B.c Close Formation & Line Formation
Units are normally considered to be in Close Formation. Units in ranks of 8 or more models are instead considered
to be in Line Formation. Units in Line Formation gain the Fight in Extra Rank Attack Attribute, but cannot add any
Rank Bonus to their Combat Score (see "Melee Phase ", page 66 for details on the formations' in-game effects).
3.B.d Health Pools
All Health Points of a unit are part of one or more Health Pools. The Health Points of all non-Champion R&F models
of a unit form a separate Health Pool, while the Champion and each Character joined to the unit each have their own
Health Pool (see "Champion ", page 104 and "Character ", page 102 ).
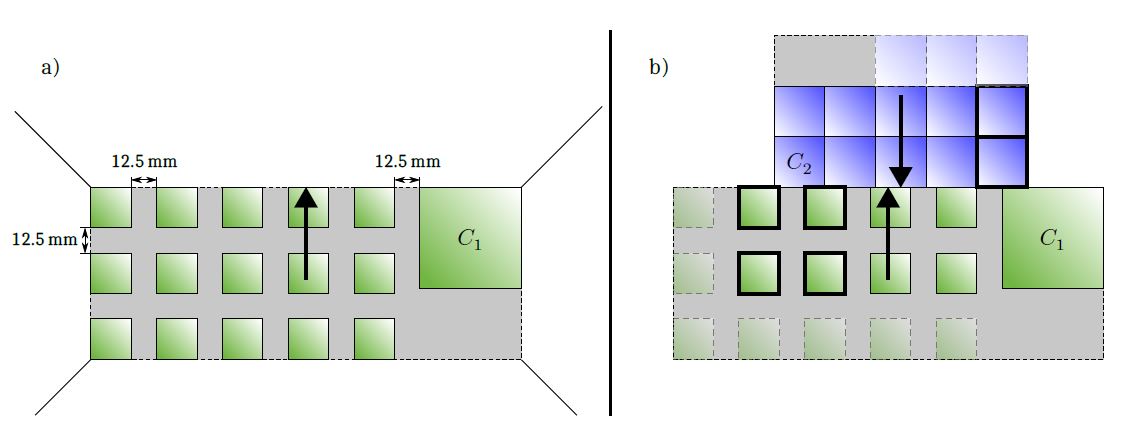
3.B.e Unit Boundary
A Unit Boundary is an imaginary rectangle around the outer edges of the unit. The Unit Boundary of units composed
of models on round bases is identical to the area occupied by their bases (this means that their Unit Boundaries are
not a rectangle but a circle). A unit usually cannot be inside another Unit Boundary, unless the units are overlapping
(see figure 2 and "Interactions between Objects ", page 10 ).
3.B.f Centre of Unit
A unit's Centre is the centre of its Unit Boundary (see figure 2 ).
3.B.g Unit Facings
A unit has 4 Facings: Front, Rear, and two Flanks. The Facings are the edges of the Unit Boundary (see figure 2 ).
Units on round bases have a single Facing, which is considered to be their Front Facing.
Contents Index 8 Model Rules Summaries
3.B.h Unit Arcs
A unit has 4 Arcs: Front, Rear, Left Flank, and Right Flank. Each Arc is determined by extending a straight line
from the corners of the Unit Boundary, in a 135° angle from the unit's Facings (see figure 2 ). Any object at least
touching the line that separates two Arcs (even if only in a single point) is considered to be inside those Arcs. For
rules purposes, units on round bases have a single 360° Arc all around, which is considered to be their Front Arc.
Many rules require the players to determine which Arc of a unit another object is Located in. Note that for rules
purposes there is a difference between "being inside an Arc" as described above and "being Located in an Arc" (see
figure 3 ):
• Models/units on rectangular bases are Located in the Arc which the centre of their Front Facing is in.
• Models/units on round bases are Located in the Arc which the centre of their base is in.
• Any other object is Located in the Arc which its centre is in.
If an object is Located exactly in two Arcs of a unit, it is considered to be Located in the unit's Flank Arc.
Front Arc
Left
Flank
Arc
Rear Arc
Right
Flank
Arc
90°
135°
a)
Centre of Unit
b)
Rear Facing
Front Facing
Right
Flank
Facing
Left
Flank
Facing
B
A
c)
Figure 2: Unit Arcs, Unit Facings, and Unit Boundaries.
a) This unit has 3 ranks and 6 files. The base on the side is a Character with a Mismatching Base that has joined the
unit (see "Mismatching Bases ", page 96 ). The rear rank is incomplete and only contains 3 models.
The Front, Flank, and Rear Arcs are defined by drawing lines from the corners of the Unit Boundary in a 135° angle
from the unit's Facings.
b) The Unit Boundary is the area drawn around the outer edges of the unit (grey area). The Centre of the unit is the
centre of the Unit Boundary (red x).
c) A Unit Boundary cannot be inside another Unit Boundary, not even with parts that aren't occupied by any models.
A
B
C
D
Figure 3: Units inside and Located in another
unit's Arc.
Unit B is both inside unit A's Flank and Rear Arc.
It is Located in unit A's Flank Arc (since this is
where the centre of its round base is).
Unit C is inside unit A's Front Arc. It is also Located
in unit A's Front Arc.
Unit D is both inside unit A's Front Arc and Flank
Arc. It is Located in unit A's Flank Arc (since this
is where the centre of its Front Facing is).
Contents Index 9 Model Rules Summaries
3.C Interactions between Objects
There are many ways models, units, and other objects in the game interact with one another (see figure 4 ).
a) b) c) d)
Figure 4: Interaction between objects.
a) Contact in a line b) Contact in a single point c) Partially inside d) Fully inside
3.C.a Base Contact between Units and Models
Two or more units are in base contact with each other if their Unit Boundaries are touching one another (including
corner to corner contact).
Two or more models on rectangular bases are in base contact with each other if their bases are touching one another
(including corner to corner contact).
3.C.a.1 Base Contact between Models across Gaps
Incomplete ranks or Characters with Mismatching Base may cause gaps between opposing models whose units are
in base contact. Two opposing models are considered to be in base contact with each other across such gaps if you
can draw a straight line from one model to the other, including corner to corner, that is perpendicular to the opposite
Facings.
A model is considered to not be in base contact across a gap if its entire Facing opposite the enemy model is in
contact with a friendly model.
See figure 5 for an example of how to determine if opposing models are considered to be in base contact across gaps.
A B C D E
F G
1 2 3 4 5 6
a) b) c)
Figure 5: Base contact between models across gaps.
The unit at the bottom has Charged the unit on top in the Rear Facing. Due
to the Charged unit's incomplete rear rank, some models are in base contact
across gaps.
a) This line connects 1 with A and B. B's entire Rear Facing is however in
contact with F, so 1 is in base contact across a gap only with A (it still is in
"normal" base contact with F).
b) This line connects C with 2 and 3. C is in base contact with both 2 and 3.
c) This line connects E with 5 and 6. E is in base contact with both 5 and 6.
Contents Index 10 Model Rules Summaries
3.C.b Contact between Objects
Two objects, like bases, Unit Boundaries, Terrain Features, and so on, are considered to be in contact (see figure 4 ):
• If they touch one another:
a) Along a line (e.g. two rectangular bases contacting each other along their front)
b) At a single point (e.g. corner to corner contact between units)
• If one object is inside another. An object is considered to be inside another if it is:
c) Partially inside the other object
d) Fully inside the other object
3.C.c Overlapping Objects
Two objects are considered to be overlapping if they or their Unit Boundaries are at least partially on top of one
another, without the two objects being in contact (e.g. a unit with Flying Movement and a Terrain Feature). This
includes the edges of both objects.
3.C.d Interactions with Round Bases
Units are considered in base contact with a model on a round base if their Unit Boundaries are in contact.
Models are considered to be in base contact with a model on a round base if all of the following conditions are met:
• Their units are in base contact.
• The Unit Boundary of the model on a round base is directly in front of them.
• There aren't any models in between them.
See figure 6 for an example.
A
B
Figure 6: Base contact between models and a model on round base.
The models with a bold frame in unit B are considered to be in base contact with
the model A on the round base, since this round base is directly in front of them.
4 Battlefield Logistics
4.A Measuring Distances
The unit of measurement for all distances and ranges in The 9th Age: Fantasy Battles, is the inch (″). An inch
corresponds to 2.54 cm.
When using 28 mm scale miniatures, 1″ in the game would be roughly equal to 1.5 meters in real life. An average
human-like creature in the game has an Advance Rate of 4″ and a March Rate of 8″, which means that in a single
Movement Phase it would move only 6 metres (12 if marching). Likewise a ranged weapon like a Longbow has an
effective range of 30″ in the game which would equal roughly 45 metres, which is 5 times shorter than the average
historic effective range of the weapon of around 250 metres.
For example, players could use the historic range of the Longbow to determine what kind of distance 1″ represents in
a game. In that case 1″ would be slightly more than 8 metres and much closer to representing the distances assumed
when writing the rules for this game.
We do not wish to tell players how to imagine their fights or how many individuals each miniature should represent,
but we believe that an easy equation of 1″ being roughly equal to 10 metres is a good representation of the size of
the game. An average game will be played on a 72×48″ table and thus represents a real-life area of 720×480 m or
roughly 50 football pitches. In medieval times (the closest thing we have to our fantasy world) this would represent
an average sized battlefield where two forces with soldiers numbering from a few hundred to several thousand
would meet.
To determine the distance between two points on the Battlefield (or two units, or any other elements), you always
measure from the closest points, even if the line of measuring goes through any kind of intervening or obstructing
element.
The rules often refer to things being within a certain distance. Measure the distance between the closest points. If
this distance is less than or equal to the given range, they are considered to be within range. This means that a model
is always within range of itself, and that the entire model or unit does not need to be within range, only a fraction of
it.
When measuring distances to and from a unit, measure to and from its Unit Boundary.
Players are allowed to measure any distance at any time.
4.B Line of Sight
A model can draw Line of Sight to its target (a point, a model, or a Unit Boundary) if you can extend a straight line
from its Front Facing directly to its target, without the line:
• Leaving the model’s Front Arc
• Being interrupted by Opaque Terrain
• Being interrupted by the base of a model that has an equal or bigger Height than both the model and its
target (see “Model Classification ”, page 87 , for more details; Model Rules such as Tall or Skirmisher can affect
this)
For the purpose of drawing Line of Sight to or from a point on the Battlefield, that point is considered to be of
Standard Height.
When drawing Line of Sight from several models inside a unit, this is done independently for each model. Line of
Sight cannot be drawn to targets outside the unit’s Front Arc, and models never block Line of Sight to other models
within the same unit. A unit is considered to have Line of Sight to a target if one or more models in the unit have Line
of Sight. A model is considered to have Line of Sight to a unit if it can draw Line of Sight to any part of the unit’s Unit
Boundary.
See figure 7 for an illustration of how to draw Line of Sight from a model.
Contents Index 12 Model Rules Summaries
A
B C
D
45° 45°
Figure 7: Drawing Line of Sight.
The area within which the single model
unit D can draw Line of Sight is marked
in yellow.
• Unit B is within Line of Sight.
• Unit A is within Line of Sight as unit D
can draw Line of Sight to the Unit Boundary
of unit A, even though that part of
A’s Unit Boundary is not occupied by any
models.
• Unit C is not within Line of Sight as
the Impassable Terrain Feature counts
as Opaque Terrain and therefore blocks
Line of Sight from unit D to unit C.
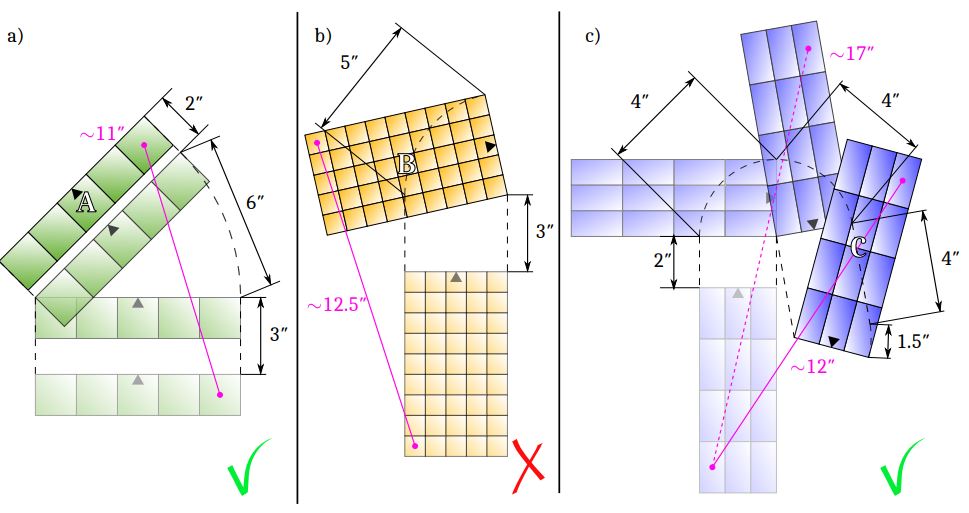
4.C Unit Spacing
Under normal circumstances, all units must be separated from Impassable Terrain and from both friendly and enemy
units by more than 1″ (remember that distances between units are measured to and from their Unit Boundaries).
Certain types of movement allow a unit to come within 1″ of other units or Impassable Terrain. The most common
types of movement are:
• During an Advance Move, a March Move, or a Swift Reform, units may come up to 0.5″ of these elements but
must be more than 1″ away at the end of the move (see figure 8 ).
• During a Failed Charge Move or a Charge Move, units are allowed to come within 0.5″ of these elements,
including base contact (they may however only move into base contact with an enemy unit that was the target
of the Charge).
Once these units have moved within 1″ of these elements, they are allowed to remain there as long as they stay
within 1″. As soon as they move farther away, the usual restrictions regarding Unit Spacing apply again.
See figure 8 for an example.
1″ 0.5″
A
B
Figure 8: Unit Spacing.
During an Advance or March Move, unit A may be moved
closer than 1″ to the Unit Boundary of unit B. Unit A may
however not come within 0.5″ of unit B. Since unit A started
the move more than 1″ away from unit B, it must be more
than 1″ away from B’s Unit Boundary at the end of its Advance
or March Move.
Contents Index 13 Model Rules Summaries
5.A Characteristic Profiles
Each unit entry contains the following Characteristic Profiles: Global Characteristics, Defensive Characteristics, and
Offensive Characteristics.
5.A.a Global Characteristics
Each model has three Global Characteristics:
Adv Advance Rate The distance the model can Advance Move in inches.
Mar March Rate The distance the model can March Move in inches.
Dis Discipline The model’s ability to stand and fight.
5.A.b Defensive Characteristics
Each model has four Defensive Characteristics:
HP Health Points When the model loses this many Health Points, it is removed as a casualty.
Def Defensive Skill How well the model avoids being hit in melee.
Res Resilience How easily the model withstands blows.
Arm Armour The innate Armour of the model.
5.A.c Offensive Characteristics
If a model consists of more than one model part, each model part has its own set of Offensive Characteristics. Each
model part has five Offensive Characteristics:
Agi Agility Model parts with a higher Agility strike first in melee.
Att Attack Value The number of times the model part can strike in a Round of Combat.
Off Offensive Skill How good the model part is at scoring hits in melee.
Str Strength How easily the model can wound enemy models.
AP Armour Penetration How well the model can penetrate the Armour of enemy models.
Contents Index 14 Model Rules Summaries
5.B Characteristic Values
Usually each Characteristic is rated with a value between 0 and 10. A higher value of a given Characteristic indicates
that a model is more accomplished in that Characteristic. These values are used for various game mechanics like
moving units and attacking with models, which will be explained in later chapters.
5.B.a Random Characteristics
Some model parts have random values for one or more Characteristics (e.g. Attack Value D6+1). Roll for the value
each time just before it is needed. In the case of Defensive and Offensive Characteristics, the rolled value is used for
all simultaneous attacks (such as Shooting Attacks from a single unit or Melee Attacks at the same Initiative Step).
When several models in the same unit have a random value for a Characteristic, roll separately for each model.
A random value for Advance Rate means that the model has the Random Movement Universal Rule (see “Random
Movement (X) ”, page 97 ).
5.B.b Special Cases of Characteristic Values
Sometimes Characteristic values in the Defensive or Global Characteristic Profile of mounts may contain a “C” instead
of a value. In this case, “C” refers to the value in the Character’s profile, which is used instead.
Sometimes a value is written as “C + X”. In this case, use the Character’s value, increased by X (see “Global and
Defensive Characteristics ”, page 88 ).
In other cases, a model part may not have any values for certain Characteristics (e.g. the chassis of a chariot). These
cannot be modified in any way.
5.C Characteristic Tests
To perform a Characteristic Test, roll a D6. If the result is less than or equal to the value of the tested Characteristic,
the test is passed. Otherwise the test is failed. A test always fails on the result of ‘6’.
When a model with more than one value for a Characteristic takes a Characteristic Test, take a single test for the
Multipart Model, using the highest value available. For instance, if a Sylvan Elf Character with Strength 4 riding an
Elven Horse with Strength 3 has to take a Strength test, the Multipart Model uses Strength 4 for this test.
When a unit as a whole takes a Characteristic Test, the highest value is used.
5.C.a Discipline Tests
Discipline Tests are a special type of Characteristic Test and follow their own rules. To perform a Discipline Test,
roll 2D6 and compare the result with the model’s Discipline Characteristic. If the result is less than or equal to the
Discipline value, the test is passed. Otherwise, the test is failed.
When a unit as a whole takes a Discipline Test, the owner chooses a single model in the unit to take the test for
the whole unit. If there are different Discipline values in the unit, the owner chooses which model to use. This
often occurs when Characters are joined to units. If the model passes the Discipline Test, every model in the unit is
considered to have passed the test. If the model fails the Discipline Test, every model in the unit is considered to
have failed the Discipline Test.
Many different game mechanics call for a Discipline Test, such as performing a Panic Test or a Break Test. All these
mechanics are Discipline Tests, regardless of any additional rules and modifications described in the relevant rules
sections.
Contents Index 15 Model Rules Summaries
The values of Characteristics, dice rolls, or other values can be the target of modifiers from numerous sources, like
spells, weapons, and armour. They can be set to a certain value, and they can be subject to addition, subtraction,
multiplication, and division.
6.A Values Set to a Fixed Number
When a value or a roll is set to a certain value, replace the modified value or the required roll with that value. For
example, if an attack is subject to the effect “The attack has its Armour Penetration set to 10”, you replace the attack’s
Armour Penetration value with 10.
A Characteristic may be set to the value of another model’s Characteristic. In this case, the value of the other model’s
Characteristic is taken after applying any modifiers which the other model is subject to. Modifiers that affect the
recipient model will then be applied to this value (following the rules in Priority of Modifiers below). For example, if
a model has the rule “The Discipline of all units within 12″ may be set to the Discipline value of the model”, all units
affected by this modifier may ignore their own Discipline and use the model’s Discipline instead.
6.B Multiplication and Division
Sometimes values or rolls can be modified by multiplication or division. In case of the latter, round fractions up.
For example, if a model attacks an enemy model that is subject to the rule “All attacks made against this model are
performed at half Strength”, the Strength of its attacks is divided by 2, rounding fractions up.
6.C Addition and Subtraction
Sometimes values or rolls are modified by addition or subtraction. For example, if a model is subject to the rule “The
wearer gains +1 Armour and suffers −2 Offensive Skill”, you add 1 to its Armour and subtract 2 from its Offensive
Skill.
Contents Index 16 Model Rules Summaries
6.D Priority of Modifiers
If any value or roll is affected by more than one modifier, these modifiers are applied in a strict order, following table
1 below. First apply modifiers listed with priority step 1, then apply modifiers with priority step 2 to the result, and
so on (whenever you see the terms set/always/never used in bold in such a modifier, this indicates its priority).
When several modifiers within a group are to be applied to a value (e.g. a Characteristic value), apply them in the
order that results in the lowest value.
When several modifiers within a group are to be applied to a dice roll (e.g. for Aegis Saves, to-hit rolls, to-wound
rolls), apply them in the order that results in the lowest success chance of the roll.
Priority Step Modifier
1
Values set to a certain number and values set to another model’s value. If the other
model’s Characteristic is modified, apply these modifiers before setting the Characteristic.
2 Multiplication and division. Round fractions up.
3 Addition and subtraction.
4
Rolls always or never succeeding or failing on certain results, and Characteristics always
or never set to a certain value or range of values.
Table 1: Priority of Modifiers.
For example, if a model is affected by (A) “The model’s attacks gain +1 to hit” and (B) “Attacks made with this weapon
are set to hit on 4+”, first apply modifier (B), since modifiers using the “set” mechanic are applied in priority step 1,
and then apply the +1 modifier, as modifiers using addition are applied in priority step 3. The final result would be
the model’s attacks hitting on 3+.
After all modifications via multiplication, division, addition, or subtraction, unless specifically stated otherwise:
• Agility and Attack Value cannot be modified to lower than 1.
• The value of all other Characteristics cannot be modified to lower than 0.
• Armour cannot be modified to exceed a maximum of 6.
• Agility and Discipline cannot be modified to exceed a maximum of 10.
Contents Index 17 Model Rules Summaries
Units in opposing armies fight each other using melee weapons, ranged weapons, spells, and other unique attacks.
This chapter will explain how attacks are performed in general and how you determine if they are successful in
inflicting damage on their targets.
7.A Classification of Attacks
All sources of damage are defined as attacks, which are then divided into Melee and Ranged Attacks (see figure 9 ).
7.A.a Melee Attacks
All attacks made at units in base contact with the attacker’s unit in the Melee Phase are Melee Attacks.
The most common type of Melee Attacks are Close Combat Attacks. Model parts perform a number of Close Combat
Attacks equal to their Attack Value (see “Which Models can Attack ”, page 67 ).
Special Attacks are considered to be Melee Attacks that are not Close Combat Attacks (see “Special Attacks ”, page
114 ).
7.A.b Ranged Attacks
All attacks that are not Melee Attacks are Ranged Attacks.
All Ranged Attacks made with a Shooting Weapon in the Shooting Phase or as a Stand and Shoot Charge Reaction are
Shooting Attacks.
Other Ranged Attacks include, amongst others, Damage spells, ranged Special Attacks, hits from Miscasts , and hits
from failed Dangerous Terrain Tests .
Attacks
Melee Attacks Ranged Attacks
Close Combat
Attacks
Shooting
Attacks
Special Attacks Others
Figure 9: Classification of attacks.
7.A.c Strength and Armour Penetration of Attacks
Attacks have a Strength and an Armour Penetration value, unless specifically stated otherwise:
• Close Combat Attacks use the Strength and Armour Penetration of the model part making the attack, possibly
modified by their Close Combat Weapon, Model Rules, spells, Characteristic modifiers, and other effects.
• Shooting Attacks use the Strength and Armour Penetration in the profile of the Shooting Weapon they are
made with.
• Other types of attacks (such as spells and Special Attacks) follow the general rules for their type and the
individual rules specified in their description.
Contents Index 18 Model Rules Summaries
7.B Attack Sequence
Whenever an attack is performed, use the following sequence:
1 Attacker allocates attacks if applicable.
2 Determine number of hits.
3 Attacker distributes hits if applicable.
4 Attacker rolls to wound; if successful, proceed.
5 Defender makes Armour Save rolls; if failed, proceed.
6 Defender makes Special Save rolls; if failed, proceed.
7 Defender removes Health Points and/or casualties.
8 Defender takes Panic Tests if necessary.
Complete each step for all the attacks that are happening simultaneously (such as all Shooting Attacks from a single
unit or all Close Combat Attacks at a given Initiative Step) before moving on to the next step.
7.C Allocating Close Combat Attacks
Close Combat Attacks are directed against enemy models in base contact. This is referred to as allocating attacks,
and will be explained in the Melee Phase chapter (see “Allocating Attacks ”, page 68 ).
7.D Determining the Number of Hits
Close Combat Attacks and most Shooting Attacks need to roll to hit (see “Rolling to Hit ”, page 69 and “Aim ”, page 62 ),
while Special Attacks and certain spells may hit automatically, inflicting a fixed or random number of hits.
7.E Distributing Hits
All attacks that target a unit as a whole will under normal circumstances hit the unit’s R&F Health Pool . These
include most Ranged Attacks and most Melee Attacks that are not Close Combat Attacks. How hits are distributed
may change when Characters are joined to units, as described in “Character ”, page 102 .
Close Combat Attacks are not distributed, but are allocated before to-hit rolls are made, as mentioned above. Do not
redistribute the hits from Close Combat Attacks at this stage.
In cases where not all models of a Health Pool have the same relevant Characteristics or rules (such as different
Resilience values or different saves), use the value or rules of the largest fraction of the Health Pool’s models, and
apply them to all rolls (to-hit, to-wound, saves). In case of a tie, the attacker chooses which fraction to use.
Contents Index 19 Model Rules Summaries
7.F To-Wound Rolls
If an attack has a Strength value, it must wound the target to have a chance to harm it. To make a to-wound roll, roll a
D6 for each hit. The difference between the Strength of the attack and the Resilience Characteristic of the defender
determines the needed roll to wound the target (see table 2 below).
A natural roll of ‘6’ will always succeed and a natural roll of ‘1’ will always fail. The player whose attack inflicted the
hit makes a to-wound roll for each attack that hit the target. A successful to-wound roll causes a wound; proceed to
Armour Saves and Armour Modifiers.
If the attack does not have a Strength value, follow the rules given for that particular attack.
Strength minus Resilience Needed roll to wound
2 or more 2+
1 3+
0 4+
−1 5+
−2 or less 6+
Table 2: To-Wound Table.
7.G Armour Saves
If one or more wounds are inflicted, the player whose unit is being wounded now has a chance to save the wound(s)
if the wounded models have any Armour. To make an Armour Save roll, roll a D6 for each wound. The following
formula determines the needed roll to disregard the wound:
7 − (Armour of the defender) + (Armour Penetration of the attack)
A natural roll of ‘1’ will always fail.
If the Armour Save is passed the wound is disregarded.
See table 3 below for the different possible results of the formula.
Armour minus AP Needed roll to disregard the wound
0 or less No save possible
1 6+
2 5+
3 4+
4 3+
5 or 6 2+
Table 3: Armour Save Rolls.
Contents Index 20 Model Rules Summaries
7.H Special Saves
The attacked model now has a final chance to disregard a wound that was not saved by its Armour Save, provided
it has a Special Save. There are different types of Special Saves, like Aegis (X) and Fortitude (X) , both detailed in
“Model Rules ”, page 92 .
To make a Special Save roll, roll a D6 for each wound that was not saved by the model’s Armour Save.
• If X is given as a dice roll (e.g. Aegis (4+)), X is the roll needed to successfully disregard the wound.
• If X is given as a modifier and with a maximum value (e.g. Fortitude (+1, max 3+)), the model gains this
as a modifier to all its Special Save rolls of the same type, which cannot be increased to rolls better than
the maximum value given in brackets. If the model doesn’t have that type of Special Save, it instead gains a
corresponding Special Save ((7 − X)+) (e.g. a model with Aegis (+2, max 4+) will gain Aegis (5+)).
If a model has more than one Special Save, choose which one to use before rolling. Only a single Special Save can be
used against each wound.
7.I Losing Health Points
For each unsaved wound, the attacked model immediately loses a Health Point, which may lead to models being
removed as casualties. See “Casualties ”, page 80 for further details.
Figure 10 summarises the steps from an attack to a potential casualty.
Attack
To-hit
roll
Hit
To-wound
roll
Wound
Armour
Save
Special
Save
Unsaved
wound
Apply
Multiple Wounds
Health Point
loss
Casualty
Figure 10: Flowchart of the steps from an attack to a potential casualty.
Contents Index 21 Model Rules Summaries
The 9th Age: Fantasy Battles includes a series of Army Books which contain the unique rules for Characters and
troops, and the descriptions of the different armies. All unit entries within an Army Book are divided into different
Army Categories, which may be limited to represent a minimum or maximum percentage of the Army Points.
The first step in building an army is writing down a selection of units, options, and their Point Costs on a document
called the Army List. An army is subject to certain rules and restrictions which this chapter will describe in further
detail.
8.A.aPoint Costs
Every unit, weapon, upgrade, Special Item, etc. costs a certain amount of points. The 9th Age uses Point Costs to
balance units and options so two players can enjoy a game that tests their skills. This allows for quick pickup games
between friends or helps design scenarios where you need to know how powerful certain things are. A unit's Point
Cost is the total of its starting Point Cost and the Point Costs of all its upgrades. An army's Point Cost is the total of all
its units' Point Costs.
Each army is divided into several Army Categories, restricting the selection of units in a way that enables players
to enjoy a balanced and fair gaming experience. At the same time, they still ensure that armies used in the game
can employ a wide variety of styles. This could represent a single Character and its hunting party or large armies
numbering in their thousands clashing for the fate of the world.
All armies in The 9th Age: Fantasy Battles are subject to the basic composition rules detailed in this section.
8.B.aArmy Points
Before building an army, you will want to decide with your opponent on the size of the battle, referred to as Army
Points. The combined Point Costs of every unit in your army, as described in "Point Costs" must not exceed
the Army Points. An army may fall below the limit by up to 40 points.
8.B.bArmy Categories
An Army List is divided into Army Categories, and every unit on the Army List belongs to one or more Army Categories.
These are marked by icons in the unit entries in the Army Book. The number of points a player can spend on each of
these Army Categories is defined in each Army Book.
The Army Categories are divided into three groupings: the commanders and the outstanding individuals (Characters),
the backbone of the force (Core and Special), and the thematic unique additions (Army-Specific). All armies must
have units from the Characters and Core Army Categories in their Army List.
8.B.b.1Characters
-
This Army Category always has a maximum amount of points that can be spent on it, usually 40% of the Army Points.
-
Each army must contain at least one Character that is eligible to be the army's General (see "The General").
-
Unless specifically stated otherwise, entries that belong to this Army Category follow the rules for Characters
given in "Character".
Characters represent the leaders and exceptional individuals who, through their particular sets
of skills, influence the course of battle using either brute force, tactical acumen, spell casting
ability, or engineering knowledge. It is they who muster the army, and your force will always
include at least one representative of this Army Category to serve as your army General.
8.B.b.2Core
-
This Army Category always has a minimum amount of points that must be spent on it, usually 25% of the Army Points.
The Core represents the most readily available warriors a faction has access to and will form
the bulk of combatants under the command of the Characters in the force. No matter where or
why the faction fights, the Core are those units that will always be present in some combination
as part of the fighting force. They are also those warriors that a society can provide for battle in
the greatest numbers. While armies can overwhelmingly be formed out of the Core units, it is
rarely the case as each commander seeks to deploy a force that contains as many of their finest
or more specialised warriors as possible, depending on the resources available to them.
8.B.b.3Special
-
This Army Category has no maximum or minimum limit. You are free to spend any amount of points on units
in this Army Category, so long as the requirements of the army composition are met.
The Special Army Category represents more specialised warriors. A faction can call upon large
numbers of these warriors and they can often be the most numerous segment of the entire
fighting force. However, their numbers are still limited, and though some of these units can form
an entire battle line there just isn’t enough of them to form armies on their own.
8.B.b.4Army-Specific
-
This Army Category has a maximum amount of points that can be spent on it; the limit is defined within
individual Army Books.
-
All armies have one or more Army-Specific Categories.
The Army-Specific Categories are introduced to provide additional limitations in the process
of army building. These limitations are designed to be reflective of the nature of the faction in
question, and with the goal of ensuring greater balance of the game. There are three types of
Army-Specific Categories: one type is simply an additional grouping of units connected with
a certain theme. These are given a thematic name reflective of the army they are part of or
the function they perform (e.g. Orcs and Goblins — Death from Above). The second type of
Army-Specific Categories provides limitations linked with a certain function a unit from another
Army Category performs within the army (e.g. Beast Herds — Ambushers). And the third type of
Army-Specific Categories is a mix of the above.
8.B.b.5Units Belonging to more than one Army Category
Some units can be included in more than one Army Category, which is represented by more than one icon in their
entry. In these cases, simply count the unit's Point Cost towards the limits of all its Army Categories, but only once
towards the army Point Cost.
8.B.b.6Adding Army Categories
Choosing certain options can make a unit count towards another Army Category in addition to its original Army
Category. For example, giving a unit Shooting Weapons might make it also count towards the Ranged Support Army
Category. This is marked by a small icon of the additional Army Category, displayed underneath the original Army
Category icon(s), together with the conditions for counting in this additional Army Category.
8.B.b.7Splitting Point Cost between Army Categories
In some rare cases a unit's Point Cost can be split between different Army Categories, where the Point Cost for some
particular option is additionally counted towards a different Army Category than the unit. This is marked in the unit
entry by a split icon, with the two halves representing the two Army Categories the unit counts towards.
For example, a 250 pts Elf Character, counted towards the Characters Army Category, decides to ride a 500 pts
Dragon, which is an option marked to count additionally towards Beasts and Monsters. In this case, the player must
count the entire unit's Point Cost (250 + 500 = 750 pts) towards Characters, and the Dragon's Point Cost (500 pts)
towards Beasts and Monsters.
8.B.cDuplication Limits and Restrictions
Certain units and options are limited in number in the army.
8.B.c.10-X Items per Army
Some items in the Army Books are marked with 0-X items per Army (e.g. 0-2 Units per Army, 0-2 Models per Army,
0-2 Mounts per Army). Such items can be included from zero to X times in the same army. The maximum limit (X) is
halved for Warbands and doubled for Grand Armies, rounding fractions up (see below).
8.B.c.2One of a Kind
Items (units, upgrades, equipment, etc.) marked as One of a Kind may only be taken once per army. This is not
changed for Warbands or Grand Armies.
8.B.c.3Minimum Army Size
Every army must contain a minimum of 4 units. Characters do not count towards this minimum. All units with the
War Machine Universal Rule together count as a single unit for this purpose.
8.B.c.4The General
A single Character in the army must be named the General. At least one Character must be included in the army that
is eligible to fulfill this role. Who is the General must be noted on the Army List.
The General gains the Commanding Presence Universal Rule.
8.CWarbands and Grand Armies
The rules for army composition are modified depending on the size of an army. An army that is unusually small or
unusually large is subject to the following rules.
Warbands
Armies of 3000 points or less are called Warbands. The
Minimum Army Size is decreased to 3 units.
All "0-X Items per Army" limits are halved, rounding
fractions up.
The usual board size is 36" wide and 48" deep.
Grand Armies
Armies of 8000 points or more are called Grand Armies.
All "0-X Items per Army" limits are doubled.
Adapt the board size to the size of the game.
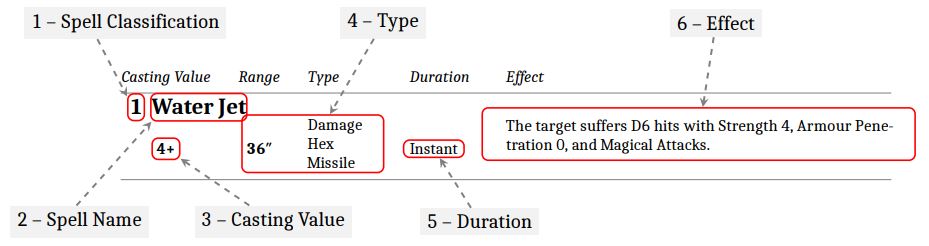
8.D How to Read Unit Entries
Every unit in the game has a certain set of Characteristics and possibly optional or mandatory upgrades, and, as
explained above, every unit is part of an Army Category. In addition, the models in that unit may be equipped with
particular weapons and armour, and they may have one or more Model Rules, as you will learn in later chapters of
this Rulebook (see "Model Rules").
Every unit is represented by its unit entry in its Army Book, and these unit entries contain all the information
pertaining to that unit, including the data above as well as further information like Model Type and Height, base size,
restrictions regarding the number of models or certain equipment, and so on.
This section will explain how the most common information in unit entries is presented in the Army Books of T9A.
8.D.a Common Unit Entries
Unit entries usually consist of a header, the unit profile, and options, as illustrated in figure 11 .
Header
Unit
Profile
Options
Tin Men
120 pts + 10 pts/extra model 15–50 models 0–4 Units/Army
Height Standard
Type Infantry
Base 25×25 mm
Global Adv Mar Dis Model Rules
5″ 10″ 7 Scoring, Strider (Forest)
Defensive HP Def Res Arm
1 4 4 2 Light Armour
Offensive Att Off Str AP Agi
1 4 3 0 3 Tin Man’s Heart, Halberd
Options pts
Ambush (0–25 Models/Unit, 0–2 Units/Army) 20
One choice only:
Shield 1/model
Paired Weapons 2/model
Throwing Weapons (5+) 2/model
Command Group Options pts
Champion 20
Musician 20
Standard Bearer 20
Banner Enchantment no limit
Model Rules
Tin Man’s Heart: Attack Attribute – Close Combat.
The model must reroll failed to-hit rolls against every enemy models with Fear.
d
Figure 11: Common unit entry.
Contents Index 25 Model Rules Summaries
8.D.a.1 Header
The header of a unit entry usually contains all the general information on the unit (see figure 12 ).
Tin Men
120 pts + 10 pts/extra model 15–50 models 0–4 Units/Army
Height Standard
Type Infantry
Base 25×25 mm
1 – Unit name 3 – Unit size 5 – Scoring 7 – Model specifications
2 – Army Category 4 – Unit cost 6 – Unit cap
Figure 12: Header of a common unit entry.
1 – Unit name
This is the name of the unit that will be used e.g. when choosing the unit to perform an action like Charging, or when
targeting the unit with a spell or a Shooting Attack.
2 – Army Category
Every unit is part of an Army Category, like Characters, Core, or Special, which is important e.g. for building an army
or for certain Model Rules. Each Army Category is represented by an icon that corresponds to the respective Army
Category as shown in each Army Book’s section on Army Organisation.
Note that some units may belong to more than one Army Category (see “Army Categories ”, page 22 ). In this case the
icons of all these Army Categories will be depicted.
3 – Unit size
The unit size tells you the minimum and the maximum size of the unit when building an army. The minimum unit
size corresponds to the number of models that the unit must contain at least. And accordingly, the maximum unit
size represents the number of models that the unit can consist of at the most.
In the example in figure 12 , a unit of Tin Men must consist of at least 15 models when building the army, while you
can add up to 35 models, attaining the unit’s maximum size of 50 models.
4 – Unit cost
The unit cost tells you how many points you have to pay for adding the unit to your army in its minimum size, and
how many points each additional model will cost. For some units in the game, an additional model will cost the same
amount of points as a model that is part of the unit’s minimum size, while for others additional models may be more
or less expensive than the initial models.
In the example in figure 12 , a unit of Tin Men consisting of the minimum size of 15 models will cost 120 points, while
each additional Tin Man model will cost 10 points. So for instance a unit of 25 Tin Men will cost a total of 220 points
(120 points for the first 15 models and 100 pts for the 10 additional models).
5 – Scoring
Some units have a certain Model Rule called Scoring, which is relevant for winning Secondary Objectives during the
game (see “Scoring ”, page 98 and “Secondary Objectives ”, page 35 ). Units with this Model Rule will be marked with a
pennant icon.
6 – Unit cap
Certain units can only be selected a limited number of times in an army. In this case you will find a “0–X Units/Army”
cap in the unit entry. In the example, an army may contain up to two units Tin Men, regardless of their size, equipment,
etc.
7 – Model specifications
Every model in the game has a specific Height, Type, and base size, which are relevant for a wide variety of game
mechanics and Model Rules.
Contents Index 26 Model Rules Summaries
8.D.a.2 Unit Profile
The unit profile contains the models’ Characteristic Profiles and Model Rules, including their mundane equipment
(see figure 13 ).
8 – Characteristic Profiles 9 – Model Rules
Global Adv Mar Dis Model Rules
5″ 10″ 7 Scoring, Strider (Forest)
Defensive HP Def Res Arm
1 4 4 2 Light Armour
Offensive Att Off Str AP Agi
1 4 3 0 3 Tin Man’s Heart, Halberd
Figure 13: Unit profile of a common unit entry.
8 – Characteristic Profiles
The Characteristic Profiles of each unit entry contain the values of all of a unit’s Global, Defensive, and Offensive
Characteristics. Note that the values displayed here represent the models’ unmodified Characteristic values, excluding
any modifiers e.g. from Model Rules and equipment:
• For instance, in case of Armour, the Characteristic value displayed here represents the models’ innate armour
(granted e.g. from scales or a tough hide). Any armour from Armour Equipment, like Light Armour in the
example above, will have to be added on top of the Armour value displayed in the Defensive Profile. In
this example, the models will have an Armour of 3 (2 from the models’ innate armour and 1 from their Light
Armour), which will give them a 4+ Armour Save against attacks without any Armour Penetration (see “Armour
Saves ”, page 20 ).
• The profile also displays the models’ unmodified Strength and Armour Penetration. Any Strength and Armour
Penetration modifiers, e.g. from weapons, will have to be added on top. In our example, the models’ Close
Combat Attacks will have a Strength value of 4 and an Armour Penetration value of 1, due to the innate Strength
of 3 and the +1 Strength and Armour Penetration modifiers from the Halberds the models are equipped with.
9 – Model Rules
In this part of the unit entry, the unit’s Model Rules are displayed:
• The Global Model Rules comprise the unit’s Universal Rules (in alphabetical order).
• The Defensive Model Rules comprise the unit’s Personal Protections and Armour Equipment. In case a unit
has more than one Model Rule from these categories, Personal Protections will be listed first (in alphabetical
order), followed by the unit’s Armour Equipment (in alphabetical order).
• The Offensive Model Rules comprise the unit’s Attack Attributes, Special Attacks, and weapons. In case a unit
has more than one Model Rule from these categories, Attack Attributes and Special Attacks will be listed first
(in alphabetical order), followed by the unit’s weapons (in alphabetical order).
In some unit entries, you will notice certain Model Rules in bold, like Tin Man’s Heart in the example above. Bold
font is used here to highlight army-specific Model Rules that are defined in the unit entry.
Contents Index 27 Model Rules Summaries
8.D.a.3 Options
In this part of the unit profile illustrated in figure 14 , you will find all the optional and mandatory upgrades that can
be bought for a unit when building the army.
10 – Command Group Options
12 – Restricted
options
11 – Unrestricted
options
13 – Model Rules
Options pts
Ambush (0–25 Models/Unit, 0–2 Units/Army) 20
One choice only:
Shield 1/model
Paired Weapons 2/model
Throwing Weapons (5+) 2/model
Command Group Options pts
Champion 20
Musician 20
Standard Bearer 20
Banner Enchantment no limit
Model Rules
Tin Man’s Heart: Attack Attribute – Close Combat.
The model must reroll failed to-hit rolls against every enemy models with Fear.
Figure 14: Options in a common unit entry.
10 – Command Group options
Certain units have one or more Command Group Options in their unit entry, which allow them to upgrade one model
of the unit to a Champion, another model to a Musician, and another model to a Standard Bearer. This means that a
single R&F model cannot be upgraded to be a Musician and a Standard Bearer at the same time. In addition, each
unit can only upgrade models to a single Champion, a single Musician, and a single Standard Bearer.
Note that upgrading the unit with a Champion/Musician/Standard Bearer does not grant you extra models for the
unit as you upgrade models that are already part of the unit.
Some Command Group models have additional options for upgrades, for instance the Standard Bearer in the example
above can purchase a Banner Enchantment. These options are listed indented underneath the corresponding
Command Group model. In order to have access to such an additional upgrade, you must first upgrade a model to
the corresponding Command Group model, and only then you can buy the upgrade for that model.
11 – Unrestricted options
Many units have options to upgrade their models with weapons, armour, certain Model Rules, etc. In some cases, the
Point Cost per unit is indicated, regardless of the number of models, while in others, like in the example above, the
unit entry gives the Point Cost per model.
Note that if you choose to buy such an upgrade, you must always upgrade all models of the unit accordingly.
12 – Restricted options
Certain options may come with restrictions. These may for instance be associated with an altered maximum number
of models per unit (in the example above 25 instead of 50), or with a restriction regarding the number of units with
the upgrade an army may contain (up to 2 units in the example above). Another possible restriction is an upper limit
on the total number of models with a given upgrade per army. In this case, the sum of all models of all units with that
upgrade in the army may not exceed that upper limit.
Other options cannot be combined with one another. These are listed indented underneath “One choice only” in
the unit entry. In the example above, the models in the unit may be upgraded either with Shields or with Paired
Weapons, they may however not gain Shields and Paired Weapons.
In case there are several groups of these “One choice only” upgrades for a unit, the unit may be given up to one choice
of each group.
13 – Model Rules
In case a unit profile contains any unit-specific Model Rules, these rules will be explained in this part of the unit
entry.
8.D.b Complex Unit Entries
In addition to the elements detailed above, certain units may have additional distinctive features that will be explained
based on the Character unit entry in figure 15 .
Contents Index 28 Model Rules Summaries
a b
c
d
e
f
Wicked Witch
140 pts single model 0–3 Units/Army
Height Standard
Type Infantry
Base 20×20 mm
Global Adv Mar Dis Model Rules
5″ 10″ 8 Hydrophobe, Wizard Apprentice
Defensive HP Def Res Arm
3 4 3 0
Offensive Att Off Str AP Agi
1 4 3 0 5
Magic Options pts
Wizard Adept 75
Wizard Master 225
Cosmology Druidism Witchcraft
Options pts
Special Items up to 100
If Wizard Master up to 200
Red Rubber Boots 5
Mount Options pts
Witches’ Broom 30
Winged Monkey Chariot 200
Model Rules
Hydrophobe: Universal Rule.
If the model touches a Water Terrain Feature, it is immediately removed as a casualty.
Optional Model Rules
Red Rubber Boots: Universal Rule.
The model loses the Hydrophobe Model Rule and gains Strider (Water Terrain).
d
Figure 15: Character unit entry.
a) Certain units, like Characters, consist only of a single model. These units are labelled as “single model” units. They
follow the same rules as units consisting of multiple models, but there may be certain differences, like Characters
being able to join other units.
b) Just like regular units, Characters may have a unit cap. This cap applies to all Characters of this type, regardless of
their upgrades, equipment, and mounts. In this example, this means that you can only have up to 3 Wicked Witches
in your army, e.g. one of them on foot and two on Witches’ Brooms.
c) Models that can cast spells are referred to as Wizards. Wizards come in 3 different types: Wizard Apprentice,
Adept, and Master. The Model Rules tell you which Wizard type the model has by default (in this example, the Wicked
Witch is a Wizard Apprentice), while the Magic Options show you which types the model can be upgraded to. In case
you upgrade your Wizard, the upgrade replaces the default Wizard type. In addition, you will also find in this section
the Paths that the Wizard has to choose a single one from. The Wizard will select its spells from this chosen Path
(see “Spell Selection ”, page 36 ).
d) Certain models, like most Characters, have access to Weapon Enchantments, Armour Enchantments, Artefacts, etc.
These upgrades are referred to as Special Items (see “Special Items ”, page 116 and The 9th Age: Fantasy Battles –
Arcane Compendium). If a model can buy Special Items, you will find this information in the unit entry’s options,
together with the maximum amount of points a model can spend on them.
e) Characters are usually on foot by default. Most of them can however be given a mount. The Mount Options will tell
you which mounts are available for a Character and how many points you have to pay for them. Note that a Character
may always only take a single mount.
f) As explained above, unit entries will contain unit-specific Model Rules. In addition, you will sometimes also find
Optional Model Rules. In order to gain these Model Rules, you must buy the corresponding upgrade for the model.
Contents Index 29 Model Rules Summaries
8.D.c Unit Entries with Multipart Models
The examples above show entries of units with models consisting of a single model part, but there are also many
Multipart Models in the game (see “Multipart Models ”, page 7 ). The unit entry of a Character Mount, the Winged
Monkey Chariot from the example in figure 16 , will be used to explain the particularities of this type of unit entry.
a
b
c
Winged Monkey Chariot
0–1 Mounts/Army
Height Large
Type Construct
Base 50×100 mm
Global Adv Mar Dis Model Rules
Ground
Fly
2″
9″
2″
9″
C Fly (9″, 9″), Light Troops, Swiftstride
Defensive HP Def Res Arm
4 C 4 C+1 Hard Target (1)
Offensive Att Off Str AP Agi
Crew (2) 1 4 3 0 5 Light Lance
Winged Monkey (2) 2 4 4 1 4 Harnessed, Hatred
Chassis 5 2 Impact Hits (D6), Inanimate
d
Figure 16: Unit entry of a Multipart Model.
a) Like for any other unit entry, there may be restrictions on the number of Character Mounts that can be part of an
army. In the example above, the army may only contain up to a single Character, regardless of the type, on a Winged
Monkey Chariot. This restriction only applies to Character mounts, so if an Army Book contains the Character mount
additionally as a unit in another Army Category, you are allowed to take this unit in addition to the Character mount
in your army.
b) In case of a Multipart Model Character, many of a model’s Characteristic values will be determined by the mount’s
Characteristics, unless they are marked with “C” or “C+X” in the mount’s profile (see “Special Cases of Characteristic
Values ”, page 15 ), which refers to the value in the Character’s profile. In this example, the mount does not have a
proper Discipline Value, but the Multipart Model uses the Character’s Discipline, which is 8.
c) Models consisting of a single model part have one Global, Defensive, and Offensive Profile each. Multipart Models
also have one Global and Defensive Profile each, which apply to the entire Multipart Model. However, they do have a
separate Offensive Profile for each identical model part. The mount above has 5 model parts: 2 Crew members and 2
Winged Monkey’s (as indicated by the “2” in brackets) and a Chassis, which all have their own Offensive Profile.
Contents Index 30 Model Rules Summaries
8.E Hidden and Open Lists
Rules are written and balanced based on the principle of openness, and we encourage players to share their full
Army Lists with their opponents at the start of the game. This Army List should include all units, unit options, Special
Items, special abilities, Point Costs, and so on. The only things that are not open to your opponent are things that are
explicitly stated as hidden or secret.
8.E.a Optional Rules for Hidden Lists
Some players may prefer to use so-called hidden lists, and for those players we have included the hidden list
rules. Please note that the game is not balanced with these rules in mind. In this format, most of your Army
List will be open, meaning that your opponent should know what your army consists of before the game starts.
However, some parts of your army are secret or “hidden”. Both players should provide their opponent with the
open part of their army before the game begins, referred to as a mundane Army List.
The following elements are included in the hidden part of your army:
• Special Items that are picked from the List of Common Special Items given in The 9th Age: Fantasy Battles
– Arcane Compendium
• Special Items that are specific to Army Books, as well as any option that follows the rules for Special Items
such as Daemonic Items and Dwarven Runic Items
Anything not on this list belongs to the mundane Army List.
If an army has two or more units or models that are identical regarding their open part but have hidden
differences, the player must be able to tell the units apart in the hidden list. For example if a player fields two
units identical in every way except that one has an enchanted banner and the other doesn’t, the Army List may
specify that the unit with the enchanted banner has a red banner while the unit with a blue banner possesses
no such Special Item.
8.E.a.1 Revealing Special Items
Special Items (or similar) must be revealed the first time they are used. A Special Item is considered as being
used when it affects or could affect the game in any way. For example:
• It affects a dice roll (even if the actual result of the dice has no effect).
• It alters an attack (such as an enchanted weapon, or any Special Item with a rule that affects an attack).
• It alters a saving roll (reveal the Special Item before making the saving roll). Note that a Special Item
that affects the saving roll the same way as the non-Enchanted counterpart would does not need to be
revealed.
A Special Item that increases movement only counts as being used if the unit moves farther than it could without
it or when Charging (declare that you have the Special Item before rolling the Charge Range but after Charge
Reactions are resolved).
When revealing Dwarven Runic Items, only reveal the Rune that is being used, not the entire combined item.
d
When setting up a game of The 9th Age: Fantasy Battles, players need to go through the following steps, referred to
as the Pre-Game Sequence:
1
2
3
4
5
6
7
8
9
Decide on the size of the game
Share your Army List with your opponent
Build the Battlefield
Determine the Deployment Type
Determine the Secondary Objective
Determine the Deployment Zones
Select Spells
Declare Special Deployment
Deployment Phase
In The 9th Age: Fantasy Battles, two armies opposing each other on the Battlefield must have roughly the same
Point Cost. This is to ensure that the battle will be decided through clever strategies and tactics rather than unfair
differences in army size.
The first step to setting up a game is to agree on the Army Points (see "Army Points"), which will determine
the size of the game. The size of the game is typically between 1500 and 3000 points for small engagements, between
3000 and 8000 points for serious battles, and beyond 8000 points for mighty clashes between epic armies. For an
optimal gaming experience, we recommend playing at 4500 points.
After deciding on the size of the game, the next step is for both players to swap Army Lists and share all relevant
information about the upcoming game.
Alternatively, players may agree to keep certain aspects about their armies secret, which they will progressively
reveal during the course of the game. For more information please see "Optional Rules for Hidden Lists".
The 9th Age: Fantasy Battles is intended to be played on a board that is 72" wide and 48" deep. For smaller battles
involving Warbands, we recommend playing on a board that is 36" wide and 48" deep (half the standard board),
while for bigger games involving Grand Armies we recommend that the players increase the size of the board as they
see fit in order to accommodate the larger armies.
While some battles may take place on a completely open board, a Battlefield typically has Terrain Features placed
upon it (see "Terrain"). These pieces of Terrain could represent exactly what they are, but they could also
be representations of far greater things for the purpose of the game. So a copse of trees could represent a forest, a
stream could actually be a wide river, a single house could denote a hamlet, and a tower could represent a keep. The
players can freely agree on the size, type, and number of Terrain Features to be placed, as well as their positions. If
an agreement cannot be reached, the game provides the following default rules for setting up a randomly generated
Battlefield.
1
Divide the board into 24×24" sections (18×24" if the board is 36×48").
2
Place the following Terrain Features in the centre of three different randomly selected sections:
-
One Impassable Terrain
-
One Hill
-
One Forest
3
Move each Terrain Feature 2D6" in a random direction.
4
Add 2D3 additional Terrain Features in the centre of different randomly selected sections (1D3
if the board is 36×48", 3D3 or more for boards larger than 72×48"). Roll 2D6 and consult the
table below to determine the type of each additional Terrain Feature.
5
Move each additional Terrain Feature 2D6" in a random direction.
- Terrain Features cannot be moved to be closer than 6" from each other. You may move them as little as possible
from their rolled position in order to meet this criterion. If it is not possible to place the Terrain Feature more
than 6" away from any other Terrain then discard the problematic piece.
- Recommended Terrain Feature sizes are between 6×8" and 6×10", except for Walls, which are 1×8", and
Impassable Terrain, which is between 6×6" and 6×8".
If no outside source tells you what Deployment Type to use (e.g. tournament organiser, campaign rules, etc.), players
may agree on a Deployment Type. Otherwise randomise by rolling a D6 and consulting the list below.
Certain Deployment Types refer to the Centre Line. This is the line drawn through the centre of the board and
parallel to the long Board Edges, dividing the board into halves.
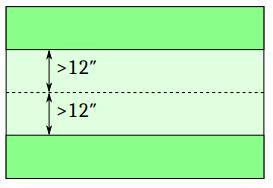
1: Frontline Clash
Deployment Zones are areas more than 12" away from the Centre Line.
2: Dawn Assault
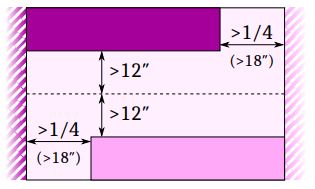
The player choosing the Deployment Zone also chooses a short Board Edge
and the other player gets the opposite short Board Edge. Deployment Zones
are areas more than 12" away from the Centre Line and more than 1/4 of the
board's length from the opponent's short Board Edge (18" on a 72" board).
When declaring Special Deployment, players may choose to keep up to two
of their units as reinforcement. These units follow the rules for Ambush ing
units, except that they must be placed touching the owner's short Board Edge
when they arrive.
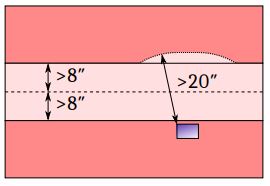
3: Counterthrust
Deployment Zones are areas more than 8" away from the Centre Line. Units
must be deployed more than 20" away from enemy units. During their first 3
deployment turns, each player must deploy a single unit, and cannot deploy
any Characters.
Units using Special Deployment, such as Scout , ignore these restrictions and
follow their Special Deployment rules.
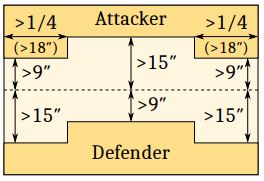
4: Encircle
The player choosing the Deployment Zone decides if they want to be the
attacker or the defender. The attacker must deploy more than 9" from the
Centre Line if entirely within a quarter of the board's length from either short
Board Edge (18" on a 72" board), and more than 15" from the Centre Line
elsewhere. The defender does the opposite: more than 15" away from the
Centre Line if within a quarter of the board's length from the short Board Edge,
and more than 9" away from the Centre Line elsewhere.
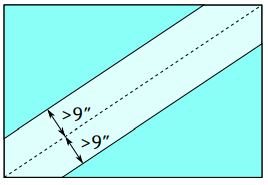
5: Refused Flank
The board is divided into halves by a diagonal line across the board. Whoever
gets to choose the Deployment Zone decides which diagonal to use. Deployment
Zones are areas more than 9" away from this line.
6: Marching Columns
Deployment Zones are areas more than 12" away from the Centre Line.
Each player must choose a short Board Edge when deploying their first unit.
Each unit this player deploys afterwards must be deployed with its Centre
farther away from the chosen short Board Edge than the Centre of the last
unit this player deployed (measure from the closest point on the short Board
Edge). Characters, War Machines, War Platforms, and Scouting units ignore
these rules.
During their first 3 deployment turns, each player must deploy a single unit,
and cannot deploy any Characters, War Machines, or War Platforms.
Instead of deploying a unit, a player may choose to make all their undeployed
units Delayed that are not using Special Deployment. Delayed units follow the
rules for Ambushing units with the following exceptions:
- In each Player Turn, after rolling for all Ambushing units, the Reactive
Player chooses the order in which all Delayed units that passed the 3+
roll enter the Battlefield.
- In the chosen order, each unit must be placed one after the other with
the centre of its rear rank as close as possible to the centre of the long
Board Edge in their owner's Deployment Zone, before any non-Delayed
Ambushers are placed on the Battlefield.
- After all arriving units have been placed, they can be moved as described
in the rules for Ambush.
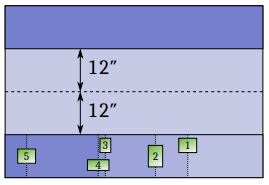
Once the Deployment Type is established, determine the Secondary Objective. If no outside source tells you which
one to use (e.g. tournament organiser, campaign rule, etc.), players may agree on a Secondary Objective. Otherwise,
randomise by rolling a D6 and consulting the list below. See "Victory Conditions", for more details on how
capturing an objective affects who is the winner.
1: Hold the Ground
Secure and hold the centre of Battlefield.
Mark the centre of the board.
At the end of each Game Turn after the first, the player with the most Scoring Units within 6" of the centre of the
board gains a counter. At the end of the game, the player with the most such counters wins this Secondary Objective.
2: Breakthrough
Invade the enemy territory.
The player with the most Scoring Units inside their opponent's Deployment Zone at the end of the game, up to a
maximum of 3, wins this Secondary Objective.
3: Spoils of War
Gather precious loot.
Place 3 markers along the line dividing the board into halves (the dashed line in the figures describing Deployment
Types). One marker is placed with its centre on a point on this line that is as close as possible to the centre of the
board while still being more than 1" away from Impassable Terrain. The other two markers are placed with their
centres on points on this line that are on either side of the central marker, as close to the centre of the board as
possible but at least a third of the length of the long Board Edge (24" on a standard board) away from it, and more
than 1" away from Impassable Terrain.
At the start of each of your Player Turns, each of your Scoring units that is not carrying a marker may pick up a single
marker whose centre they are in contact with. Remove the marker from the Battlefield: the unit is now carrying
the marker. Units carrying a marker with less than 3 Full Ranks cannot perform March Moves. If a unit carrying a
marker is destroyed or loses Scoring , the opponent must immediately place the marker carried by this unit with its
centre on a point within 3" of it. Ignore Post-Combat Reform for this purpose. This point cannot be within 1" of
Impassable Terrain, but it can be inside a unit.
At the end of the game, the player with the most units carrying markers wins this Secondary Objective.
4: King of the Hill
Desecrate your opponent's holy ground while protecting yours.
After Spell Selection (at the end of step 7 of the Pre-Game Sequence), both players choose a Terrain Feature that
isn't Impassable Terrain and that is not fully inside their Deployment Zone, starting with the player that chose their
Deployment Zone (note that both players may choose the same Terrain Feature).
A player captures their opponent's chosen Terrain Feature if any of the player's Scoring Units are inside that Terrain
Feature at the end of the game. If a player captures their opponent's chosen Terrain Feature while not allowing their
own to be captured, they win this Secondary Objective.
5: Capture the Flags
Valuable targets must be annihilated.
After Spell Selection (at the end of step 7 of the Pre-Game Sequence), mark all Scoring Units on both players' Army
Lists. If either player has less than 3 marked units, their opponent must mark enough units from this player's Army
List so that there are exactly 3 marked units in the army, starting with the player that chose their Deployment Zone.
The player that has the lowest number of their marked units removed as casualties at the end of the game wins this
Secondary Objective.
6: Secure Target
Critical resources must not fall into enemy hands.
Directly after determining Deployment Zones, both players place one marker on the Battlefield, starting with the
player that chose their Deployment Zone. Each player must place the marker with its centre on a point that is more
than 12" away from their Deployment Zone and a third of the long Board Edge length (24" on a standard board)
from the point marked by the other marker.
At the end of the game, the player controlling the most markers wins this Secondary Objective. A marker is controlled
by the player with the most Scoring Units within 6" of the centre of the marker. If a unit is within 6" of the centres of
both markers, it only counts as within 6" of the centre of the marker which is closest to its Centre (randomise if both
markers' centres are equally close).
1
2
3
4
5
6
7
8
Determine who deploys first
Take turns deploying units
Declare intent to go first or second
Deploy remaining units
Deploy Scouting units (starting with the player who finished deploying first)
Move Vanguarding units (starting with the player who finished deploying last)
Other rules and abilities
Roll for first turn
The player who did not choose the Deployment Zone decides which player deploys first.
The players then take turns deploying their units fully inside their own Deployment Zone. On each of their deployment
turns, a player can deploy any number of units, but must deploy at least one unit. All Characters count as a single
unit during the Deployment Phase and must all be deployed during the same deployment turn.
Once a player has deployed all of their units (excluding units that are deployed with alternative rules, such as
Ambushing or Scouting units), that player must announce whether they will play first or second should they win the
Roll for First Turn.
10.EDeploy Remaining Units
The other player must now deploy the rest of their units. The number of units deployed in this step is called the
Undeployed Units Number and will be used in the Roll for First Turn. As before, all remaining Characters count as
one unit when deployed.
10.E.aUndeployable Units
In the unlikely event that a unit cannot be deployed during the Deployment Phase for whatever reason (e.g. if there is
not enough space in the player’s Deployment Zone), the unit counts as destroyed, unless specifically stated otherwise.
Both players deploy their units that have been nominated to use their Scout rules during "Declaring Special Deployment"
starting with the player who first completed their normal deployment (see "Scout").
Both players move their units with Vanguard (see "Vanguard (X)"), starting with the player who finished
deploying last.
10.HOther Rules And Abilities
Put into effect all rules and abilities described as taking place right before the battle.
Both players must now roll a D6. The player that finished deploying first adds the Undeployed Units Number to their
dice roll.
- If the player who finished deploying first scores a higher result, they play first or second, whichever they
previously declared.
- If the score is a tie or the player who finished deploying second scores a higher result, that player can now
choose which player has the first turn.
The Charge Phase is when the Active Player has the chance to move their units into combat with enemy units.
Declaring a Charge and then performing a successful Charge Move is usually the only way to engage an enemy unit in
combat.
11.A Charge Phase Sequence
The Charge Phase is divided into the following steps:
1 Start of the Charge Phase (and start of the Player Turn)
2 The Active Player chooses a unit and declares a Charge
3 The Reactive Player declares and resolves their Charge Reaction
4 Repeat steps 2–3 of this sequence until all units that wish to declare a Charge have done so
5
The Active Player chooses a unit that declared a Charge, then rolls for Charge Range, and moves
the unit
6 Repeat step 5 of this sequence until all units that declared a Charge have moved
7 End of the Charge Phase
See figures 22 and 23 , page 48 and 49 , for the illustration of a Charge Phase with several units Charging enemy units
and those enemy units declaring and performing their Charge Reactions.
11.B Declaring Charges
Select one of your units that is not already Charging, Engaged in Combat, Fleeing, or contains any Shaken models
and declare which enemy unit it will Charge. Each time the Active Player declares a Charge, the Reactive Player must
declare the Charged unit’s Charge Reaction. In order to be able to declare a Charge:
• At least one model in the Charging unit’s first rank must be able to draw Line of Sight to the Charged unit’s
Unit Boundary.
• The Charged unit must be within the Charging unit’s maximum potential Charge Range (which usually is the
Charging unit’s Advance Rate + 12″).
• There must be enough room to move the Charging unit into base contact with the Charged unit.
When determining if there is enough room for the Charging unit:
• Take into account already declared Charges (including align moves of Charging and Charged units)
• Do not take into account any potential Flee Charge Reactions (including mandatory ones)
• Do not take into account any potential casualties inflicted to the Charging unit (e.g. by Stand and Shoot Charge
Reactions or failed Dangerous Terrain Tests)
• Do not take into account any potential Combat Reforms due to Blocked Path
The unit declaring a Charge is now considered Charging until it has:
• Finished its First Round of Combat after making a Charge Move
• Successfully Charged a Fleeing unit
• Performed a Failed Charge Move
• Failed a Panic Test before completing the Charge Move
• Been subject to the rules for No Longer Engaged
Contents Index 39 Model Rules Summaries
11.C Charge Reactions
Before declaring a Charge Reaction, determine in which Facing the unit will be Charged. This is determined by the
unit’s Arc which the Charging unit is Located in (see figure 17 ).
a) b)
Charge!
A
B
B A
Figure 17: Front or Flank?
a) The Charging unit is Located in the enemy’s Front
Arc (since this is where the centre of its Front Facing
is).
b) The Charging unit must contact the Charged unit’s
Front Facing.
A unit must declare and then resolve its Charge Reaction immediately after a Charge is declared against it and the
Facing in which it will be Charged is determined, before any further Charges are declared. There are three different
Charge Reactions: “Hold”, “Stand and Shoot”, and “Flee”.
11.C.a Hold
A Hold Charge Reaction means that the unit does nothing.
Units Engaged in Combat can only choose to declare the Hold Charge Reaction.
11.C.b Stand and Shoot
A Stand and Shoot Charge Reaction means that the Charged unit immediately performs a Shooting Attack as if in
the Shooting Phase, even if the enemy is beyond the attack’s maximum range. In this case, the Charging unit is
considered to be at Long Range for the Shooting Attack. Remember to apply any modifiers like Long Range and
Stand and Shoot. After this, follow the rules for Hold Charge Reactions.
A Stand and Shoot Charge Reaction can only be taken if all of the following conditions are met:
• The Charged unit can perform Shooting Attacks.
• The Charging unit is Located in the Charged unit’s Front Arc.
• The Charging unit is farther away than its Advance Rate; use the lowest value among the Charging models if it
has more than one.
Units can only choose to declare a Stand and Shoot Charge Reaction once per Player Turn (even if they are Charged
more than once).
11.C.c Flee
A Flee Charge Reaction means that the Charged unit starts Fleeing. It is immediately Pivoted to face directly away
from the Charging enemy (along a line drawn from the Centre of the Charging unit through the Centre of the Charged
unit) and performs a Flee Move (see “Flee Moves ”, page 50 ). After a unit completes this Flee Move, any unit that
declared a Charge against this unit may immediately attempt to Redirect the Charge.
If the Fleeing unit’s Front Facing comes into contact with any unit that declared a Charge against it in this phase
(regardless whether the enemy unit Redirected its Charge), the Fleeing unit is removed as a casualty.
Units already Fleeing when Charged can only choose to declare a Flee Charge Reaction.
Contents Index 40 Model Rules Summaries
11.D Redirecting a Charge
After a unit declares a Flee Charge Reaction, the Charging unit may attempt to Redirect the Charge by rolling a
Discipline Test. If failed, the unit will try to complete the Charge against the unit that Fled. If passed, the unit may
immediately declare a new Charge against another viable target unit, which may choose their Charge Reaction as
normal. If more than one unit declared a Charge against the Fleeing unit, each may attempt to Redirect the Charge in
any order chosen by the Active Player. If a unit Redirects a Charge and the second target also Flees, the Charging unit
may opt to Charge either target, but must declare which before rolling the Charge Range.
Units can only attempt to Redirect a Charge once per Player Turn.
11.E Move Chargers
After all Charges have been declared and all Charge Reactions have been declared and completed, Chargers will
attempt to move into combat. Choose a unit that has declared a Charge in this phase, roll its Charge Range, and then
perform the Charge Move. Repeat these steps with all units that have declared a Charge in this phase.
11.E.a Charge Range
A unit’s Charge Range is normally 2D6″ plus the unit’s Advance Rate, using the lowest Advance Rate among the unit’s
models.
• If the Charge Range is equal to or higher than the distance between the Charger and the Charged unit, and if
there is enough space to complete the Charge, the Charge is successful and the Charger performs a Charge
Move.
• If the Charge Range is less than the distance between the Charger and the Charged unit, or if there is not
enough space to complete the Charge (see “Impossible Charge ”, page 46 ), the Charge has failed and the Charger
performs a Failed Charge Move.
11.E.b Charge Move
A Charge Move is resolved as follows:
• The unit can move forwards an unlimited distance.
• A single Wheel can be performed during the move (remember a Wheel may not exceed 90°).
• The Front Facing of the Charging unit must contact the Charged unit in the Arc determined when declaring the
Charge Reaction.
• The Charging unit is allowed to come within 0.5″ of other units and Impassable Terrain as per the Unit Spacing
rule. It can only move into base contact with an enemy unit that it declared a Charge against (remember that it
is allowed to come into base contact with friendly units and Impassable Terrain).
11.E.c Aligning Units
After the Charger manages to move into base contact with the Charged unit, the units must now be aligned towards
each other. An align move is performed as follows:
1
The Active Player rotates the Charging unit around the point where it contacted the enemy (see
figure 17 ), so that the Charging unit’s Front Facing and the Charged unit’s Facing in which it was
contacted are parallel.
2
If this will not align the two units properly, for example due to interfering Terrain or other units,
players may rotate the Charged unit instead if this will achieve proper contact between them, or
do a combination of the two, rotating the enemy unit as little as possible.
The Charged unit must only be moved if it is the only way to align the units. Units can never be moved if they are
already Engaged in Combat. These moves are considered part of the Charge Move, so they may bring the units within
0.5″ of other units and Impassable Terrain as per the Unit Spacing rule. A unit that is forced to make an align move
when it is Charged never has to take Dangerous Terrain Tests due to this move.
Contents Index 41 Model Rules Summaries
11.E.d Maximising Contact
Charge Moves must be made so the following conditions are satisfied as best as possible, in decreasing priority order.
• 1st priority: Make contact with no enemy units other than the one that was Charged. If it will be unavoidable
to make contact with more than one enemy unit, make contact with as few enemy units as possible. Follow the
rules for Multiple Charges.
• 2nd priority: Maximise the total number of Charging units that make contact (note that this is only applicable
when multiple units Charge the same unit).
• 3rd priority: Avoid rotating the Charged unit (see “Aligning Units ”, page 41 ). If it is unavoidable, rotate the unit
as little as possible. Remember that units Engaged in Combat cannot be rotated.
• 4th priority: Maximise the number of models (on both sides) in base contact with at least one enemy model
(including models fighting across gaps).
See figure 18 for an example.
If it is unavoidable to break one or more of the above conditions, you must avoid breaking the higher priority order
conditions, even if this means the total number of conditions you break is higher. As long as all above conditions are
satisfied as best is possible, Charging units are free to move as they please (following the rules for Moving Chargers).
A
B
A
B
A
B
a) b1) b2)
Charge!
Figure 18: Maximising contact.
a) Unit B Charges an enemy unit. Follow the priority given by Maximising Contact when moving the Charger.
1. Not Charging multiple enemy units
2. Maximising the number of units Engaged in Combat
3. Not rotating the enemy unit
4. Maximising the number of models in contact with one or more enemy models
b1) OK.
1. Not applicable
2. Not applicable
3. The Charged unit is not rotated
4. The number of models is maximised without breaking priority 2. A total of 11 (5 vs 6) models is in base contact
with one or more enemy models
b2) Not OK.
1. Not applicable
2. Not applicable
3. The Charged unit is rotated. The Charge is illegal
4. The number of models is maximised. A total of 12 (5 vs 7) models is in base contact with one or more enemy
models, which is more than b1). This is irrelevant though since the Charge is illegal due to the Charged unit being
rotated
Contents Index 42 Model Rules Summaries
11.E.e Multiple Charges
If it will be unavoidable for a Charging unit to contact more than one enemy unit during the Charge Move, the rules
for Multiple Charges are applied when declaring Charges:
• First declare a Charge against a single initial target as normal.
• If the initial target of the Charge declares a Charge Reaction other than Flee, the Charging unit must, after the
initial target has declared and resolved its Charge Reaction, successively declare secondary Charges against all
enemy units it cannot avoid contacting, in an order chosen by the Active Player.
• The targets of secondary Charges declare and perform Charge Reactions as normal.
• If the initial target of the Charge Flees or is destroyed before the Charging unit is moved, ignore all secondary
Charges and treat the Charge as a normal Charge against the initial target only.
• If a target of a secondary Charge Flees, the Charging unit is not allowed to redirect the Charge, unless the initial
target also Flees.
• If a Multiple Charge no longer is unavoidable after all Charges have been declared and after all Charge Reactions
have been performed, ignore all secondary Charges and treat the Charge as a normal Charge against the initial
target only.
Note that if contacting more than one enemy unit becomes unavoidable only after all Charges have been declared
and all Charge Reactions have been performed, the rules for Multiple Charges do not apply and the Charging unit
performs a Failed Charge Move.
See figure 19 for examples in which the rules for Multiple Charges apply.
11.E.f Combined Charges
When more than one unit has declared a Charge against the same enemy unit, Chargers are moved in a slightly
different order:
1 Roll Charge Range for each unit Charging that same unit before moving any of them.
2
Check which units would be able to reach their target (sufficiently high Charge Range rolls, no
other units blocking the Charge Move, etc.).
3
Perform the Charge Moves of all Charging units (including those failing their Charge) in the
order that best satisfies the priority order of the Maximising Contact rule.
See figure 20 for an example.
11.E.g Engaged in Combat
As soon as a unit completes a Charge, it is Engaged in Combat: units are considered Engaged in Combat (or short
Engaged) as long as one or more models in the unit are in base contact and aligned with an enemy unit. In addition,
if a unit is Engaged at the start of a Round of Combat, it counts as Engaged until the start of step 7 of the Round of
Combat Sequence (before calculating Combat Score and taking Break Tests, even if it loses base contact with all
enemy units before then).
If a unit is Engaged in Combat, all models in the unit are also considered to be Engaged in Combat. Units that are
Engaged in Combat cannot move unless specifically stated otherwise (such as during Combat Reforms or when
Breaking from Combat ).
11.E.h Charging a Fleeing Unit
When Charging a Fleeing unit, follow the rules for Charge Moves, except that the Charging unit can move into contact
with any Facing of the Charged unit. Do not align or maximise base contact. Once the Charger makes contact with
the Fleeing unit, the Fleeing unit is removed as a casualty. Once the Fleeing unit has been removed, the Charging unit
can take a Discipline Test. If the test it passed, the unit may perform a Post-Combat Pivot manoeuvre.
A unit that has Charged a Fleeing unit is Shaken until the end of the Player Turn.
Contents Index 43 Model Rules Summaries
a)
C D
B
C D
B
A
A
a)
Charge!
b)
D
C
B
1
2
Charge!
D C B
A
C
A A
b)
Figure 19: Multiple Charges.
a) When Charging unit D in the Front Facing, unit A cannot avoid contacting unit C, so the rules for Multiple Charges
apply. Unit A declares a Charge against D as its initial target and a secondary Charge against C. Both Charged units
have to Hold as they are already Engaged in Combat.
b) Units B, C, and D are aligned and in base contact with one another (this situation may arise if all 3 units had
previously Charged and destroyed an enemy unit). Unit A cannot avoid contacting more than one enemy unit when
charging unit C, so the rules for Multiple Charges apply. As per the rules for Maximising Contact as few enemy units
as possible must be contacted (1st priority), so A must declare a secondary Charge against either unit B or unit D. In
case neither unit C nor the target of the secondary Charge Flee as a Charge Reaction, A moves into contact with both
units, maximising the number of models in base contact according to the 4th priority (position 1 in case unit B was
Charged, position 2 in case unit D was Charged).
Contents Index 44 Model Rules Summaries
a)
b1)
b3)
b4)
b2)
Charge!
Charge!
Charge!
Charge!Charge!
C
A B
E F
C
A
B
F E
A
B
E
C
A
B
F
E
C
A
B
E F
D
D
D
D
F
C
Figure 20: Combined Charges.
a) Multiple units declaring a Charge against a single
unit. Follow the priority given by Maximising Contact.
1. Not Charging multiple enemy units
2. Maximising the number of Charging units in the
combat
3. Not rotating the Charged unit
4. Maximising the number of models in contact with
one or more enemy models
b1) OK
1. Not applicable
2. Maximised. 4 Charging units are Engaged (unit A’s
Front Facing is only wide enough for 3 of the 4 Charging
units in the Front Arc)
3. Not applicable
4. Maximised without breaking priority 2. A total
of 12 (4 vs 8) models is in contact with one or more
enemy models. Notice that the flanking unit is only in
contact with one enemy model. This is allowed because
other models it could contact are already in contact
with enemy models
b2) Not OK
1. Not applicable
2. Maximised. 4 Charging units are Engaged
3. Not applicable
4. Not maximised. A total of 10 (4 vs 6) models is in
contact with one or more enemy models
b3) Not OK
1. Not applicable
2. Not maximised. Only 3 Charging units are Engaged.
The Charge is illegal
3. Not applicable
4. Maximised. A total of 13 (4 vs 9) models is in
contact with one or more enemy models, which is more
than all the above. This is irrelevant though since the
Charge is illegal due to the number of units not being
maximised
b4) Not OK
1. Not applicable
2. Maximised. 4 Charging units are Engaged
3. Not applicable
4. Not maximised. A total of 10 (4 vs 6) models is in
contact with one or more enemy models. The Charge
is illegal
Contents Index 45 Model Rules Summaries
11.E.i Impossible Charge
Sometimes units block each other from reaching combat when moving the Chargers (or there is not enough space to
fit all Chargers). When this happens, the units that can no longer make it into combat must make a Failed Charge
Move.
11.E.j Failed Charge
When a unit does not roll a sufficient Charge Range, or is otherwise unable to complete the Charge, it performs a
Failed Charge Move, comprising an initial Wheel followed by a straight forward move, as follows:
1 The move distance of a Failed Charge Move is equal to the highest D6 of the Charge Range roll.
2
Wheel the unit until it is facing directly towards the Centre of its intended target or if it was
destroyed, towards the final position of the Centre of the unit, or until it cannot Wheel anymore
due to obstructions (whichever comes first).
3 Move the unit straight forward the remaining move distance.
A Failed Charge Move may bring the unit within 0.5″ of other units and Impassable Terrain as per the Unit Spacing
rule.
Models in a unit that performs a Failed Charge Move are Shaken until the end of the Player Turn. Units that have
completed a Failed Charge Move are no longer considered Charging.
11.E.k Blocked Path
To prevent abusive situations where a unit cannot Charge an enemy unit well within Charge Range and Line of Sight
due to a convoluted positioning of enemy units, potentially in conjunction with Impassable Terrain, the following
rules are applied.
If, after declaring a Charge, a unit is unable to complete the Charge solely due to unengaged enemy units that it could
not Charge (normally), or due to the combination of at least 2 unengaged enemy units and one or more Impassable
Terrain Features, it can make a special Charge Move as described below.
Move the unit straight forward up to its Charge Range. If this brings the Charging unit into base contact with the
enemy unit against which the Charge was declared, that unit is Charged. Instead of Aligning Units as normal, the
enemy unit performs a Combat Reform to bring the units into alignment with each other (see “Combat Reforms ”,
page 79 ). Combat Reform so that:
• The Charged Facing determined when declaring the Charge Reaction is aligned with the Charging unit.
• The Charging unit is Engaged in its Front Facing.
• The Charged unit does not change its number of ranks or files.
• The number of models (on both sides) in base contact with an enemy is maximised.
If it is not possible to align the units without changing the number of ranks or files, you may change the number of
ranks and files and do not have to maximise models in base contact. If the enemy unit is unable to perform a Combat
Reform to align the units, the Blocked Path Charge Move cannot be performed.
Figure 21 illustrates Blocked Path situations.
Contents Index 46 Model Rules Summaries
A C
B
C
A
B
a1) a2)
F
b1) b2)
E
D
F
D
A C
B
a3)
F
b3)
E
D E
Charge!
Charge!
Figure 21: Examples of Charges where Blocked Path is applicable.
a1) Unit B Charges unit A, but the units cannot be aligned towards each other, solely due to the enemy unit C.
a2) Unit B performs a Blocked Path move: it moves forwards until it contacts unit A.
a3) Unit A then performs a Combat Reform to align the units.
b1) Unit F Charges unit E, but the units cannot be aligned towards each other due to the enemy unit D and the
Impassable Terrain.
b2) Unit F performs a Blocked Path move: it moves forwards until it contacts unit E.
b3) Unit E then performs a Combat Reform to align the units.
Contents Index 47 Model Rules Summaries
a)
Charge!
Hold!
1
Charge!
Stand and Shoot!
Redirect
Charge
Redirect
Failed
Passed
Hold!
Charge
Charge!
Redirect
Passed
Charge
Charge
Charge
Charge!
Stand and Shoot!
Flee!
Charge!
Flee Distance
Panic Test
Passed
Charge
Charge
Charge
Flee!
Flee Distance
Charge!
Charge Flee
Charge
A
B
C
D
E
F
G
A
A
A
A
B
B
B
B
C
E D
F
G
C
E D
F
G
C
D
E
F
G
C
D
E
F
G
Flee
b)
c)
d)
e)
2
3
4
1
2
3
1
2
1
2
2 1
3
4
3
Panic Test
Passed
Figure 22: Example of a Charge Phase involving
multiple units.
a) 1. Unit A declares a Charge against unit
E.
2. Unit E declares and resolves a Hold
Charge Reaction.
3. Unit C declares a Charge against unit G.
4. Unit G declares and resolves a Stand and
Shoot Charge Reaction, inflicting 1 casualty
against unit C.
b) 1. Unit B declares a Charge against unit
E.
2. Unit E declares and resolves a Flee
Charge Reaction, rolling 5″ for the Flee Distance.
The Flee Move would make unit E
end its move inside unit F’s Unit Boundary,
so the Flee Distance is extended for unit E
to get clear of unit F.
3. Unit F takes a Panic Test for the friendly
unit E Fleeing through its Unit Boundary
and passes the test.
c) 1. Since unit E performed a Flee Charge
Reaction, unit A may attempt to Redirect
the Charge. The unit however fails the Discipline
Test, so it must try to complete the
Charge against unit E.
2. Unit B also attempts to Redirect the
Charge and passes the Discipline Test. Unit
B now declares a Charge against unit F.
3. Unit F declares and performs a Hold
Charge Reaction.
d) 1. Unit D declares a Charge against the
Fleeing unit E. Note that this Charge is legal
although at this point unit D could not
complete this Charge as unit C would block
the Charge Move, because already declared
Charges are taken into account when determining
if there is enough room for a Charging
unit to complete the Charge.
2. Since unit E is already Fleeing, it must
declare and perform another Flee Charge
Reaction, rolling 3″ for the Flee Distance.
As before, the Flee Distance is extended until
unit E gets clear of unit F. Unit F does
not take a Panic Test for a friendly unit Fleeing
through its Unit Boundary as it already
passed a Panic Test during this phase.
e) 1. Unit D attempts to Redirect the Charge
and passes the Discipline Test. Unit D declares
a Charge against unit F.
2. Unit F declares and performs a Stand and
Shoot Charge Reaction, inflicting 2 casualties
against unit D.
3. Unit D takes and passes a Panic Test for
losing 25% or more Health Points.
Contents Index 48 Model Rules Summaries
Figure 23: Example of a Charge Phase involving
multiple units – part 2.
After all Charges have been declared and all
Charge Reactions have been declared and performed,
the Active Player moves all the units
that declared Charges this turn, by rolling a
unit’s Charge Range and then moving the unit,
in an order chosen by the Active Player.
a) Unit C rolls a sufficiently high Charge Range
to reach unit G. Unit C performs a Charge Move
against unit G.
b) Unit A rolls a sufficiently high Charge Range
to reach the Fleeing unit E. Unit A performs a
Charge Move against unit E. Since unit E was
Fleeing, it is removed as a casualty as soon as
the Charging unit moves into contact (without
aligning or maximising base contact).
c) Unit A performs and passes a Discipline Test
in order to perform a Post-Combat Pivot after
successfully Charging a Fleeing unit.
d) Since units B and D both Charge the same
enemy unit, both units roll their Charge Range
before any of the units that are part of the Combined
Charge is moved. Unit B rolls a sufficiently
high Charge Range, while unit D fails the Charge
Range roll.
e) Unit B performs a Charge Move against unit
F, following the rules for “Maximising Contact ”,
page 42 . Unit D performs a Failed Charge Move
towards unit F.
Charge Range roll
Passed
Charge
Charge
Charge
Charge Range roll
Passed
Charge Charge
Charge Charge
Discipline Test
Passed
Charge Range roll
Passed
Charge Range roll
Failed
a)
b)
c)
e)
A
B
C
D
E
F
G
A
B
C
D
F
G
A
B
C
D
F
G
A
B
C
D
F
G
Charge Charge
d)
A
B
C
D
F
G
Contents Index 49 Model Rules Summaries
The Magic Phase is when your Wizards will attempt to cast spells, and your opponent can attempt to dispel them.
The Magic Phase is divided into the following steps:
1
2
3
4
5
6
Start of the Magic Phase
Draw a Flux Card
Siphon the Veil
Cast a spell with one of your models (see "Spell Casting Sequence ")
Repeat step 4 for each spell the Active Player wishes to cast
End of the Magic Phase
Models that can cast non-Bound Spells are referred to as Wizards. There are 3 types of Wizards (see "Spell Selection" and
"Model Rules" for details on the differences between them):
- Wizard Apprentices
- Wizard Adepts (Channel (1))
- Wizard Masters (Channel (1) and a +1 Casting Modifier)
Each of your Wizards has to choose an available Path of Magic to select spells from; the chosen Path of Magic has to
be written down on your Army List.
In the Magic Phase, spells are cast and dispelled using a pool of dice called the Magic Dice. The number of Magic Dice
each player receives in each Magic Phase is determined by which Flux Cards are drawn (see Flux Cards below) and
what decisions are made during Siphon the Veil (see "Siphon the Veil").
Each player has a deck consisting of the 8 Flux Cards given in figure 25 . During step 2 of the Magic Phase, the Reactive
Player randomly draws one of the Flux Cards from the Active Player's deck. This card determines how many starting
Magic Dice both players receive in this Magic Phase, and how many Veil Tokens the Active Player receives. Once a
Flux Card has been drawn, it is discarded from the deck. The remaining Flux Cards in the decks are open information
to both players.
Instead of using Flux Cards, you may use dice to randomise which Flux Card to use. Mark which cards have already
been used and roll again whenever you get an already used card. Here is an example of how to randomise using two
D6: roll the first dice until its result, called X, is within 1-4. Then roll the second D6. If this D6 rolls 4+, add 4 to X.
This will result in a value between 1 and 8.
Flux Card 1
4 Magic Dice
(both players)
3 Veil Tokens
(Active Player)
All Miscasts this phase gain
a +1 Miscast Modifier
Flux Card 2
5 Magic Dice
(both players)
2 Veil Tokens
(Active Player)
Flux Card 3
5 Magic Dice
(both players)
5 Veil Tokens
(Active Player)
Flux Card 4
5 Magic Dice
(both players)
7 Veil Tokens
(Active Player)
Flux Card 5
5 Magic Dice
(both players)
9 Veil Tokens
(Active Player)
Flux Card 6
6 Magic Dice
(both players)
5 Veil Tokens
(Active Player)
Flux Card 7
6 Magic Dice
(both players)
7 Veil Tokens
(Active Player)
Flux Card 8
7 Magic Dice
(both players)
7 Veil Tokens
(Active Player)
All Miscasts this phase
suffer a −1 Miscast Modifier
Figure 25: Flux Cards.
The Active Player creates a new pool of Veil Tokens that will last until their next Siphon the Veil phase.
- Add the number of Veil Tokens left in their previous Veil Token pool
- Add the number of Veil Tokens given by the Flux Card drawn this Player Turn
- Add Veil Tokens from other sources, such as Channel (see "Channel (X)")
Up to 12 Veil Tokens can now be removed from the pool to be converted into Magic Dice by the Active Player. For
each full 3 Veil Tokens that were removed, the Active Player adds a single Magic Dice to their Magic Dice pool. Up to
4 Magic Dice may be added to the Active Player's pool this way.
At the end of Siphon the Veil, the Active Player must discard Veil Tokens from their Veil Token pool until it contains
no more than 3 tokens. The remaining Veil Tokens are saved to be added to the Veil Token pool in the Active Player's
next Magic Phase.
Some armies can generate Veil Tokens outside Siphon the Veil. This cannot increase the Veil Token pool beyond 6
Veil Tokens.
Spells are cast during the Magic Phase. Most spells belong to a specific Path of Magic.
13.G.aSpell Properties
All spells are defined by the following 6 properties (see figure 26 ):
1 – Spell Classification
Spells are classified into the different categories Learned Spells, Attribute Spells, and Hereditary Spells by letters or numbers.
2 – Spell Name
Use the spell name to state which spell you intend to cast.
3 – Casting Value
The Casting Value is the minimum value you need to reach to succeed a Casting Attempt.
Spells may have different Casting Values available (see "Boosted Spells").
4 – Type
The spell type describes how the spell’s targets have to be chosen.
5 – Duration
The duration of a spell determines how long the effects of the spell are applied.
6 – Effect
The effect of a spell defines what happens to the target of the spell when the spell is successfully
cast. Spell effects are never affected by Special Items, Model Rules, other spell effects,
or similar abilities affecting the Caster, unless specifically stated otherwise.
Figure 26:
Spell Properties in The 9th Age: Fantasy Battles – Arcane Compendium.
13.G.bSpell Classification
All spells are part of one or more of the following categories:
13.G.b.1Learned Spells
All spells labelled with a number are Learned Spells, which are the main spells of a Path. They are usually numbered
from 1 to 6, which is relevant for the Spell Selection rules.
Each player may only attempt to cast each Learned Spell once per Magic Phase, even if it is known by different
Wizards (unless the spell is Replicable, see below).
13.G.b.2Hereditary Spells
Most Army Books contain a Hereditary Spell, which is labelled “H” instead of a number. Hereditary Spells follow all
the rules for Learned Spells.
13.G.b.3Attribute Spells
Attribute Spells are labelled "A". All Wizards that know at least one spell from a Path of Magic automatically know
the Attribute Spell from that Path if there is any.
Path Attribute Spells are special spells that cannot be cast independently. Instead, the Caster may cast the Attribute
Spell automatically each time it successfully casts a non-Attribute Spell from the corresponding Path. This means
that an Attribute Spell can be cast more than once by the same Caster, and also by different Casters during a Magic
Phase. Attribute Spells cannot be dispelled.
13.G.b.4Replicable Spells
Some Learned Spells are Replicable Spells and are labelled "rep". The player may attempt to cast Replicable Spells
multiple times in the same Magic Phase, but each Wizard may only make a single attempt.
13.G.b.5Bound Spells
Some spells are classified as Bound Spells, which follow different rules than the above (see "Bound Spells").
13.G.cSpell Types
The spell type describes which targets can be chosen for the spell. Unless specifically stated otherwise, a spell
may only have a single target and the target must be a single unit. If a spell has more than one type, apply all the
restrictions of each type.
For example, if a spell has the types Direct, Hex, and Range 12", the target must be in the Caster's Front Arc, be an
enemy unit, and be within 12" of the Caster.
Augment
The spell may only target friendly units (or friendly models inside units if Focused).
Aura
This spell has an area of effect. Its effects are applied to all possible targets, according to the
rest of the spell types, within X" of the Caster. For example, a spell with Augment, Aura, and
Range 12" targets all friendly units within 12" of the Caster.
Caster
The spell targets only the model casting the spell (unless Focused, all model parts are affected).
Caster's Unit
The spell targets only the Caster's unit.
Damage
The spell may only target units and/or models not currently Engaged in Combat.
Direct
The spell may only target units and/or models in the Caster's Front Arc.
Focused
The spell may only target single models (including a Character inside a unit). If the target
is a Multipart Model (such as a chariot with riders and pulling beasts, or a knight and its
mount), only one model part may be targeted.
Ground
The spell doesn't target units or models. Instead, the target is a point on the Battlefield.
Hex
The spell may only target enemy units (or enemy models inside units if Focused).
Missile
The spell may only target units and/or models within the Caster's Line of Sight. It cannot be
cast if the Caster (or its unit) is Engaged in Combat.
Range X"
The spell has a maximum casting range. Only targets within X" can be chosen. This casting
range is always indicated in the corresponding column in the spell's profile (see figure 26 ).
Note that any effects that alter a spell's range do not affect any other distance specifications
that may be part of the spell's effect.
Universal
The spell may target both friendly and enemy units (or models inside units if Focused).
13.G.dSpell Duration
The spell duration specifies how long the effects of the spell are applied. A spell duration can either be Instant, One
Turn, or Permanent as described below:
13.G.d.1Instant
The effect of the spell has no lasting duration: effects are applied when the spell is cast. Afterwards the spell ends
automatically.
13.G.d.2One Turn
The effect of the spell lasts until the start of the Caster's next Magic Phase. If an affected unit is divided into several
units (the most common example being a Character leaving its unit), each of the units formed this way keeps being
affected by the spell effects. Characters that join a unit affected by One Turn spells are not affected by these spells,
and likewise, units joined by Characters affected by One Turn spells are not affected either.
13.G.d.3Permanent
The effect of the spell lasts until the end of the game or until a designated ending condition is met (as detailed in the
spell effect). The spell can only be removed by the method described in the spell. If an affected unit is divided into
several units, follow the same restrictions as for One Turn spells.
13.H Spell Casting Sequence
Each of the Active Player’s non-Fleeing models with one or more spells may now attempt to cast each of its spells
up to one time per Magic Phase. The model is referred to as the Caster. In each Magic Phase one Casting Attempt
may be made for each spell, even if this spell is known by different Wizards. Remember that Bound Spells, Attribute
Spells, and Replicable Spells ignore this restriction.
Each casting of a spell is resolved as follows:
A Casting Attempt. If failed, skip steps B–F
B Dispelling Attempt. If successful, skip steps C–F
C In case of Broken Concentration , skip steps D–E and go directly to step F
D Resolve the spell effect
E If applicable, choose target(s) for the Attribute Spell and resolve its effect
F If applicable, apply the Miscast effect
13.H.a Casting Attempt
Each Casting Attempt is resolved as follows:
1
The Active Player declares which Wizard is casting which spell and how many Magic Dice will
be used. If applicable, they also declare which version of the spell is used and what its targets
are. Between 1 and 5 dice from the Active Player’s Magic Dice pool must be used.
2
The Active Player rolls the chosen number of Magic Dice from the Magic Dice pool and adds
the results of the rolled dice and any Casting Modifiers together (see “Casting and Dispelling
Modifiers ”, page 58 ). This total is referred to as the total casting roll.
3
The Casting Attempt is passed if the total casting roll is equal to or greater than the spell’s
Casting Value. The Casting Attempt fails if the total casting roll is less than the spell’s Casting
Value. Note that the Casting Attempt may Fizzle if 2 or more dice were used (see “Fizzle ”, page
58 ).
13.H.a.1 Boosted Spells
Some spells have two Casting Values, with the greater Casting Value being referred to as the Boosted version of the
spell. Boosted versions may have their type (range, target restrictions) and/or duration modified (e.g. giving the
spell a longer range), and/or the effects of the spell changed. Declare if you are trying to cast the Boosted version
before rolling any dice. If no declaration is made, the basic version for the chosen target is assumed to be used.
13.H.b Dispelling Attempt
Whenever the Active Player passes a Casting Attempt, the Reactive Player may attempt to dispel the Casting Attempt:
1
The Reactive Player declares how many Magic Dice will be used from their pool. The Reactive
Player must use at least 1 dice for a Dispelling Attempt. Note that there is no maximum number
of Magic Dice allowed to be used for a Dispelling Attempt.
2
The Reactive Player rolls the chosen number of dice and adds the results of the rolled dice and
any Dispelling Modifiers together (see “Casting and Dispelling Modifiers ”, page 58 ), to get the
total dispelling roll.
3
The Dispelling Attempt is successful if the total dispelling roll is equal to or greater than the
total casting roll. If so, the spell is dispelled and the spell is not cast. The Dispelling Attempt
fails if the total dispelling roll is less than the total casting roll. If so, the spell is successfully cast.
Note that the Dispelling Attempt may Fizzle if 2 or more dice were used (see “Fizzle ”, page 58 ).
13.H.c Resolve the Spell
If the spell was not dispelled, it is successfully cast. Apply the spell effects. Afterwards (if applicable), choose a target
for the Path Attribute Spell and immediately apply its effects (Attribute Spells cannot be dispelled).
Contents Index 57 Model Rules Summaries
13.H.d Additional Rules Affecting Casting and Dispelling Attempts
13.H.d.1 Casting and Dispelling Modifiers
There are many potential sources for modifiers to the roll (the most common modifier for casting rolls is the +1 to
cast modifier for being a Wizard Master). Add these modifiers to the casting or dispelling rolls. After all modifiers
are applied, total Casting and Dispelling Modifiers may not exceed +2 and −2.
13.H.d.2 Fizzle
When a Casting Attempt or Dispelling Attempt is failed for which 2 dice or more were used, any Magic Dice that
rolled a natural ‘1’ are returned to the Magic Dice pool they were taken from. Note that this does not apply to passed
Casting Attempts that are then dispelled.
13.I Miscasts
When a player rolls their casting roll and three or more Magic Dice roll the same value, the Casting Attempt results in
a Miscast (regardless of whether the Casting Attempt is passed or not). If the Casting Attempt is successful and not
dispelled, apply the effects of the Miscast, as determined by the value on the Magic Dice as shown in table 4 .
If 3 Magic Dice were used for the casting roll, apply a −1 Miscast Modifier (see “Miscast Modifiers and Miscast Table ”
below).
If 5 Magic Dice were used for the casting roll, apply a +1 Miscast Modifier.
13.I.a Miscast Modifiers and Miscast Table
A +X or −X Miscast Modifier means that X is added to or deducted from the value of the dice yielding the Miscast. For
example, a 222 Miscast with a +1 Miscast Modifier makes a 222 counts as a 333 Miscast.
Three of a kind: Miscast Effects
Apply the effects of 222 and higher after resolving the effects of the spell and any Attribute
Spell
000 or lower No effect.
111 Broken Concentration
The Casting Attempt fails (apply Fizzle as normal).
222 Witchfire
The Caster’s unit suffers 1D6 hits with Armour Penetration 2, Magical Attacks, and a Strength
equal to the number of Magic Dice that were used for the casting roll.
333 Magical Inferno
The Caster’s unit suffers 2D6 hits with Armour Penetration 2, Magical Attacks, and a Strength
equal to the number of Magic Dice that were used for the casting roll.
444 Amnesia
The Caster cannot cast the Miscast spell anymore this game.
555 Backlash
The Caster suffers 2 hits that wound on 4+ with Armour Penetration 10 and Magical Attacks.
666 Implosion
The Caster suffers 4 hits that wound on 4+ with Armour Penetration 10 and Magical Attacks.
777 or higher Breach in the Veil
The Caster’s model is removed as a casualty (no saves of any kind allowed).
Table 4: Miscast Table.
Contents Index 58 Model Rules Summaries
13.J Bound Spells
Bound Spells can also be cast by models that are not Wizards, but possessing a Bound Spell does not make a model a
Wizard. A Bound Spell is a spell that is usually contained in a magical artefact of some sort. Bound Spells cannot
be used to cast Boosted versions of the spell they contain. A Bound Spell containing a spell from a Path with an
Attribute also automatically contains the Path Attribute Spell.
13.J.a Power Level
All Bound Spells have two Power Levels, given as values in brackets (usually Power Level (4/8)). The first value is
the Bound Spell’s primary Power Level. This is used when the Bound Spell is cast with 2 Magic Dice. The second
value is the Bound Spell’s secondary Power Level, and is used when the Bound Spell is cast with 3 Magic Dice.
13.J.b Casting a Bound Spell
Casting a Bound Spell ignores the normal Casting Attempt rules, and instead follows a different procedure. Each of
the Active Player’s non-Fleeing models with Bound Spells may attempt to cast each of its Bound Spells up to one
time per Magic Phase. This model is referred to as the Caster. Bound Spells can be cast even if the same spell has
already been cast earlier in the same Magic Phase. Casting a Bound Spell does not prevent the casting of the same
spell later in the same Magic Phase, even as non-Bound Spell.
13.J.b.1 Bound Spell Casting Attempt
1
The Active Player declares which model will cast which Bound Spell, and whether they will use
2 or 3 Magic Dice. If applicable, the Active Player also declares the targets of the spell. The spell
is always cast with the basic version as Bound Spells cannot be Boosted.
2
The Active Player removes the chosen number of Magic Dice (2 or 3) from their Magic Dice pool
(do not roll them).
3 The Casting Attempt is always passed.
Note that Bound Spells that contain a spell from a Path with an Attribute automatically also contain the Path Attribute
Spell, and that unless specifically stated otherwise Casting Modifiers are not applied to the casting roll of a Bound
Spell.
13.J.b.2 Bound Spell Dispelling Attempt
Dispelling a Bound Spell works exactly like dispelling a Learned Spell. If 2 Magic Dice were removed the casting
roll is equal to the Bound Spell’s primary Power Level. If 3 Magic Dice were removed the casting roll is equal to the
Bound Spell’s secondary Power Level.
13.K Magical Effects
13.K.a Magical Move
Some spells or abilities enable a unit to perform a Magical Move. The move is performed as if in step 3 of the
Movement Phase Sequence (Moving Units), which means that it follows the same rules and restrictions as if this was
a new Moving Units sub-phase (e.g. Fleeing units, Shaken units, units with Random Movement , or units Engaged in
Combat cannot move). Actions that a unit could normally do in the Moving Units sub-phase can be made (such as
Wheeling, Reforming, joining units, leaving units, and so on).
A Magical Move always has a limited movement range (e.g. “the target may perform a 12″ Magical Move”): the
target’s Advance Rate and March Rate are always equal to this value for the duration of the move. A unit can only
perform a single Magical Move per Magic Phase.
Contents Index 59 Model Rules Summaries
13.K.b Recover Health Points
Some spells or abilities can recover Health Points lost earlier in the battle. The amount of Health Points recovered is
noted in the ability (Recover X Health Points). Recovering Health Points can never bring back models that have been
removed as casualties, and cannot increase a model’s Health Points above its starting value.
A Character inside a Combined Unit never recovers Health Points from abilities that allow a unit to recover Health
Points. A Character can only recover Health Points when it is the only target of an ability or spell.
Any excess Recovered Health Points are lost.
13.K.c Raise Health Points
Raise Health Points uses the rules for Recover Health Points with the exception that Raise Health Points can bring
back models that have been removed as casualties. Bringing back models is subject to the following rules and
restrictions:
• First, recover all lost Health Points on models in the unit (except for Characters), then bring back models in the
following order: first Champions, then other R&F models (including Musicians and Standard Bearers). Each
Raised model must be recovered to its full amount of Health Points before another model can be Raised. This
cannot Raise a unit’s number of models above its starting number. Any excess Raised Health Points are lost.
• Raised models without Front Rank must be placed in the rear rank if incomplete, or in a new rear rank if the
current rear rank is complete. In units with one rank (including single model units), a Raised model can either
be placed in the first rank or you can declare the first rank complete and create a new rank. Any models that
cannot be placed in legal positions are lost.
• Any used One use only effects, or destroyed equipment (Special Items or mundane equipment) are not regained.
• Raised models are subject to the same ongoing effects as their unit, and count as Charging if their unit Charged.
13.K.d Summoned Units
Summoned units are units created during the game. All models in a newly Summoned unit must be deployed within
the range of the ability. If the unit is summoned as a result of a Ground type spell, at least one of the Summoned
models must be placed on the targeted point and all models must be within the spell’s range. Summoned models
must be placed at least 1″ away from other units and from Impassable Terrain. If the whole unit cannot be deployed,
then no models can be deployed. Once Summoned, the newly created unit operates as a normal unit on the Caster’s
side. Summoned units do not award Victory Points to the opponent when they are destroyed.
Contents Index 60 Model Rules Summaries
In the Shooting Phase, models with Shooting Attacks get a chance to use them.
14.A Shooting Phase Sequence
The Shooting Phase is divided into the following steps.
1 Start of the Shooting Phase
2 Select one of your units and perform a Shooting Attack
3
Repeat step 2 with a different unit that has not performed a Shooting Attack during this phase
yet
4 When all units that can (and want to) shoot have done so, the Shooting Phase ends
14.A.a Shooting With a Unit
Some units have Shooting Weapons or Model Rules that allow them to perform Shooting Attacks. Apply the following
rules for shooting with a unit:
1. Choose a shooting unit
Each unit that can perform a Shooting Attack can do so once per Shooting Phase, with the following conditions and
restrictions:
• Fleeing units, Shaken units, units that are Engaged in Combat or were Engaged in Combat at any point during
the Player Turn, and units that have Marched or Reformed this Player Turn cannot perform Shooting Attacks.
• All models in the same unit must shoot at the same target, and only models in the first and second rank
may shoot.
• If models in the unit have more than one type of Shooting Attack, declare which one is used. All R&F models
except Champions must use the same type. Champions and Characters are free to use other types of Shooting
Attacks (still maximum one attack per model, and directed at the same target as the unit).
• In case of Multipart Models, each model part can make a Shooting Attack in the same phase.
2. Choose a target
Nominate an enemy unit within the shooting unit’s Line of Sight as target. Units Engaged in Combat cannot be chosen
as targets.
3. Choose models to shoot with
Now determine which models from the shooting unit will shoot at the target unit:
• Check the Line of Sight for each shooting model. Remember that Line of Sight is always drawn from the model’s
Front Facing. Models that do not have Line of Sight to at least one model in the target unit cannot shoot.
• Measure the range to the target unit for each individual shooting model. This is measured from the actual
position of each shooting model to the closest point of the target’s Unit Boundary (even if this particular point
is not within Line of Sight). Models that are further away from their target than the range of their weapon
cannot shoot (unless performing a Stand and Shoot Charge Reaction).
• If the Shooting Attack has a minimum range, the model can only shoot if the target is at least partially outside
the minimum range.
• Any model part in the unit is free to choose not to shoot.
Contents Index 61 Model Rules Summaries
4. Shoot!
Once you have established which models will shoot, these models shoot as many times as indicated in their weapon’s
profile. For each shot, roll to hit with each model, as described below, and then follow the Attack Sequence rules
(page 19 ) after determining the number of hits.
14.B Aim
A Shooting Weapon’s Aim tells you what the model needs to roll on a D6 to successfully hit its target. This roll is
called a to-hit roll. A weapon’s Aim is written in brackets after the weapon’s name. Each unit has its own Aim for
a given Shooting Weapon available to it. For example, an elven archer might have a Longbow (3+) while a human
peasant only has a Longbow (4+). The elf would hit its target if it rolls 3 or higher on a D6, while the human would
need to roll 4 or higher.
14.C To-Hit Modifiers
Shooting Attacks may suffer one or more to-hit modifiers to their to-hit rolls. If so, simply modify the dice roll for the
shot with the given modifiers. The most common to-hit modifiers are explained below and summarised in table 5 . If
one or more hits are scored, follow the procedure described under “Attacks ”, page 18 . A natural roll of ‘1’ is always a
miss.
Long Range −1 Stand and Shoot −1
(if Accurate ) 0 Soft Cover −1
Moving and Shooting −1 Hard Cover −2
(if Quick to Fire ) 0 Hard Target (X) −X
(if Unwieldy ) −2
(if both) −1
Table 5: Summary of To-Hit Modifiers.
14.C.a Long Range (−1 to hit)
If the distance from the shooting model to the target is more than half the weapon’s range, the shooting model suffers
a −1 to-hit modifier. Remember that you measure range for each shooting model individually.
For rules purposes, any model not shooting at Long Range is considered to be at Short Range.
14.C.b Moving and Shooting (−1 to hit)
A model that has moved during this Player Turn suffers a −1 to-hit modifier.
14.C.c Stand and Shoot Charge Reaction (−1 to hit)
Shooting Attacks made as part of a Stand and Shoot Charge Reaction suffer a −1 to-hit modifier.
14.C.d Cover
Cover is determined individually for each shooting model. There are two types of Cover: Soft Cover and Hard Cover.
The most common reason for applying Cover is the target being obscured by Terrain or other models, or the target
being inside a Terrain Feature.
Contents Index 62 Model Rules Summaries
Determine if the target benefits from Cover as follows:
1
Determine which Arc of the target the shooting model is Located in. The corresponding Facing
is referred to as Target Facing.
2 Choose any point on the shooting model’s Front Facing.
3
For targets on rectangular bases:
• From the chosen point, check how large the fraction of the Target Facing is that is behind
obstructions (see figures 28 and 29 ).
• If half or more of the Target Facing is obscured, the target benefits from Cover.
For targets on round bases:
• From the chosen point, check whether the nearest point on the Target Facing, referred to
as Target Point, is behind obstructions.
• If this point is obscured, the target benefits from Cover.
Note that:
• This is not Line of Sight. Check what is behind obstructions even outside of the shooting model’s Front Arc.
• Models always ignore their own unit and the Terrain Feature they are inside for Cover purposes (e.g. a model
shooting from a Forest doesn’t suffer a Soft Cover modifier for shooting through or at a target inside that
Forest).
14.C.d.1 Target Benefiting from Soft Cover (−1 to hit)
A model shooting at a target that benefits from Soft Cover suffers a −1 to-hit modifier. Soft Cover applies if more than
half of the Target Facing or the Target Point is obscured by either:
• Covering Terrain that contributes to Soft Cover
• Models that do not block Line of Sight, except if the target and/or the shooting model is of Gigantic Height
(see “Model Classification ”, page 87 ), and the obscuring model is of Standard Height (in which case no cover is
applied) (remember that Skirmisher and Tall affect what blocks Line of Sight)
For examples, see figure 27 for Cover inside Terrain, and figure 30 for Cover behind intervening models.
a) b)
A
B
A
B
Figure 27: Example of Soft Cover inside a Terrain Feature.
a) The left model in unit A is Located in unit B’s Flank Arc, so unit B’s Flank Facing is the Target Facing. More than
half of the Target Facing is obscured inside the Forest, so unit B benefits from Soft Cover against the left model.
b) The right model in unit A is Located in unit B’s Front Arc, so unit B’s Front Facing is the Target Facing. Less than
half of the Target Facing is obscured inside the Forest, so unit B does not benefit from Soft Cover against the right
model.
Contents Index 63 Model Rules Summaries
14.C.d.2 Target Benefiting from Hard Cover (−2 to hit)
A model shooting at a target that benefits from Hard Cover suffers a −2 to-hit modifier. Hard Cover applies if more
than half of the Target Facing or the Target Point is obscured by either:
• Covering Terrain that contributes to Hard Cover
• Models that do block Line of Sight (remember that Skirmisher and Tall affect what blocks Line of Sight)
See figure 28 for an example of Hard Cover.
a)
Not within
Line of Sight
b)
Within Line of Sight
More than half
of the Target
Facing is
obscured
c)
Within Line of Sight
Less than half
of the Target
Facing is
obscured
Figure 28: Example of Hard Cover.
a) The model cannot shoot (as its Line of Sight is blocked).
b) The model can shoot (as the enemy is within Line of Sight). Hard Cover is applied since more than half of the
Target Facing is obscured by a Terrain Feature that contributes to Hard Cover.
c) The model can shoot (enemy within Line of Sight). No Cover is applied since half or less of the Target Facing is
obscured by a Terrain Feature that contributes to Hard Cover.
14.C.d.3 Target Benefiting from Soft and Hard Cover
If a target benefits from both Soft and Hard Cover, only apply the Hard Cover modifier.
If parts of the Target Facing are obscured by obstructions that contribute to Soft and Hard Cover, but not enough to
grant either Soft Cover or Hard Cover, apply only the Soft Cover modifier if more than half of the Target Facing is
obscured. For example, if 30% of the Target Facing is obscured by Terrain contributing to Soft Cover, and another
30% by Terrain contributing to Hard Cover, then apply the Soft Cover modifier, as 60% of the Target Facing is
obscured in total (see figure 29 ).
C
B
A
Less than half of the
Target Facing is in Soft
Cover
More than half of
the total Target
Facing is in Cover
Height: Large
Height: Large
Height: Standard
Less than half of the Target Facing is in Hard Cover
Figure 29: Example of Soft and Hard Cover.
Less than half of the Target Facing is obscured by
obstructions contributing either to Soft or Hard
Cover. However, more than half is obscured by
the combination of both. In this case, the target
counts as benefiting from Soft Cover.
Contents Index 64 Model Rules Summaries
14.D Hopeless Shots
When to-hit modifiers make the needed roll to hit with a Shooting Attack 7+, apply the following procedure:
1 Roll to hit. Rolls of ‘6’ are considered successful.
2
For each successful roll, roll to hit again: on a roll of 4+, this second to-hit roll is successful, and
the shot hits.
3 Proceed as described under “Attacks ”, page 18 .
If there are enough modifiers to make the needed roll to hit 8 or more, the shot cannot hit.
For example, a model with Bow (4+) shoots at a target benefiting from Hard Cover (−2 to hit), and is Moving and
Shooting (−1). This would require the shooter to roll 7+ on a D6, which means that this shot follows the Hopeless
Shots rule. If a ‘6’ is rolled, roll to-hit again. If the shooter manages to roll 4+ on the second attempt, the shot hits.
Soft Cover (−1 to hit)
No Cover
Large Large Standard Large
Large
Large
Standard Standard
Standard
Standard Standard Standard
Gigantic
Gigantic Gigantic
Large Large Gigantic Gigantic Large Gigantic
Gigantic Standard Gigantic
Figure 30: Soft Cover from intervening models.
This diagram shows all possible Height combinations between shooting, target, and intervening models that result in
Soft Cover or No Cover. The intervening model is assumed to be placed in such a way that it is sufficiently obscuring
the target from the shooter. All other Height combinations yield either Hard Cover or no Line of Sight, depending on
whether the target is completely obscured by the intervening model or not.
Contents Index 65 Model Rules Summaries
In the Melee Phase, both players' units Engaged in Combat must attack.
15.HPursuits and Overruns
7
8
9
10
11
12
13
14
15
16
15.D.a Initiative Order
Melee Attacks are performed in Rounds of Combat during the Melee Phase. All Melee Attacks have a specific Agility
value that corresponds to the Agility of their model part, unless specifically stated otherwise (such as Impact Hits or
Crush Attacks ).
Each Round of Combat is fought in a strict striking order, referred to as Initiative Order. The Initiative Order in a
combat is determined immediately before any attacks are made. Take into account all modifiers that affect the Agility
of attacks that may be performed in this Round of Combat. Once the Initiative Order has been determined for a
Round of Combat, it cannot be changed by effects that alter the Agility of attacks during that Round of Combat. The
order starts at Initiative Step 10 with all attacks with Agility 10, and is resolved downwards to Initiative Step 0 with
all attacks with Agility 0.
At each Initiative Step, all attacks from this step that meet the necessary requirements (see Which Models can Attack ,
below) strike simultaneously.
15.D.b Charging Momentum
Charging models gain +1 Agility.
15.D.c Which Models can Attack
Models in base contact with an enemy attack during their Initiative Step (remember that models are considered to
be in base contact across gaps: see "Base Contact between Models across Gaps ", page 10 ). Models from both sides
attack in each player's Melee Phase.
Contents Index 67 Model Rules Summaries
15.D.c.1 Supporting Attacks
Models in the second rank and not in base contact with any enemy models can perform Close Combat Attacks across
models in the first rank directly in front of them. These Close Combat Attacks are called Supporting Attacks. A model
part that performs Supporting Attacks always has a maximum Attack Value of X, where X is defined by the Height of
the model (see "Model Classification ", page 87 ).
C
A
B
Figure 31: Which models can attack?
Models colour-coded with a darker shade can all strike. Models with
a bold frame count as being in base contact with an enemy; note that
models are considered to be in base contact across gaps. Models
colour-coded with a lighter shade cannot make Supporting Attacks.
Unit C is in Line Formation and thus both the second and third rank
can make Supporting Attacks. Unit B is not Engaged in its Front
Facing; its models cannot make Supporting Attacks to their Flank or
Rear; they could only strike across the first rank.
15.D.d Allocating Attacks
At each Initiative Step, before any attacks are rolled, Close Combat Attacks must first be allocated towards enemy
models. If a model is in base contact with more than one enemy model, it can choose which model to attack. Attacks
can be allocated towards models with different Health Pools, i.e. R&F models, Champions, and Characters (see
"Attacks ", page 18 ). The number of Close Combat Attacks a model can make is equal to its Attack Value, which can be
modified by equipment, Attack Attributes, spells, etc. If a model has an Attack Value above 1, it can allocate its Close
Combat Attacks towards different enemy models in base contact. If a model is making Supporting Attacks, it can
allocate its attacks as if it was in the first rank of the unit (in the same file). Allocate all attacks at each Initiative Step
before making any to-hit rolls.
15.D.d.1 Swirling Melee
R&F models Engaged in Combat may be in positions in the unit where, based on the general rules for allocating
attacks, they can either:
• allocate attacks (including Supporting Attacks) only towards enemy Characters or Champions
• not allocate any attacks at all due to enemy models fighting a Duel
Such models may elect to allocate their Close Combat Attacks towards R&F models of the same unit instead. Note
that Swirling Melee cannot be used by Characters.
Figure 32 illustrates how attacks can be allocated in a complex case.
A
B
𝐶1
Ch
𝐶2
𝐶3
Ch
Figure 32: Example for allocating attacks.
The Champion of unit B (Ch) and Character 𝐶2 are locked in
a Duel (indicated by the chess pattern). This means that they
can only allocate attacks towards each other. The magenta
and green models can allocate attacks towards the R&F
models of the other unit. The models with a bold frame
can allocate attacks towards Characters/Champions. The
models in fainter colours with dashed frames cannot attack
at all. Character 𝐶1 cannot attack because the only model it
is in base contact with is a Champion that is locked in a Duel.
If 𝐶1 was a R&F model, it could allocate attacks towards the
magenta R&F models.
Contents Index 68 Model Rules Summaries
15.D.e Rolling to Hit
Roll a D6 for each Close Combat Attack, referred to as to-hit rolls. The needed roll to hit the target is determined by
the difference between the Offensive Skill of the attacking model part and the Defensive Skill of the model the attack
was allocated towards. See table 6 below.
To-hit modifiers can alter this to-hit roll. Close Combat to-hit rolls that are modified to hit on better than 2+ always
fail on a natural roll of ‘1', while they are always successful on a natural roll of ‘6' even if they are modified beyond 6+.
Example: a model has Offensive Skill 3, Attack Value 2, and is equipped with Paired Weapons, which gives it a total
of 3 attacks. The model may allocate two attacks towards a model with Defensive Skill 2, which hit on 3+, and one
towards a model with Defensive Skill 8, which hits on 5+.
Once you have determined the number of hits, follow the Attack Sequence rules (page 19 ).
Offensive Skill minus Defensive Skill Needed roll to hit
4 or more 2+
1 to 3 3+
0 to −3 4+
−4 to −7 5+
−8 or less 6+
Table 6: Close Combat to-Hit Table.
15.D.f Losing Base Contact
Removing casualties may cause units to lose base contact with their foe. When this happens, units are nudged back
into combat using the following procedure:
1. The unit that is going to lose base contact while not suffering casualties is moved the minimum amount needed
to keep the units in base contact.
2. If this will not bring the units back into contact, move the unit suffering casualties the minimum amount
needed to keep the units in base contact.
A nudged unit can only be moved in a straight line forwards, backwards, to either side, or a combination of two
of these directions (first one, then the other). Units that are in base contact with other enemy units can never be
nudged in this way. Nudged units cannot move through the Unit Boundary of other units or Impassable Terrain.
They also cannot move into base contact with enemy units that they were not in base contact with before the nudge
move, but they are allowed to move within 1" of the Unit Boundary of other units Engaged in the same Combat.
Nudge moves cannot be used to change the Facing in which any unit is fighting (which means that if the unit was
Engaged in the Flank before the nudge move, this must still be true after the nudge move). If several units lose base
contact at the same time, move them in the order that allows the maximum number of units to stay in combat. If this
number is equal, the Active Player decides the order.
If nudging either unit does not manage to bring the units back into contact with each other, the unit Drops out of
Combat. Any units that are no longer Engaged in Combat follow the rules given under "No More Foes ", page 72 .
15.E
15.E.a Issuing a Duel
Characters and Champions Engaged in Combat may issue a Duel at step 4 of the Round of Combat Sequence (see
"Round of Combat Sequence ", page 67 ). The Active Player may nominate one of their Characters or Champions and
issue a Duel, provided that there is at least one enemy Champion or Character able to accept it (this enemy model's
unit must be in base contact with the unit of the model that issued the Duel, and there must not be any ongoing Duel
in this combat; see below).
If the Duel was refused, or if no Duel was issued, the Reactive Player may nominate one of their Characters or
Champions that did not refuse the Active Player's Duel and issue a Duel.
Contents Index 69 Model Rules Summaries
15.E.b Accepting or Refusing a Duel
If a Duel was issued, the opponent may now choose one of their own Characters or Champions Engaged in the same
Combat to accept the Duel and fight the Character or Champion that issued the Duel. The model that accepts the
Duel must be in a unit that is in base contact with the unit of the model that issued the Duel.
If a Duel isn't accepted it is said to be refused. The player issuing the Duel now nominates one of their opponent's
Characters that could have accepted the Duel, if there is any (note that Champions cannot be nominated).
The chosen model:
• Has its Discipline set to 0, and it loses Stubborn (if it has it)
• Cannot perform any Melee Attacks
• Loses Rally Around the Flag (if it has it)
• In case of a Battle Standard Bearer , doesn't add +1 to its side's Combat Score
The effects end:
• At the end of the Player Turn in which the combat ends
• When the chosen Character accepts or issues a Duel
• At the end of the Player Turn if there no longer is an enemy model Engaged in the same Combat that could
accept a Duel
15.E.c Fighting a Duel
If the Duel was accepted, the model that issued the Duel and the model that accepted the Duel will fight the Duel
based on the following rules:
• The two models count as being in base contact with each other (even if their bases are not physically touching
each other) and must allocate all their Close Combat Attacks towards each other.
• Melee Attacks made towards a unit as a whole (such as Breath Attacks , Impact Hits , Grind Attacks , Stomp
Attacks ) can only be distributed onto the opposing duellist. Melee Attacks made at specific models (such as all
models in base contact) are unaffected and work as normal.
• No other model can allocate attacks towards either of these models, and attacks/hits from Melee Attacks can
never be distributed onto a model that is fighting a Duel.
• If one of the models is removed as a casualty in the Melee Phase before the other model had a chance to make
all its Melee Attacks (this is a common situation with Characters that have attacks with more than one Agility
value, such as a rider and its mount, or a model with Stomp Attacks), any of the attacks not yet carried out can
and must be directed at the removed model, as if it was still Engaged and in base contact, in order to get an
Overkill bonus. Note that the gap from the removed model is filled immediately during the Initiative Step in
which the model is removed, according to the rules for "Removing Champions and Characters ", page 81 .
• If one of the models is removed as a casualty, Breaks, or if the combat ends for any reason (including being
divided through Splitting Combat), the Duel ends at the end of the phase. If neither model is removed as a
casualty and both their units are still Engaged with one another at the beginning of the next Round of Combat,
the Duel continues. No other Duel can be issued in the same combat before the Duel ends.
15.E.d Overkill
During a Duel, any excess Health Point losses caused count towards the Combat Score , up to a maximum of +3.
Contents Index 70 Model Rules Summaries
15.F
15.F.a Combat Score
Once all Initiative Steps have passed (i.e. all models have had a chance to attack), the winner of this Round of Combat
is determined by calculating each side's Combat Score. Simply add up all Combat Score bonuses. The side with
the higher Combat Score wins the Round of Combat and the side with the lower Combat Score loses the Round of
Combat. If there is a tie, both sides are treated as winners. The different Combat Score bonuses are described below
and summarised in table 7 .
15.F.a.1 Lost Health Points on enemy units: +1 for each Health Point
Each player adds up the number of Health Points lost from their opponent's units (Engaged in the same Combat)
during this Round of Combat. This includes enemies that were Engaged in the Combat but Dropped out of Combat
or were completely wiped out during this Round of Combat.
15.F.a.2 Overkill: +1 for each Health Point (maximum +3)
In a Duel, excess Health Points lost by the enemy model after it was removed as a casualty are counted towards the
Combat Score. A maximum of +3 can be added to your Combat Score due to Overkill. Note that excess Health Point
losses are only counted when fighting a Duel. In all other situations, excess Health Point losses count for nothing.
15.F.a.3 Charge: +1
Each side with one or more Charging models receives +1 to their Combat Score.
15.F.a.4 Rank Bonus: +1 for each Full Rank after the first (maximum +3)
Each side adds +1 to their Combat Score for each Full Rank after the first in a single unit, up to a maximum of +3.
Only count this for a single unit per side (use the unit that gives the highest Rank Bonus). Units in Line Formation
cannot add Rank Bonus to their Combat Score.
15.F.a.5 Standards: +1 for each Standard and Battle Standard Bearer
Each side adds +1 to their Combat Score for each Standard Bearer and Battle Standard Bearer Engaged in Combat at
the end of the Round of Combat.
15.F.a.6 Flank Bonus: +1 or +2
Each side adds +1 to their Combat Score if they have one or more units fighting an enemy in the enemy's Flank. If at
least one of these units (that are fighting an enemy in its Flank) has one or more Full Ranks, add +2 instead.
15.F.a.7 Rear Bonus: +2 or +3
Each side adds +2 to their Combat Score if they have one or more units fighting an enemy in the enemy's Rear. If at
least one of these units (that are fighting an enemy in its Rear) has one or more Full Ranks, add +3 instead.
15.F.a.8 Combat Score Summary
Health Points Lost by Enemy Units +1 for each Health Point
Overkill +1 for each Health Point (maximum +3)
Charge +1
Rank Bonus +1 for each Full Rank after the first (maximum +3)
Standard +1 for each Standard and Battle Standard Bearer
Flank Bonus +1 or +2
Rear Bonus +2 or +3
Table 7: Combat Score Summary.
15.G
Each unit on the side that lost the Round of Combat must take a Break Test. The order is chosen by the losing player.
A Break Test is a Discipline Test with a negative modifier equal to the Combat Score difference (i.e. if the Combat
Score was 6 to 3, the units on the losing side take Break Tests with a −3 modifier).
If the test is passed, the unit remains Engaged in the Combat. If the test is failed, the unit Breaks and Flees. Remember
that units within 6" of a friendly unit that Breaks must take a Panic Test (see Panic Test ).
15.G.a Steadfast
Any units that have more Full Ranks than each of the enemy units Engaged in the same Combat are considered
Steadfast. Steadfast units ignore Discipline modifiers from the Combat Score difference when rolling Break Tests
(and tests to Combat Reform ).
15.G.b Disrupted Ranks
A unit cannot use the Steadfast rule if it is Engaged in Combat in its Flank or Rear with an enemy unit with at least 2
Full Ranks.
15.G.c No More Foes
Sometimes a unit destroys all enemy units in base contact and finds itself no longer Engaged in Combat (so it cannot
provide Combat Score bonuses such as Standards or Flank). These units always count as winning the combat, and
can either make an Overrun (if they were Charging), a Post-Combat Pivot , or a Post-Combat Reform .
When this happens in multiple combats, the Combat Score resulting from lost Health Points by the unit and its
enemies counts, but all other Combat Score bonuses are ignored. Note that the unit itself doesn't take a Break Test
since it always counts as if on the winning side.
15.G.d Splitting Combat
If due to removing casualties, two or more disconnected subgroups of opposing units are created (see figure 33 ),
resolve the Combat normally (accounting for every unit that took part in this Round of Combat), checking any
remaining base contact for the purpose of Rear and Flank Bonuses. In the next Melee Phase, each subgroup will be
treated as a separate combat.
C
A
B
D
C
A
B
D
a) b)
Figure 33: Splitting combat.
a) Unit A suffers casualties, which results in unit D no longer being in base contact. Neither unit A nor unit D can be
nudged back into base contact since they are in base contact with other enemies (see "Losing Base Contact ", page
69 ). Calculate Combat Score in this case as one single combat (only unit C grants a Flank Bonus).
b) In the next Player Turn, this situation will count as two separate combats.
Contents Index 72 Model Rules Summaries
15.H
Before moving Broken units, each unit that is in base contact with the Broken unit(s) may declare a Pursuit of a
single Broken unit (each Pursuing unit may choose any eligible enemy unit to Pursue). Determine the direction of
the Flee Move as follows:
• If the Broken unit is in contact with a single enemy unit, its Flee Move will be directed away from that unit.
• If the Broken unit is in contact with more than one enemy unit, the owner of the enemy units must declare
which of those units the Flee Move will be directed away from.
To be able to Pursue a Broken enemy, the unit cannot be Engaged with any non-Broken enemy units and must be in
base contact with the Broken unit. Units can elect not to Pursue, but must then pass a Discipline Test to succeed in
restraining themselves, referred to as Restrain Pursuit Test; if the test is failed, the unit must Pursue anyway. If the
test is passed, the unit may do either a Post-Combat Pivot or a Post-Combat Reform .
15.H.1 Overrun
A unit that fought its First Round of Combat after Charging can choose to make a special Pursuit Move called Overrun
(instead of a Post-Combat Pivot or Post-Combat Reform), if all enemy units in base contact were wiped out (including
units removed from play as a result of Unstable or something similar). Overruns follow the rules for moving Pursuing
units, except that step 1. Pivot is ignored (i.e. Overruns are straight forward) and that no Restrain Pursuit Test is
required. Check which Arc the Overrunning unit is Located in for each enemy unit that may be Charged later in this
process. If the Overrun Move will lead to a Charge, it will be in the Facing determined at this point.
15.H.a Roll for Flee and Pursuit Distances
Each Broken unit now rolls 2D6 to determine its Flee Distance, and each unit that has declared a Pursuit now rolls
2D6 to determine its Pursuit Distance. If any Pursuing unit rolls a Pursuit Distance equal or higher than the Flee
Distance of the unit it is Pursuing, the Fleeing unit is immediately destroyed. Remove that unit as a casualty (with no
saves of any kind allowed). If several units are Fleeing from the same combat, the units move in the same order as
their Flee Distance was rolled (the owner chooses in which order they roll the Flee Distance). The Active Player
chooses which player will roll for their Pursuing units first. Each player chooses the order in which they roll the
Pursuit Distances of their own Pursuing units.
15.H.b Flee Distance and Fleeing Units
Each Broken unit that was not captured and destroyed will now Flee directly away from the previously determined
enemy unit. Pivot the Fleeing unit so that its Rear Facing is parallel with the Facing it was Engaged in (of the enemy
unit the Flee Move is directed away from), and then move the Fleeing unit straight forward a number of inches equal
to the Flee Distance rolled earlier. Use the rules for Flee Moves with the exception that units that are Engaged in the
same Combat do not cause Dangerous Terrain Tests. If the direction of the Flee Move cannot be determined, e.g.
because the enemy units that won the Round of Combat were removed as casualties, the Broken unit Flees directly
away from the closest enemy unit instead (Centre of Unit to Centre of Unit).
15.H.c Pursuit Distance and Pursuing Units
Each Pursuing unit now performs a Pursuit Move, which is divided into three consecutive steps.
Impassable Terrain, enemy units that Fled from the combat involving the Pursuing unit, and friendly units that were
not part of that combat are considered to be obstructions for the Pursuit Move. Models cannot move into or through
obstructions during Pursuit Moves. All friendly units that were part of the same combat are treated as Open Terrain
for steps 1 and 2 of the Pursuit Move.
Before moving any unit, check:
• Which Pursuing unit would Charge an enemy unit (see 2.2 Enemy Unit below). Ignore other Pursuing units
potentially rendering the Charge impossible.
• Which Arc the Pursuing unit is Located in for each enemy unit that may be Charged later in this process. If the
Pursuit Move will lead to a Charge, it will be in the Facing determined at this point.
The Charging units will be moved first, in the order that best satisfies the priority order of "Maximising Contact ",
page 42 (see figure 35 ). Afterwards the remaining Pursuing units will be moved, in an order chosen by the owner.
Contents Index 73 Model Rules Summaries
1. Pivot
The Pursuing unit Pivots so that it is facing the same direction as the Pursued unit, or if destroyed, the direction the
Pursued unit would have had, had it not been destroyed. Ignore the Unit Spacing rule during this Pivot.
After the Pivot, one of the four situations below will arise. If more than one is applicable, apply the uppermost one.
1. If the Front Facing of the Pursuing unit would overlap the Board Edge, the unit Pursues off the Board (see
"Pursuing off the Board ", page 78 ).
2. If the Front Facing of the Pursuing unit would overlap the Unit Boundary of an enemy unit that did not Flee
from the same combat, it declares a Charge against that unit. If there is more than one possible target, the
Pivoting unit chooses which to Charge. The Charged unit may not perform any Charge Reactions (not even if
already Fleeing). Remove the Pursuing unit from the Battlefield and then place it back on the Battlefield with its
Front Facing in base contact with its target, in the Facing determined before the Pivot, maximising the number
of Engaged models as normal but keeping the Centre of the unit as close as possible to its starting position
while doing so. If there is not enough room to place the Pursuing unit, treat the enemy unit as obstruction
instead.
3. If the Front Facing of the Pursuing unit would overlap an obstruction, the unit instead Pivots so that it faces as
close as possible towards the direction of the the Pursued unit, while following the Unit Spacing rule (normally
this means stopping 1" away from the obstacle), and then moves no farther (i.e. ignore steps 2 and 3).
4. If the Front Facing of the Pursuing unit touches neither of the above, proceed to step 2. Note that only the
Front Facing needs to be clear: Unit Boundaries, Impassable Terrain, or the Board Edge overlapping other
parts of the unit are ignored during steps 1-3.
2. Forward Ahead
Without moving the Pursuing unit, check what the first obstacle (Board Edge, enemy Unit Boundary, or obstruction)
within the rectangle directly ahead of the unit formed by its Front Facing and the rolled Pursuit Distance would be.
The Unit Spacing rule is ignored when doing this check and for all movement during Forward Ahead. If more than
one is applicable, apply the uppermost one.
2.1. Board Edge
If the first obstacle would be the Board Edge, move the unit straight forward until it touches the Board Edge and
then follow the rules for Pursuing off the Board .
2.2. Enemy Unit
If the first obstacle would be the Unit Boundary of an enemy unit that did not Flee from the same combat, the
Pursuing unit declares a Charge against that unit, using its Pursuit Distance roll as its Charge Range. If there is more
than one possible target, the Pursuing unit chooses which to Charge. The Charged unit may not perform any Charge
Reactions (not even if already Fleeing). The Pursuing unit immediately performs a Charge Move (following all the
normal Move Chargers rules) towards the previously determined Facing.
If the Pursuing unit joins a combat that has already been fought or was created during this Melee Phase, it will be
resolved in the next Melee Phase (with the Charging unit still counting as Charging). If the Pursuing unit joins a
combat that wasn't created during this Melee Phase and that hasn't been fought yet, the unit will have a chance to
fight and Pursue again this phase.
If the Charge is not possible to complete, the unit does not perform a Failed Charge Move but treats the enemy unit
as obstruction and proceeds to 2.3 instead.
2.3. Obstruction or No Obstacle
If the first obstacle, if any, would not be an enemy Unit Boundary or the Board Edge, the Pursuing unit now moves its
Pursuit Distance straight forward. If this brings the Front Facing of the unit into base contact with an obstruction,
the unit stops.
Contents Index 74 Model Rules Summaries
3. Legal Position?
At the end of the Pursuit Move, check if the unit is in a legal position. It cannot be in base contact with a unit it didn't
declare a Charge against, and it must follow the Unit Spacing rule, which includes friendly units that were part of the
same combat. If the unit is not in a legal position, backtrack the move to the unit's last legal position where it follows
the Unit Spacing rule.
Figure 34 shows a simple example of a Pursuit Move, figure 35 illustrates a case where two units are Pursuing into
an enemy unit, and figure 36 introduces more complex cases.
6"
3"
a) b)
A
B
A
B
Figure 34: Simple example of a Pursuit.
a) Unit A Breaks from Combat. It Pivots to face away
from unit B, and then moves the Flee Distance forwards.
b) Unit B Pursues. It does not need to Pivot as it is already
facing the same direction as unit A, and moves
the Pursuit Distance forwards.
Contents Index 75 Model Rules Summaries
E
E
E
B
B
A
1
2 C
a)
Flee Distance
Unit D
Pursuit Distance
Unit B
Pursuit Distance
Unit A
Pursuit Distance
Unit C
b) 6"
D
A
C
7"
5"
A
C
5"
c)
B
Figure 35: Example of two units Pursuing into the
same enemy unit.
a) Unit D loses the combat, Breaks, and Flees 7".
The owner of the winning units chooses to roll for
unit A's Pursuit Distance first. 6" is not enough to
catch the Fleeing unit. Unit B's Pursuit Distance is
7", so it is equal or higher than unit D's Flee Distance:
the Fleeing unit is immediately destroyed.
Unit C's Pursuit Distance is 5".
b) When checking which units will Charge an enemy
unit during their Pursuit, before moving any
Pursuing unit, it turns out that both unit A and
unit B will Charge unit E, so both units declare a
Charge against unit E. Unit C will not Charge any
enemy units.
c) Now units A and B perform their Pursuit Moves
first. During this move, they can move through one
another as they treat each other as Open Terrain.
Otherwise they move using the normal rules for
Moving Chargers (one Wheel allowed, Maximising
Contact). In order to maximise the number of models
and units in base contact, unit A aligns its Front
Facing with unit E's, while unit B moves into corner
to corner contact with unit E. Afterwards unit
C Pivots and moves its Pursuit Distance straight
forward.
Contents Index 76 Model Rules Summaries
C
A
B
A
C
D
E
F
G
H
G
H
b)
c)
d)
a) 1"
The Front Facing of the Pursuing
unit touches a friendly Unit
Boundary.
The Front Facing of the Pursuing
unit touches an enemy Unit
Boundary.
The first obstacle would be an
enemy unit.
The first obstacle would be an
obstruction.
9"
9"
1"
E
Figure 36: Examples of Pursuits.
a) Unit C is in unit A's Flank. Unit A wins combat,
unit C Breaks and Flees, unit A Pursues. Pivoting
unit A would make its Front Facing overlap a
friendly unit, unit B. The Pivot is instead made as
close as possible to the intended direction and the
Pursuit Move ends.
b) Unit C is in unit A's Flank. Unit A wins combat,
unit C Breaks and Flees, unit A Pursues. Pivoting
unit A would make its Front Facing overlap an enemy
unit, unit D. Unit A is removed from the Battlefield
and then placed back on the Battlefield with its
Front Facing in base contact with the Charged unit
D's Front Facing, maximising contact while keeping
the Centre of the unit as close as possible to its
starting position.
c) Unit G Breaks and Flees from unit E. No obstacles
are encountered during the Pivot. The first obstacle
unit E would encounter during its move ahead
is unit F. Unit E must now perform a Charge Move
against unit F, Maximising Contact as usual.
d) Unit G Breaks and Flees from unit E. No obstacles
are encountered during the Pivot. The first obstacle
unit E would encounter during its move ahead is
Impassable Terrain. Unit E is moved into contact
with the Impassable Terrain. However, this position
breaks the Unit Spacing rule. Unit E's Pursuit move
is backtracked to its last legal position.
Contents Index 77 Model Rules Summaries
15.H.d Pursuing off the Board
When a unit Pursues off the Board, it will leave the Battlefield and will return during the owner's next Movement
Phase, using the rules for arriving Ambushers (see "Ambush ", page 93 ), with the following exceptions:
• It automatically arrives.
• It must be placed with its rear rank centred on a point at which it contacted the Board Edge, or as close as
possible.
• It must arrive in the same formation as it left.
• It does not count as destroyed at the end of the game, nor does it lose Scoring .
15.H.e Post-Combat Pivot and Post-Combat Reform
After Pursuing and Fleeing units have been moved, the other units that were Engaged in the same Combat but are now
unengaged may now perform one of the manoeuvres below (in an order determined by the rules for "Simultaneous
Effects ", page 5 ).
15.H.e.1 Post-Combat Pivot
The unit Pivots around its Centre and/or may reorganise models with the Front Rank rule (they must still be in legal
positions).
15.H.e.2 Post-Combat Reform
The unit performs a Reform manoeuvre. If it does, the unit doesn't count as Scoring for claiming Secondary Objectives
until the start of the following Player Turn and may not declare any Charges in the following Player Turn.
Contents Index 78 Model Rules Summaries
15.I
Each unit still Engaged in Combat after all Fleeing and Pursuing units have moved, and after Post-Combat Pivots and
Post-Combat Reforms have been performed, now performs a Combat Reform.
• Units on the losing side of the combat must pass a Discipline Test in order to do so. Apply the same modifiers
as for the previous Break Test (i.e. apply the Combat Score difference, unless the unit is Steadfast or Stubborn ).
• Units Engaged in more than one Facing can never perform any Combat Reforms.
• After all Discipline tests have been taken, the Active Player decides which player performs their Combat
Reforms first. After this player has completed all Combat Reforms with their units (one at a time, in any order),
the opponent Combat Reforms their units.
• Each player may choose not to Combat Reform one or more of their units.
When performing a Combat Reform, remove a unit from the Battlefield and place it back, following these restrictions:
• The unit must be placed in a legal formation (following the Unit Spacing rule, etc.).
- The unit is allowed to come within 0.5" of units Engaged in the same Combat, but it cannot move into
base contact with enemy units that it was not in base contact with before the Combat Reform.
• The unit must be placed in base contact with all the enemy units it was in base contact before the Combat
Reform, and in the same Facing of the enemy unit(s).
• All models in the unit must be placed with their centre within their March Rate from their position before the
Combat Reform.
• Characters that were in base contact with an enemy must still be after the Combat Reform.
- This applies to both enemy and friendly Characters.
- A Character may end up in base contact with different enemy models than it was before the Combat
Reform.
• After each Combat Reform, at least as many models of the Combat Reforming unit must be in base contact
with enemy models as there were before.
- These don't have to be the same models.
Furthermore, after a player has completed all their Combat Reforms, all enemy models that were in base contact
with opposing models before the Combat Reform must still be in base contact after the Combat Reform, but they
may be Engaged with different models or units.
See figure 37 for an example of Combat Reforms.
𝐶1
a)
𝐶2
A
B C
𝐶2
B C
𝐶1
A
𝐶2
B
C
𝐶1
A
b) c)
Figure 37: Combat Reforms.
a) At the end of a Round of Combat, the Combined Unit A is Engaged with unit B and the Combined Unit C. All units
perform Combat Reforms, starting with unit A.
b) After Unit A's Combat Reform, the unit has added a file to the left, and the Character joined to the unit has moved
to the left.
c) During Unit B's Combat Reform, the unit shifts as far as possible to the right and the two models that are not in
base contact with enemy models are moved to the second rank. Unit C does not change its position, however the
Character joined to the unit moves into a position where it is in base contact only with a single enemy model.
Contents Index 79 Model Rules Summaries
Models suffering unsaved wounds lose Health Points.
16.A Losing Health Points
16.A.a R&F Models
R&F models except Champions in the same unit share a common Health Pool. If the attack was allocated towards or
distributed onto a R&F model, the combined R&F Health Pool loses 1 Health Point for each unsaved wound. If the
R&F models have 1 Health Point each, remove one R&F model for each Health Point lost.
If the R&F models have more than 1 Health Point each, remove whole R&F models whenever possible. Keep track of
Health Points lost from the Health Pool that are not enough to remove an entire model. These lost Health Points are
taken into account for future attacks. For example, a unit of 10 Trolls (3 Health Points each) loses 7 Health Points.
Remove two whole models (6 Health Points), leaving 1 lost Health Point which is kept track of. Later, this unit loses
2 Health Points, which is enough to remove a single Troll since 1 Health Point was lost from the previous attack.
If all non-Champion R&F models in a unit are wiped out, any excess lost Health Points are allotted to the Champion
(even if it is fighting a Duel). If there is no Champion, the excess Health Point losses are ignored.
If a unit consists of R&F models with different Types and/or Heights, all R&F models with the same Type and Height
have their own separate Health Pool.
16.A.b Champions
Even though Champions are R&F models, each Champion has its own Health Pool, and follows the rules for Characters
below. If enough Health Points are lost by R&F models in order to wipe out the entire unit, any remaining lost Health
Points are allotted to the Champion (even if it is fighting a Duel).
16.A.c Characters
If the attack was allocated towards or distributed onto a Character, the attacked model loses 1 Health Point for each
unsaved wound. If the model reaches 0 Health Points, it is removed as a casualty. Keep track of models that have lost
Health Points, but not enough to reach 0 Health Points (placing “Health Point markers” next to such models works
fine). These lost Health Points will be taken into account for future attacks. If the model is removed as a casualty, any
excess Health Point losses are ignored.
16.A.d Excess Health Point Losses
Whenever more Health Point losses are inflicted than there are Health Points in a Health Pool, these excess Health
Point losses are ignored.
When caused by simultaneous attacks from models from two or more Health Pools and/or units, it may be necessary
to determine which models caused the excess Health Point losses. In this case, the owner of the models that inflicted
the Health Point losses gets to decide.
16.A.e Losing the Last Health Point
Certain effects are triggered by models being removed as a casualty, while others are set off by models losing their
last Health Point or reaching 0 Health Points. Note that losing the last Health Point does not apply to situations in
which a model is directly removed as a casualty, without actually losing any Health Points, like Fleeing off the board
or being destroyed after Breaking from Combat.
Contents Index 80 Model Rules Summaries
16.B Removing Casualties
Whenever the rules tell you to remove models as casualties, remove the models from the Battlefield following the
rules below. Models that have been removed as casualties no longer affect the game in any way, but they may award
Victory Points to the opponent (see “Victory Conditions ”, page 85 ).
16.B.a Removing R&F Models
If the unit is in multiple ranks, R&F casualties are removed from the rear rank by the owner, in any order they choose.
If the unit is in a single rank, remove models as equally as possible from both sides of the unit. Note that this only
applies to each batch of simultaneous attacks.
If a Champion or Character is in a position that would normally be removed as a casualty, remove the next eligible
R&F model and slide the Champion and/or Character model(s) into the now empty spot.
16.B.b Removing R&F Models from Units Engaged in Combat
The removal of casualties from Engaged units follows the general rules for Removing R&F models above. In addition,
if the unit is in a single rank, remove casualties from either side of the unit, so that the following conditions are
satisfied as best as possible for each batch of simultaneous casualties, in decreasing priority order:
• 1st priority: As few units as possible Drop out of Combat (see “Losing Base Contact ”, page 69 )
• 2nd priority: As few units as possible lose base contact without Dropping out of Combat
• 3rd priority: The number of models in base contact is maximised after nudging all units
• 4th priority: Casualties are removed as equally as possible from both sides of the unit
If it is unavoidable to break one or more of the above conditions, you must avoid breaking the higher priority order
conditions, even if this means the total number of conditions you break is higher. As long as all above conditions are
satisfied as best as possible, the owner is free to remove casualties as they please. See figure 38 for examples.
16.B.c Removing Champions and Characters
When Champions and Characters are removed as casualties they are removed from their positions within the unit.
Other models are then moved to fill empty spots, following the same guidelines as for casualty removal above.
When removing casualties from unengaged units with a single rank, Champions and Characters follow the rules for
Matching Bases (see “Front Rank ”, page 95 ).
Contents Index 81 Model Rules Summaries
A
C
A
C
A A
C
B
A
C
B
A
B
C A
B
D
a)
c)
C
E E
A A
B B
A
b)
C
C
d)
C
C C
C
C
C
D
e)
Figure 38: Removing R&F models from units Engaged
in Combat.
This figure shows how models are removed as
casualties from a unit that is Engaged with one
or more enemy units according to Removing R&F
Models from Units Engaged in Combat. In all examples,
3 models are removed as casualties from
the green Combined Unit containing a Character
in its first rank.
a) One of these casualties is the model in the second
rank, and the other two have to be removed
from both sides of the first rank according to the
4th priority. Since there is a Character on the right
side of the unit, the R&F model to its left is removed
instead, and the Character is slid into the
removed model’s spot.
b) In order to maximise the number of models in
base contact (3rd priority), the model in the second
rank and the two rightmost R&F models from
the first rank are removed as casualties. The Character
is slid into the spot of a removed R&F model.
c) In order not to have unit B lose base contact by
removing casualties (2nd priority), the model in
the second rank and the two rightmost R&F models
from the first rank are removed as casualties.
The Character is slid into the spot of a removed
R&F model.
d) In order not to cause any units to Drop out of
Combat (1st priority), the model in the second rank
and the two leftmost R&F models from the first
rank are removed as casualties. Unit B loses contact
but is nudged back into combat (see “Losing
Base Contact ”, page 69 ).
e) In order to cause as few units as possible to
Drop out of Combat (1st priority), the model in
the second rank and the two rightmost R&F models
from the first rank are removed as casualties.
The Character is slid into the spot of a removed
R&F model. Unit D loses contact and cannot be
nudged back into combat, so that it Drops out of
Combat (see “Losing Base Contact ”, page 69 ).
Contents Index 82 Model Rules Summaries
17.A Panic Test
A Panic Test is a Discipline Test that a unit has to take immediately after any of the following situations arise:
• A friendly unit is destroyed within 6″ of the unit (including Fleeing off the board).
• A friendly unit Breaks from Combat within 6″ of the unit.
• A friendly unit Flees through the unit’s Unit Boundary.
• In a single phase, the unit suffers Health Point losses equal to or greater than 25% of the number of Health
Points that it had at the start of the phase. This does not apply to single model units that started the game as a
single model (i.e. with a starting number of 1 model on the Army List).
Unless specifically stated otherwise, units that fail a Panic Test immediately Flee directly away from the closest
enemy unit (Centre of Unit to Centre of Unit). If several enemy units are equally close, randomise which one the unit
will Flee away from. If there are no enemy units on the Battlefield, randomise the direction. If the Panic Test was
caused by any of the cases listed below, the unit Flees directly away from the enemy unit that caused the Panic Test
(Centre of Unit to Centre of Unit).
• A spell cast by an enemy model
• A Model Rule on an enemy model (such as Terror )
• Losing 25% or more Health Points, and the final wounds causing the Health Point losses to reach or go above
25% were due to an attack by an enemy unit
If several units have to take a Panic Test at the same time, take all Panic Tests before performing any Flee Moves
caused by failed Panic Tests.
Units do not take Panic Tests if they are Engaged in Combat, if they are already Fleeing, or if they already passed a
Panic Test during this phase.
17.B Shaken
Under certain circumstances, models may become Shaken. The most common situations are:
• Charging a Fleeing unit (page 43 )
• Failing a Charge (page 46 )
• Rallying a Fleeing Unit (page 50 )
• Failing a Fear Test (see “Fear ”, page 94 )
• War Machines failing a Panic Test (see “War Machine ”, page 101 )
• War Machines suffering a Jammed Misfire Effect (page 109 )
A Shaken model cannot perform any of the following actions:
• Declare Charges
• Pursuit
• Overrun
• Advance Move
• March Move
• Reform (it can Combat Reform and Post-Combat Reform)
• Random Movement
Contents Index 83 Model Rules Summaries
• Shooting Attack
17.C Fleeing
A unit is considered Fleeing from the moment:
• It fails a Break Test (after potential rerolls)
• It fails a Panic Test (after potential rerolls)
• Its Flee Distance is rolled
As soon as a unit passes its Rally Test, it is no longer considered Fleeing.
When a unit is Fleeing, it cannot perform any voluntary actions (a voluntary action is an action that a unit would
have the option to not perform). This includes (but is not limited to):
• Declare Charges
• Charge Reactions other than Flee
• Move in any way other than a Flee Move
• Shoot
• Channel
• Cast spells or activate One use only Special Items which need to be activated voluntarily
Models cannot receive Commanding Presence or Rally Around the Flag from a Fleeing model.
17.D Decimated
A unit is considered Decimated if the sum of the Health Points of its models, including Characters that are part of the
unit, is 25% or less of its starting Health Points (the number taken from the Army List, regardless of any Characters
in the unit). Decimated units must take their Rally Test at half their Discipline, rounding fractions up (this is not
considered a Characteristic modifier).
For example, if a unit with Discipline 8 started the game with 40 models with 1 Health Point each, is reduced to 9
models and Flees, it takes Rally Tests at Discipline 4. However, if a Character with Discipline 8 and 2 Health Points is
part of the unit, the Combined Unit would instead take its Rally Test at Discipline 8.
Contents Index 84 Model Rules Summaries
At the end of the game, players determine the winner of the battle. For this purpose, calculate each player’s Victory
Points, check if any player scored the Secondary Objective, and distribute the Battle Points accordingly as described
below. Of course players may agree to use a different method to determine the winner, e.g. by creating custom
scenarios that set specific goals for each player to claim victory.
18.A Scoring Victory Points
At the end of each game, each player is awarded a number of Victory Points (VP) according to the rules below.
Destroyed Units For each enemy unit that has been removed as a casualty, you gain a number of VP equal
to its Point Cost.
Fleeing Units For each enemy unit that is Fleeing at the end of the game, you gain a number of VP equal
to half its Point Cost, rounding fractions up.
Shattered Units For each enemy unit that is at 25% or less of its starting Health Points (of the number
taken from the Army List) at the end of the game, you gain a number of VP equal to half
its Point Cost, rounding fractions up. Characters are counted separately from the units
they have joined. Note that if an enemy unit is both Fleeing and Shattered, you gain a
number of VP equal to the unit’s total Point Cost.
Defeated
General
If the enemy General was removed as a casualty, you gain 200 VP.
Defeated Battle
Standard Bearer
If the enemy Battle Standard Bearer was removed as a casualty, you gain 200 VP.
18.B Scoring Secondary Objectives
The Secondary Objective selected at the start of the game can grant extra Battle Points (see “Secondary Objectives ”,
page 35 , and table 8 below).
18.C Who is the Winner?
Once all Victory Points are added together, a total of 20 Battle Points are divided between the players, depending
on the Victory Point Difference. Calculate the Victory Point Difference and use table 8 below to convert the Victory
Points into Battle Points. The winner of the Secondary Objective gains 3 additional Battle Points while the loser of
the Secondary Objective loses 3 Battle Points. In case there is no winner, the Secondary Objective ends in a draw and
no additional Battle Points are awarded to either player.
18.C.a Optional Simplified Rules for Determining the Winner
Winning the Secondary Objective awards the winner a number of Victory Points equal to 20% of the Army
Points. Once all Victory Points are added together, compare the two results.
• If the Victory Point Difference is less than 10% of the Army Points, the result is a Draw.
• If the Victory Point Difference is at least 10% and up to 50% of the Army Points, the result is a Win for
the player who scored higher.
• If the Victory Point Difference is more than 50% of the Army Points, the result is a Massacre for the player
who scored higher.
d
Contents Index 85 Model Rules Summaries
Victory Point Difference Battle Points
Percentage of
Army Points
(if playing with
4500 Army Points)
Winner Loser
0–5% 0–225 10 10
>5–10% 226–450 11 9
>10–20% 451–900 12 8
>20–30% 901–1350 13 7
>30–40% 1351–1800 14 6
>40–50% 1801–2250 15 5
>50–70% 2251–3150 16 4
>70% >3150 17 3
Winning Secondary Objective +3 −3
Table 8: Victory Point Difference and Battle Points.
Contents Index 86 Model Rules Summaries
19.A Classification of Models
All models have a Height and a Type, defined in their unit entry.
19.A.a Height
Models come in three Heights, which are connected to the following rules:
Standard Large Gigantic
Model Rules None Stomp Attacks (1)
Fear
Massive Bulk
Stomp Attacks (D6)
Terror
Towering Presence
Full Ranks
Minimum number of models required to
form Full Ranks
5 3 1
Supporting Attacks
Maximum number of Supporting Attacks
1 3 5
Dangerous Terrain
Number of D6 rolled when performing
Dangerous Terrain Tests
1 2 3
19.A.b Type
Models come in four Types, which are associated with the following rules:
Infantry Beast Cavalry Construct
None Swiftstride
Cannot be Stomped
Swiftstride
Tall
Cannot use Stomp Attacks
Chariot
19.A.c Models on Foot and Mounted Models
Certain spells and rules affect models on foot and mounted models differently.
Models that don’t include any model parts with Harnessed are considered to be on foot.
Models with at least one model part with Harnessed are considered to be mounted.
Contents Index 87 Model Rules Summaries
19.B Character Mounts
Many Characters can select mounts from the mount section of their Army Book. When a Character, referred to as the
rider, selects a mount, apply the following rules:
19.B.1 Height, Type, and Base
Always use the Height, Type, and base of the mount.
19.B.2 Offensive Characteristics
Rider and mount use their own respective Offensive Characteristics.
19.B.3 Global and Defensive Characteristics
The Multipart Model has a single set of Global Characteristics and a single set of Defensive Characteristics. Always use
the values in the mount’s profile, except when that value is “C”. In this case, “C” refers to the value in the Character’s
profile which is used instead. Sometimes, a value is written as “C + X”. In this case, use the Character’s value, increased
by X.
For example, if a Character (Armour 0) rides a horse (Armour C + 2), wears Heavy Armour (+2 Armour), and carries
a Shield (+1 Armour), the Multipart Model has an Armour equal to: 0 + 2 + 2 + 1 = 5.
19.B.4 Model Rules
Model Rules connected to specific model parts (such as Attack Attributes, Special Attacks, and weapons) are only
applied to this model part. Other Model Rules (such as Universal Rules, Character, Armour, and Personal Protections)
are applied to the Multipart Model as normal.
Remember that models with Massive Bulk (all models of Gigantic Height) ignore Armour and Personal Protections
from the rider.
19.C Classification of Units
Some rules call for a unit’s Height or Type, e.g. for determining how many models are required for Full Ranks. In
case a unit contains a mix of different Heights the unit’s Height is the same as that of the largest fraction of its models.
Likewise, a unit’s Type is the same as that of the largest fraction of its models. In case of a tie, the opponent chooses
which fraction to use.
Contents Index 88 Model Rules Summaries
20.A Terrain Types
20.A.a Dangerous Terrain (X)
A model must take a Dangerous Terrain Test if it is in contact with a Terrain Feature that counts as Dangerous Terrain
at any point during its March, Charge, Failed Charge, Flee, Pursuit, or Overrun Move. Take a Dangerous Terrain Test
by rolling a number of D6 depending on the model’s Height and Model Rules:
Standard Large Gigantic Chariot
Number of D6 rolled 1 2 3 +1
For each dice that rolled equal to or below X (where X is the value stated in brackets), the model suffers a hit with
Armour Penetration 10 that wounds automatically.
Note that:
• Dangerous Terrain Tests are taken as soon as the model is in contact with the relevant Terrain. If it does not
matter exactly when a model is removed as a casualty, take all Dangerous Terrain Tests for a unit at the same
time.
• Hits suffered from Dangerous Terrain Tests are distributed onto the model’s Health Pool.
• A model never takes more than one Dangerous Terrain Test for the same Terrain Feature during a single move,
but it might have to take several Dangerous Terrain Tests caused by different Terrain Features or abilities.
20.A.b Opaque Terrain
Line of Sight cannot be drawn through Opaque Terrain, but can be drawn into it. Models always ignore any Terrain
they are inside for drawing Line of Sight.
20.A.c Covering Terrain
Like models, Terrain Features may contribute to Cover when obscuring a fraction of the Target Facing or the Target
Point from the enemy’s Line of Sight (see “Cover ”, page 62 , and remember that Cover modifiers only apply if more
than half of the Target Facing or the Target Point is obscured by Cover).
For the purpose of counting as Cover, Terrain Features may distinguish:
• Targets obscured behind the Terrain Feature. These units must have more than half of their Target Facing or
their Target Point off the Terrain Feature, and the part of the Terrain Feature obscuring Line of Sight must be
between the shooting model and its target.
• Targets obscured inside the Terrain Feature. These units must have more than half of their Target Facing or
their Target Point inside the Terrain Feature.
• Targets obscured behind and/or inside the Terrain Feature: there is no need to determine where more than
half of these units’ Target Facing or their Target Point lies (as long as it is obscured).
Models always ignore any Terrain they are inside for drawing Line of Sight.
Contents Index 89 Model Rules Summaries
20.B Terrain Features
A Terrain Feature is a topographical area on the Battlefield that may be a mixture of Dangerous, Impassable, Opaque,
or Covering Terrain and may possess its own set of rules.
20.B.a Open Terrain
Open Terrain normally doesn’t have any effect on Line of Sight, Cover modifiers, or movement. All parts of the board
that are not covered by any other kind of Terrain are considered to be Open Terrain.
20.B.b Fields
Fields can be represented in the game for example by meadows or agricultural fields.
Types Fields are Covering Terrain for units inside them.
Cover Fields contribute to Soft Cover , except for models with Towering Presence .
20.B.c Forests
Forests can be represented in the game for example by jungles, brushwoods, or coniferous forests.
Types Forests are Covering Terrain for units inside and/or behind them, and Dangerous Terrain
(1) for Cavalry, Constructs, and units making a Flying Movement .
Cover Forests contribute to Soft Cover .
Broken
Ranks
Units with more than half of their models with the centre of their base inside a Forest can
never be Steadfast , unless specifically stated otherwise.
Guerilla
Warfare
Units consisting entirely of Infantry models with Light Troops are Stubborn if more than
half of their models are inside a Forest with the centre of their bases, unless any model in
the unit has Towering Presence and/or Fly .
20.B.d Hills
Hills can be represented in the game for example by elevated plateaus or burial mounds.
Types Hills are Opaque Terrain .
Hills are Covering Terrain for units behind them.
Cover Hills contribute to Soft Cover for targets behind but partially on them.
Hills contribute to Hard Cover for targets behind and entirely off them.
Elevated
Position
Models with the centre of their base on a Hill are considered to be Elevated. Ignore all
intervening non-Elevated models if you are:
• drawing Line of Sight to or from Elevated models.
• determining Cover when shooting with:
– Elevated models.
– non-Elevated models at units which have more than half of their models Elevated.
Charging
Downhill
A unit initiating a Charge Move with more than half of its models with the centre of their
base on a Hill towards an enemy with more than half of its models with the centre of their
base off a Hill must reroll failed Charge Range rolls.
Contents Index 90 Model Rules Summaries
20.B.e Impassable Terrain
Impassable Terrain can be represented in the game for example by monoliths, massive boulders, or buildings.
Types Impassable Terrain is Opaque Terrain .
Cover Impassable Terrain contributes to Hard Cover for units behind it.
Mission
Impassible
Models cannot move into or through Impassable Terrain.
20.B.f Ruins
Ruins can be represented in the game for example by rubble or abandoned farmsteads.
Types Ruins are Covering Terrain for units inside them, Dangerous Terrain (2) for Cavalry and
Constructs, and Dangerous Terrain (1) for any other unit. Units with Skirmisher automatically
pass Dangerous Terrain Tests caused by Ruins.
Cover Ruins contribute to Hard Cover , except for models with Towering Presence .
20.B.g Walls
Walls can be represented in the game for example by wooden barricades, stone walls, or hedges.
Types Walls are Covering Terrain for models behind them while Defending the Wall (see below)
and Dangerous Terrain (2) for Constructs.
Cover Walls contribute to Hard Cover , except for models with Towering Presence .
Defending a
Wall
In order to Defend a Wall, more than half of a unit’s Front Facing must be in contact with it.
Fortified
Position
Units Defending a Wall gain Distracting against Close Combat Attacks from Charging enemies
in their Front Facing.
20.B.h Water Terrain
Water Terrain can be represented in the game for example by ponds, swamps, or rivers.
Types Water Terrain is Dangerous Terrain (1) for Standard Height models on foot.
Broken
Ranks
Units with more than half of their models with the centre of their base inside Water Terrain
can never be Steadfast , unless specifically stated otherwise.
Doused
Flames
All Melee Attacks against or by models in units with more than half of their models with the
centre of their base inside Water Terrain are no longer Flaming Attacks (if they were before).
20.C Board Edge
The Board Edge represents the boundaries of the game. A unit is allowed to temporarily and partially move off the
board (during any move) with by the following restrictions:
• The unit’s Front Facing must remain entirely on the board at all times, except during align moves .
• The unit must finish its move with its Unit Boundary entirely on the board.
Contents Index 91 Model Rules Summaries
21.A Universal Rules
If at least one model part has a Universal Rule, the entire Multipart Model is affected by it.
For example, in case of a Character with the Strider Universal Rule on a Character mount without this Universal Rule,
all model parts of the Multipart Model (Character and mount) benefit from Strider.
21.A.aList of Universal Rules
21.A.a.1Ambush
Units with Ambush may be deployed using Special Deployment rules. All units that will be deployed using the
Ambush rule must be declared at step 8 of the Pre-Game Sequence (after Spell Selection), starting with the player
that chose their Deployment Zone. Deploy your army as usual, but without the Ambushing units. Starting with
your Player Turn 2, immediately after step 2 of the Movement Phase Sequence (after moving units with Random
Movement), roll a dice for each of your Ambushing units. After rolling for all Ambushing units, all units that rolled 3+
enter the Battlefield from any Board Edge. Place the arriving units with their Rear Facing in contact and aligned with
the Board Edge. Ambushers are subject to the following rules and restrictions:
- Ambushing models can neither March Move during the Movement Phase in which they arrive, nor can they
voluntarily end that Movement Phase farther away from the Board Edge that they arrived from than their
March Rate.
- Ambushing models count as having moved during the turn they arrive on the Battlefield.
- If an Ambushing unit has not entered the Battlefield before the end of the game (e.g. due to failing all its 3+
rolls), the unit counts as destroyed.
- An Ambushing unit that enters the Battlefield on Game Turn 4 or later loses Scoring.
- An Ambushing Character may Ambush within an Ambushing unit that it is allowed to join (declare this when
declaring which units are Ambushing). Roll only one dice for the Combined Unit.
- Until arriving on the Battlefield, Ambushing units cannot perform any actions at all, and all their Special Items,
rules, and abilities don’t work while off the board.
21.A.a.2Battle Standard Bearer — One of a Kind
An army may only include a single Battle Standard Bearer. The model gains Rally Around the Flag and Not a Leader.
If the model has the option to buy Special Items, it is allowed to buy up to two Banner Enchantments.
21.A.a.3Bodyguard (X)
While a Character is joined to a unit in which at least one model has Bodyguard, that Character gains Stubborn.
When Characters or Character types are stated in brackets, Bodyguard only works for the specified Characters or
Character types.
21.A.a.4Channel (X)
During step 3 of the Magic Phase Sequence, each of the Active Player's models with Channel may add X Veil Tokens
to its owner's Veil Token pool. This Universal Rule is cumulative, adding the X of each instance of Channel to the
model’s total Channel value (e.g. a model with Channel (1) and Channel (2) is treated like a model with Channel (3)).
21.A.a.5Chariot
The model must roll an additional D6 when taking Dangerous Terrain Tests. A model with Chariot can only be part
of a unit consisting entirely of models with Chariot, unless specifically stated otherwise.
Contents Index 93 Model Rules Summaries
21.A.a.6Commanding Presence
All Generals have the Commanding Presence Universal Rule. The Discipline of all units within 12" of a friendly
non-Fleeing model with Commanding Presence may be set to the Discipline value of that model (this ability follows
the normal rules for Values Set to a Fixed Number
, page 16 , meaning that effects modifying the Discipline of the
model with Commanding Presence are applied before setting the recipient model's Discipline to that value; this
value may then be further modified).
21.A.a.7Engineer (X+)
Once per Shooting Phase, an unengaged Engineer may select a single War Machine within 6" that has not fired yet to
gain the following effects:
- Set the Aim of one of the War Machine's Artillery Weapons to the value given in brackets (X+).
- You may reroll the roll on the Misfire Table.
- You may reroll the dice (all of them or none) for determining the number of hits of a Flamethrower Artillery
Weapon.
21.A.a.8Fear
Units in base contact with one or more enemy models with Fear suffer -1 Discipline. At the start of each Round
of Combat, such units must take a Discipline Test, called a Fear Test. If this test is failed, the models in the unit are
Shaken and Close Combat Attacks made by models in the unit suffer -1 to hit, while Close Combat Attacks allocated
towards models in the unit gain +1 to hit. These effects apply until the end of the Round of Combat. Models that have
Fear themselves are immune to the effects of Fear.
21.A.a.9Fearless
If more than half of a unit's models are Fearless, the unit automatically passes Panic Tests and cannot declare a Flee
Charge Reaction, unless already Fleeing. Models that are Fearless are also immune to the effects of Fear.
21.A.a.10Feigned Flight
Units consisting entirely of models with Feigned Flight do not become Shaken if they voluntarily choose Flee as
Charge Reaction and pass their Rally Test in their next Player Turn. The Reform after Rallying in this case does not
prevent the unit from moving nor from shooting, but the unit still counts as having moved. This rule does not apply
if a unit fails to rally on the next friendly Player Turn or Flees involuntarily (e.g. as the result of a failed Panic Test , or
if it was already Fleeing when being Charged).
21.A.a.11Fly (X, Y)
Units composed entirely of models with Fly may use Flying Movement during Charge Moves, Failed Charge Moves,
Advance Moves, and March Moves. When a unit uses Flying Movement, substitute its models' Advance Rate with the
first value given in brackets (X), and their March Rate with the second value given in brackets (Y). A unit using Flying
Movement ignores all Terrain Features and units during the Flying Movement. Note that:
- It must follow the Unit Spacing rule at the end of the move.
- It is affected by the Terrain Features from which it takes off and in which it lands.
- All modifiers to ground movement values also apply to a model's Fly values, unless specifically stated otherwise.
- When declaring a Charge with a unit with Fly, you must declare if the unit will not use Flying Movement for the
Charge Move.
- A Failed Charge Move of a unit with Fly must use the type of movement (ground or Flying) that was chosen
when the Charge was declared. If the unit would end its Failed Charge Move inside another unit's Unit Boundary
or inside Impassable Terrain, backtrack the move to the unit's last legal position where it follows the Unit
Spacing rule.
21.A.a.12Frenzy
At the start of the Charge Phase, each of your units with at least one model with Frenzy that could declare a Charge
against an enemy unit within the unit's Advance Rate +7" must take a Discipline Test , called a Frenzy Test. If the test
is failed, the whole unit must declare a Charge this Player Turn if possible.
Frenzy Tests and Restrain Pursuit Tests taken by units with at least one model with Frenzy are subject to Maximised
Roll .
If there are different Advance Rates available in the unit, the Advance Rate used for the Frenzy Test and for the
Charge Range is determined as follows:
- If a model has more than one Advance Rate (e.g. due to Fly ), the model must use the Advance Rate that has the
highest chance of completing the Charge.
- If a unit contains models with different Advance Rates, the unit must use the highest Advance Rate that all
models in the unit can use (which will usually be the lowest Advance Rate in the unit).
For example, a model with Advance Rate 2" and Fly (8", 16") must use the Advance Rate from Fly. And if a Character
in a Combined Unit has Advance Rate 4" while the R&F models have 6", the Combined Unit must use Advance Rate 4".
Note that when a unit is forced to declare a Charge due to a failed Frenzy Test, it is not forced to Charge the enemy
unit that triggered the Frenzy Test.
21.A.a.13Front Rank
Front Rank specifies where in a unit the model may be placed and how the model moves inside its unit.
A model with Front Rank must always be placed as far forwards as possible in its unit. This normally means that it
must be placed in the first rank unless specifically stated otherwise.
When making an Advance Move, March Move, or Reform with a unit that includes models with Front Rank, these
models can be reorganised into a new position (still as far forwards as possible) as part of the move. This counts
towards the distance moved by the unit (measure the distance from the starting position to the ending position of
the centre of the model with Front Rank to determine how far it has moved).
A model with Front Rank can either have a Matching Base or a Mismatching Base.
Matching Bases
In Combined Units containing Characters and R&F models, a Character is considered to have a Matching Base if:
- The model has the same base size as the R&F models.
- The model's base is the same size as a multiple of the R&F models' bases (such as a 40×40 mm base in a 20×20
mm unit).
For Combined Units consisting entirely of Characters, Matching Bases are determined differently as these units do
not contain any R&F models. The R&F base size for the purposes of Matching Bases must:
- Correspond to the base size of at least one of the Characters
- Result in as few Characters as possible having Mismatching Bases; the owner chooses in case of a tie
For example, in a unit consisting of a 25×25 mm Character and two 25×50 mm Characters, that base size is 25×25
mm, as it does not result in any Mismatching Bases in the unit.
If the first rank is occupied by models with Front Rank, a model with Matching Base is placed in the second rank
instead. If this rank is also occupied by models with Front Rank, it is placed in the third rank, and so on. Matching
Bases are subject to the following rules and restrictions:
- If the model has a larger base than the R&F models, it is considered to be in all ranks its base occupies for the
purposes of calculating Full Ranks . For calculating the number of models in the unit's ranks (e.g. for Full Ranks,
Line Formation , Area Attack ), the large base counts as the number of models it replaces.
- If a model with a Matching Base has a longer base than the R&F models in the unit, the unit is allowed to have
more than one incomplete rank if all incomplete ranks after the first consist entirely of models with such bases
(for instance the rear parts of long bases such as War Platforms are allowed to form several incomplete ranks).
- A model cannot join a unit that has more than one rank if its base is wider than the unit it wishes to join, nor
can a unit Reform into a formation that is narrower than any model joined to the unit.
If a model with Front Rank moves inside or leaves a unit that has more than one rank, or if it is removed from such a
unit as a casualty, the gap the model leaves must be filled with models without Front Rank. If there aren't any models
without Front Rank available, move models with Front Rank instead. After filling a gap, sometimes models with
Front Rank must be redistributed in order for all such models to be as far forwards as possible. When this happens,
move as few models as possible in order to have all models with Front Rank as far forwards as possible.
If a model with Front Rank moves inside or leaves a unit that has a single rank, or if it is removed from such a unit as a
casualty, gaps may be created in the unit. If this leads to an illegal formation (there can only be gaps in an incomplete
rear rank; see "Units ", page 8 ), slide as few models as possible to fill the now empty spot. In case of a draw, i.e. if the
model was positioned in the middle of the rank, the owner decides which half of the remaining models to slide.
Mismatching Bases
Anything that is not a Matching Base is a Mismatching Base (such as a 50×75 mm base inside a 25×50 mm unit).
A model with Mismatching Base is always placed in base contact to the side of the unit, aligned with its front. Only
two Mismatching Bases can be joined to a single unit (one at each side). These models are considered to be only in
the first rank, but are ignored when counting the number of models in each rank in order to establish the number of
Full Ranks and whether or not a unit is in Line Formation. They form a file of one model each.
During Advance Moves, March Moves, or Reforms, models with Mismatching Bases can only be moved to the other
side of the unit as part of the move.
Figure 39 shows how models with Front Rank can be placed in a complex case.
Figure 39: Illustration of the Front Rank rule.
Yellow models have Front Rank, green models do not.
a) A Character on a Mismatching Base is placed next to the unit. Characters on Matching Bases are placed inside the
unit, as far forwards as possible. This unit is considered to have 3 Full Ranks.
b) When a model with Front Rank joins the unit, the small model with Front Rank in the second rank must be moved
to the side in order to have all models with Front Rank as far forwards as possible.
21.A.a.14Ghost Step
The model may choose to treat all Terrain Features as Open Terrain for movement purposes, but must follow the
Unit Spacing rule upon the completion of its moves. It can never end its move inside Impassable Terrain. If this
would be the case, backtrack the move to the unit's last legal position (unless Fleeing, in which case the normal rules
for "Flee Moves ", page 50 apply).
In addition, the model automatically passes Dangerous Terrain Tests taken due to Terrain.
21.A.a.15Insignificant
Units consisting entirely of Insignificant models only cause Panic Tests on friendly units in which half the models or
more are Insignificant. Units with Insignificant R&F models can only be joined by Insignificant Characters.
21.A.a.16Light Troops
A unit composed entirely of models with Light Troops applies the following rules for Advance Moves and March
Moves:
- The unit may perform any number of Reforms , at any time during the move, and in any order. This does not
prevent models with Light Troops from shooting this Player Turn.
- The unit can move backwards and sideways as if moving forwards (i.e. up to its Advance/March Rate), but
cannot leave the board with any part of its Unit Boundary.
- The unit cannot perform any Wheels.
In addition:
- Units composed entirely of models with Light Troops gain March and Shoot.
- Units with more than half of their models with Light Troops always count as having 0 Full Ranks.
- Infantry Characters gain Light Troops while joined to Infantry units of the same Height with Light Troops.
21.A.a.17Magic Resistance (X)
Learned Spells and Bound Spells targeting at least one enemy unit with one or more models with Magic Resistance
suffer a -X modifier to their casting roll (where X is given in brackets). This is an exception to the Casting and
Dispelling Modifier rule. If there are different X values that could be used, use the highest value.
21.A.a.18Massive Bulk
If the model is mounted by a Character, ignore the rider's Armour Equipment (including Armour Enchantments) and
Personal Protections, unless specifically stated otherwise (such as Armour Enchantments that affect the bearer's
model).
21.A.a.19Not a Leader
The model cannot be the General.
21.A.a.20Protean Magic
During Spell Selection, the Wizard must select its spells from the Learned Spell 1 of each Path it has access to, as well
as the Hereditary Spell of its army. This rule overrides the Spell Selection rules for Wizard Apprentices, Adepts, and
Masters.
21.A.a.21Rally Around the Flag
All units within 12" of a friendly non-Fleeing model with Rally Around the Flag may reroll failed Discipline Tests.
21.A.a.22Random Movement (X)
At the end of step 2 of the Movement Phase Sequence (after Rallying Fleeing Units), a non-Fleeing unit with Random
Movement must move using the rules for Pursuing units, with the following exceptions, which only apply in the
Movement Phase, unless specifically stated otherwise:
- It always moves the distance stated in brackets (X), which is also used for Flee Distance and Pursuit Distance
(including Overruns ).
- It can choose which direction to Pivot in before rolling the Pursuit Distance.
- It cannot move off the Board Edge.
- It does not take Dangerous Terrain Tests unless Charging.
There are several restrictions connected with Random Movement:
- The unit cannot move normally in the Movement Phase (Advance, March, Reform) and cannot declare Charges
in the Charge Phase. Whenever it requires a March Rate (e.g. when Post-Combat Reforming ), use the potential
maximum value of X as its March Rate.
- The unit cannot perform Magical Moves.
- The unit loses Swiftstride and can never gain it (but X can be affected by Maximised/Minimised Roll from other
sources).
- Characters with Random Movement cannot join units, and units with Random Movement cannot be joined by
Characters. Note that Characters that are part of a Combined Unit when the unit gains Random Movement will
gain Random Movement too as they are already part of that unit.
- If the unit has several instances of Random Movement, use the one with the lowest average (the owner chooses
in case of a tie).
21.A.a.23Scoring
Units with at least one model with Scoring are considered to be Scoring Units, which are used for winning Secondary
Objectives (see "Secondary Objectives ", page 35 ). Every army needs Scoring Units to be able to complete Secondary
Objectives, which is why units with Scoring are marked in the Army Books with a special pennant icon:
Scoring can be lost during the game:
- A unit that is Fleeing loses Scoring for as long as it is Fleeing.
- An Ambushing unit that enters the Battlefield on Game Turn 4 or later loses Scoring for the rest of the game.
- A unit that has performed a Post-Combat Reform loses Scoring until the start of the following Player Turn.
- A Vanguarding model loses Scoring until the end of Game Turn 1.
21.A.a.24Scout
Units with Scout may be deployed using Special Deployment rules. All units that will be deployed using the Scout
rule must be declared at step 8 of the Pre-Game Sequence (after Spell Selection), starting with the player that chose
their Deployment Zone. Scout deployment is conducted on Step 5 of the Deployment Phase (Deploy Scouting Units).
If both players have Scouting units, alternate unit placement (one unit at a time), starting with the player who first
completed their normal deployment. Scouting units have three deployment options:
- Fully inside your Deployment Zone, using the normal deployment rules
- Anywhere on the Battlefield at least 18″ away from enemy units
- Anywhere on the Battlefield fully inside a Field, Forest, Ruins, or Water Terrain Feature and at least 12″ away
from enemy units
Scouting units that aren't placed fully inside their Deployment Zone may not declare Charges in the first Player Turn
of the first Game Turn (there are no Scout Charge restrictions after the first Player Turn).
21.A.a.25Skirmisher
The model can always use Shooting Attacks from any rank (models with Skirmisher are not limited to shooting from
first and second rank).
Units with at least one R&F model with Skirmisher are formed into a skirmish formation. They are not placed in base
contact with each other. Instead, models are placed with a 12.5 mm distance (roughly half an inch) between them.
This gap is considered part of the unit for Cover purposes, and will have the same Height as the models in the unit.
Other than this gap between models, units with Skirmisher follow the normal rules for forming units and therefore
have a Front, two Flank, and a Rear Facing, can perform Supporting Attacks, and so on. Units in skirmish formation
never block Line of Sight (remember that this also affects Cover as they can never contribute to Hard Cover).
Units in skirmish formation can only be joined by Characters that have both the same Type and the same Height as
the unit. Unless a Character has the exact same base size as all R&F models in the unit, it is considered Mismatched
for the purpose of placement within the unit. The unit ceases to be in skirmish formation when all R&F models
with Skirmisher are removed as a casualty: immediately contract their skirmish formation into a normal formation,
without moving the centre of the first rank. Nudge any unit as normal to maintain base contact if possible.
See figure 40 for an illustration of this rule.
Figure 40: Skirmish formation.
a) An example of a unit in skirmish formation with a joined Mismatching Character.
b) The same unit Engaged in Combat. Models with bold frame can attack a Character (either 𝐶1 or 𝐶2).
Models with dashed frame cannot attack at all.
21.A.a.26Stand Behind
The model can be placed anywhere inside its unit (it doesn't have to be placed as far forwards as possible, even if it
has Front Rank ). It cannot be placed farther forwards inside a unit than any model with Front Rank but without
Stand Behind. Ignore Stand Behind for models with Mismatching Bases.
21.A.a.27Strider
The model automatically passes Dangerous Terrain Tests caused by Terrain. If more than half of a unit's models have
Strider, the unit never loses Steadfast due to Terrain. Sometimes Strider is linked to a specific type of Terrain, stated
in brackets. In this case, Strider only applies when interacting with this type of Terrain.
21.A.a.28Stubborn
A unit with at least one model with Stubborn ignores Discipline modifiers from the Combat Score difference when
taking Break Tests or Combat Reform Discipline Tests.
21.A.a.29Supernal
All attacks made by the model become Magical Attacks, including Special Attacks and Crush Attacks. In addition,
the model gains Unstable, with the following exception: when a unit consisting entirely of models with Supernal
loses a combat, it must take a Break Test (Stubborn or Steadfast units ignore Discipline modifiers from the Combat
Score difference as normal):
- If the Break Test is passed, ignore all Health Points that would be lost due to Unstable.
- If the Break Test is failed, follow the rules for Unstable as normal.
21.A.a.30Swift Reform
During the Movement Phase, a unit containing one or more models with Swift Reform may execute a Swift Reform
instead of a Reform . The unit makes a Reform with the following exceptions:
- The unit is not prohibited from shooting in the next Shooting Phase (but will still suffer the to-hit modifier for
moving and shooting).
- The unit can perform an Advance Move after the Reform. For the purpose of no model being able to end its
movement with its centre farther away than its Advance Rate from its starting position, measure this distance
after the Reform.
- No model can end its movement (after an Advance Move) with its centre farther away than its March Rate
from its starting position before the Reform.
21.A.a.31Swiftstride
If a unit is composed entirely of models with Swiftstride, its rolls for Charge Range, Flee Distance, Pursuit Distance,
and Overrun Distance are subject to Maximised Roll.
21.A.a.32Tall
Line of Sight drawn to or from a model with Tall is not blocked by models of the same Height (as the model with
Tall), unless the intervening model also has Tall. Remember that this also affects Cover (if a model blocks Line of
Sight it contributes to Hard Cover, otherwise only to Soft Cover).
21.A.a.33Terror
The model is immune to the effects of Terror. When a unit with one or more models with Terror declares a Charge,
its target must immediately take a Panic Test before declaring its Charge Reaction. If the test is failed, the target of
the Charge must declare a Flee Charge Reaction if able to do so.
21.A.a.34Towering Presence
The model gains Tall and can never be joined or join a unit (unless it is a War Platform). A model with Towering
Presence increases its Rally Around the Flag and Commanding Presence ranges by 6".
21.A.a.35Unbreakable
The model's unit automatically passes all Break Tests. Models with Unbreakable can only join or be joined by models
with Unbreakable.
21.A.a.36Undead
The model gains Unstable . Models with Undead cannot perform March Moves, unless their unit starts the March
Move within the range of a friendly model's Commanding Presence . The only Charge Reaction a unit with one or
more models with Undead can perform is Hold.
When units consisting entirely of models with Undead lose Health Points due to Unstable , the number of lost Health
Points can be reduced in certain situations. Apply the modifiers in the following order:
- If the unit contains at least one model with Stubborn , halve the number of lost Health Points, rounding fractions
up.
- If the unit is Steadfast , ignore any excess Health Point losses above 12.
- If the unit receives Rally Around the Flag , reduce the number of lost Health Points by the unit's current Rank
Bonus. Units without any Rank Bonus reduce the number of lost Health Points by 1 instead.
- Apply all other modifiers (from Special Items, Model Rules, spells, etc.) afterwards.
21.A.a.37Unstable
Models with Unstable can only join or be joined by models with Unstable. A unit with one or more models with
Unstable does not take a Break Test when losing a Round of Combat, but instead it loses one Health Point for each
point of Combat Score difference by which it lost the Round of Combat (with no saves of any kind allowed).
The Health Point losses are allotted in the following order:
- R&F models, excluding Champions
- Champion
- Characters, allotted by the owner of the unit as evenly as possible
21.A.a.38Vanguard (X)
After Deployment (including Scouting units), models with Vanguard may perform a 12" move. This move is performed
as a combination of Advance Move and/or Reforms , as in the Movement Phase, including any actions and restrictions
that normally apply to the unit (e.g. Wheeling , joining units, leaving units, and so on). The 12" distance is used
instead of the unit's Advance Rate and March Rate. In case a figure is stated in brackets, this distance is X" instead.
This move cannot be used to move within 12" of enemy units. This is decreased to 6" for enemy units that have
either Scouted or Vanguarded.
If both players have units with Vanguard, alternate moving units one at a time, starting with the player that finished
deploying last (note that this is an exception to the rules for Simultaneous Effects). A Combined Unit counts as a single
unit for this purpose even if parts of the unit perform separate Vanguard moves (like two Characters Vanguarding
out of a Combined Unit). Any game effects that would affect the Combined Unit (such as Banner Enchantments)
remain in effect for all parts of the Combined Unit until all parts of the Combined Unit have finished their Vanguard
move (even if a Character leaves the unit). Instead of moving a unit, a player may declare to not move any more
Vanguarding units.
Units that have moved this way lose Scoring until the end of Game Turn 1 and may not declare Charges in the first
Player Turn (if their side has the first turn).
21.A.a.39War Machine
The model cannot Pursue (which does not prevent it from being affected by Random Movement), declare Charges, or
declare Flee Charge Reactions. Characters can never join units with War Machine, and Characters with War Machine
cannot join units.
When a War Machine fails a Panic Test, instead of Fleeing it is Shaken until the end of the next Player Turn. War
Machines that fail a Break Test are automatically destroyed. War Machines on round bases and units Engaged in
Combat with them cannot make Combat Reforms.
When a unit Charges a War Machine on a round base, it can move into base contact by having its Front Facing contact
any point of the War Machine's base (it must still maximise the number of models in base contact, see "Contact
between Objects ", page 11 and figure 31, page 68). No align move is allowed.
When a unit Breaks from Combat and Flees away from a War Machine on a round base, always Pivot the Fleeing unit
180°, so that it's Rear Facing is in contact with the War Machine's base. Otherwise follow the normal rules for units
Breaking from Combat and Fleeing.
21.A.a.40War Platform
Unless selected as a mount for a Character, a model with War Platform gains Character with the following exceptions:
- It does not count towards the Characters Army Category (for Army List creation).
- It does not count as Character when Deploying Units (it may still be deployed inside units).
- It cannot issue Duels, accept Duels, or Make Way.
- It can perform Swirling Melee.
- It does not count as Character regarding Bodyguard and Multiple Wounds, unless the War Platform is specifically
mentioned in the Bodyguard rule.
The model can join units even if it has Towering Presence , and having Chariot does not prevent it from joining units
without Chariot. Additionally, it does not prevent Characters without Chariot from joining a unit containing a model
with War Platform and Chariot. When joined to a unit, it must always be placed in the centre of the first rank, possibly
pushing back other models with Front Rank , and must keep its position in the centre of the first rank at all times (as
long as it is joined to the unit). If two positions are equally central (e.g. in a unit with an even number of models in
the first rank and a War Platform replacing an uneven number of models per rank), the War Platform can be placed
in either of these positions. If the War Platform cannot be placed in the centre of the the first rank, the model cannot
join the unit. A War Platform with Mismatching Base can never join a unit, and only a single War Platform can be in
the same unit unless specifically stated otherwise.
21.A.a.41Wizard Apprentice
The Wizard selects its spells as described in "Spell Selection ", page 36.
21.A.a.42Wizard Adept
The Wizard gains Channel (1) and selects its spells as described in "Spell Selection ", page 36.
21.A.a.43Wizard Master
The Wizard gains Channel (1) and a +1 modifier to its casting rolls, and selects its spells as described in "Spell
Selection ", page 36.
21.A.a.44Wizard Conclave
The Champion of a unit with Wizard Conclave is a Wizard Adept and gains +1 Health Point in addition to the
normal Attack Value increase associated with being a Champion. This Champion may select up to two spells from
predetermined spells given in the unit entry. This overrides the Spell Selection rules for Wizard Adepts.
Character is a special type of Universal Rule. Unless specifically stated otherwise, any model bought as part of the
Characters Army Category of an Army Book has the Character Universal Rule. A model with this rule is referred to as
a Character.
All Characters gain the Front Rank Universal Rule.
21.B.aLone Characters
Characters can operate as a unit consisting of just a single model. In this case, follow the normal rules for units.
21.B.bCharacters Joined to Units
Characters can operate as part of other units, by joining them. This can be done either by deploying the Character in
the unit or by moving into contact with the unit during the Movement Phase while performing an Advance Move or a
March Move. Units that are Engaged in Combat or Fleeing cannot be joined.
Characters can join other Characters to form a unit consisting only of Characters.
Units that are formed by Characters joining R&F models or other Characters are referred to as Combined Units.
When a Character joins a unit, it must move into a legal position during its Advance or March Move (see "Front Rank",
page 95 ). A Character can choose any legal position it can reach with its move, moving through the unit it joins,
possibly displacing other models (including models with Front Rank). Move displaced models as little as possible in
order to keep all models in legal positions. If the Character does not have a sufficient movement range to reach a
legal position, it cannot join the unit.
When a Character joins a unit with just a single rank, the owner can choose to either displace a model to the second
rank, or to expand the unit&apost;s width and place the displaced model at either side of the first rank.
When a unit is joined by a Character, the unit cannot move any farther in the same Movement Phase. For determining
which model counts as having moved or Marched (e.g. for purposes of shooting), the Character and the unit are
treated individually during the Player Turn in which the Character joined the unit. For example, if the unit hasn't
moved and the Character has Marched in order to join the unit, the Character counts as having Marched, while the
rest of the unit counts as not having moved at all.
Once joined to a unit, the Character is considered as part of the unit for all rules purposes.
21.B.cR&F Models in a Combined Unit Wiped out
If a Combined Unit has all its R&F models removed as casualties, leaving one or more Characters behind, the remaining
Characters will stay a Combined Unit, which is considered to be the same unit for ongoing effects (such as One Turn
spells) and Panic (the unit has not been destroyed; the Characters in this Combined Unit may have to take a Panic
Test if they have suffered 25% or more casualties). They are treated as a new unit for Rally Tests (i.e. Characters that
were part of Fleeing Combined Units at 25% or less of their starting number of Health Points take Rally Tests on
their normal Discipline).
21.B.dLeaving a Combined Unit
A Character can leave a Combined Unit in the Charge Phase and in the Movement Phase if it is able to move (i.e. if it
isn't Engaged in Combat, hasn't already moved, isn't Fleeing, etc.). In both cases, any game effects that would affect
the Combined Unit (such as Banner Enchantments) remain in effect for all parts of the Combined Unit until the end
of the phase (even if a Character leaves the unit), unless specifically stated otherwise (e.g. One Turn spells). The
Character ignores models from the Combined Unit for movement purposes and may make a Flying Movement (if it
has Fly ). Characters leaving a unit do not affect whether or not this unit counts as having moved (e.g. for purposes of
shooting).
21.B.d.1Charging out of a Unit
Declare a Charge with a Character in a Combined Unit (during the Charge Phase as normal) and apply the following
rules:
- Use the Character's model for determining Line of Sight and distance to the enemy unit.
- As soon as the Character declares a Charge, it is considered a separate unit (i.e. it uses its own Advance Rate,
all hits from Stand and Shoot Charge Reactions will hit the Character, in case of a Flee Charge Reaction the
enemy unit Flees away from the Character, etc.).
- Ignore the unit the Character was part of when determining Line of Sight and cover for Stand and Shoot Charge
Reactions.
- The unit itself (including other Characters in the unit) cannot declare Charges in the same Player Turn.
- If the Charge is successful, move the Character out of the unit by Charging as normal.
- If the Charge is not successful, the Character makes a Failed Charge Move out of the unit. If the Failed Charge
Move is too short to place the Character outside 1" of the Combined Unit, the Character is no longer considered
a separate unit and remains in the Combined Unit. All the models in the Combined Unit are Shaken until the
end of the Player Turn.
21.B.d.2Advance/March Moving out of a Combined Unit
A Character counts as part of the unit until it has physically left it. If a Character does not have enough movement to
be placed at least 1″ away from the unit, it cannot leave the unit. A Character cannot leave a unit and rejoin it in
the same phase. If one or more Characters want to leave a Combined Unit during the Movement Phase, apply the
following rules:
- Choose the Combined Unit and take a single March Test if necessary as per "Moving Units ", page 51. The test
applies to both Characters and R&F models in the unit, i.e. if the test is failed, none of the models may perform
a March Move during this Movement Phase.
- Characters leaving the unit and the remainder of the Combined Unit can perform different types of move (see
"Moving Units ", page 51).
- Move any Character that can and wishes to leave the unit, then move the remainder of the unit if applicable.
- Once all elements of the chosen Combined Unit that can and wish to have moved, proceed with the next unit.
21.B.eDistributing Hits onto Combined Units
When a non-Close Combat Attack hits a Combined Unit, there are two possibilities for distributing hits:
-
Characters are:
- of the same Type
- and of the same Height
- and there are 5 or more R&F models in the unit
All hits are distributed onto the R&F Health Pool , Characters
cannot suffer any hits.
-
Characters are:
- of a different Type
- or different Height
- or there are 4 or less R&F models in the unit
The player making the attack distributes hits onto the
R&F Health Pool and Characters. All simultaneous hits
must be distributed as equally as possible, meaning
that no model can take a second hit until all models
have taken a single hit, and so on.
If a unit of 5 or more R&F models contains several Characters of both the same and different Type or Height,
Characters with the same Type and Height as the R&F models are ignored for the hit distributions. Note that hits are
never distributed onto Champions.
21.B.fMake Way
At step 3 of the Round of Combat Sequence , any Character placed in the first rank and not in base contact with an
enemy model may move into contact with an enemy model. This enemy model must be in base contact with the
Character's unit, and it must be attacking the Character's unit in its Front Facing. To perform a Make Way move,
the Character switches position with another model (or models) in its unit; these models cannot be Characters.
Characters with Mismatching Bases can never perform a Make Way move.
21.CCommand Group
Certain units feature the option of upgrading regular models to a Champion, Musician, or Standard Bearer. If so, the
model gains the corresponding Model Rule. These models are referred to as a unit's Command Group.
21.C.aChampion
A Champion gains Front Rank, First Amongst Equals, and Ordering the Charge.
21.C.a.1First Amongst Equals
A Champion gains +1 Attack Value. If it is a Multipart Model, the Attack Value modifier only affects a single model
part, which must be a model part without Harnessed or Inanimate.
21.C.a.2Ordering the Charge
When a unit with a Champion rolls for its Charge Range, it always counts as rolling at least a '4'. If the Charge is still
failed, ignore this rule and use the rolled dice to determine the Failed Charge Move following the normal rules.
For example, a Charging unit with an Advance Rate of 7" containing a Champion declares a Charge against an enemy
unit that is 11" away. In case of a Charge Range roll of 2, the Charge will still be successful since the Charge Range
roll is considered to be 4, resulting in a Charge Range of 11".
21.C.a.3Other Rules Associated with Champions
- Hits from attacks that follow the rules for Distributing Hits are never distributed onto Champions.
-
When removing non-Champion R&F models as casualties and a Champion is in a position that would normally be removed as a casualty,
remove the next eligible R&F model and slide the Champion into the empty spot (see"Removing Casualties ").
-
When Raising Health Points, a Champion is the first model that is brought back if it was previously removed as
a casualty (see "Raise Health Points").
-
Champions may choose to use a different Shooting Weapon than the other R&F models in their unit (see
"Shooting With a Unit").
-
Champions may issue and accept Duels. If a Duel is not accepted, a Champion cannot be chosen as the model
that suffers the penalties for refusing a Duel (see "Duels").
21.C.bMusician
A Musician gains Swift Reform and March to the Beat.
21.C.b.1March to the Beat
A unit within 8" of one or more enemy units that contain a model with March to the Beat suffers −1 Discipline when
taking March Tests. Units with at least one model with March to the Beat ignore this modifier.
21.C.cStandard Bearer
A Standard Bearer gains Combat Bonus. Certain Standard Bearers may have the option to be upgraded with Banner
Enchantments (see "Banner Enchantments ").
21.C.c.1Combat Bonus
A side with Standard Bearers adds +1 to its Combat Score for each Standard Bearer.
21.C.dPlacing and Moving Command Group Models
Musicians and Standard Bearers can be placed anywhere inside their units.
When making an Advance Move, March Move, or Reform with a unit that includes a Musician and/or a Standard
Bearer, these models can be reorganised into a new position as part of the move. This counts towards the distance
moved by the unit (measure the distance from the starting position to the ending position of the centre of the
Command Group model to determine how far it moved).
Note that Champions are placed and moved inside their units according to the rules in Front Rank as normal.
21.C.eRemoving Command Group Casualties
If a Musician or Standard Bearer is to be removed as a casualty, replace the closest non-Command Group R&F model
from the same Health Pool (if there is any) with the Musician or Standard Bearer. The owner chooses if several R&F
models are equally close. It is assumed that another soldier picked up their tool and responsibility. Champions are
however not replaceable and have their own Health Pool, which can be specifically targeted in certain situations (e.g.
by allocating Close Combat Attacks, attacks that target individual models such as attacks from Focused spells, or
attacks that target all models in a unit). When a Champion is removed as a casualty, a non-Champion R&F model is
moved to fill the empty spot. If enough Health Points are lost from a unit's Health Pool to remove all non-Champion
R&F models as casualties, any remaining Health Point losses are allotted to the Champion, even if it is fighting a Duel.
21.DPersonal Protections
If at least one model part has a Personal Protection, the entire Multipart Model follows the rules of the Personal
Protection, unless the model's mount is of Gigantic Height (and therefore has the Massive Bulk Universal Rule). In
this case, only the mount's Personal Protections are applied.
For example, if a Character with Distracting mounts a horse (Standard Height), the Multipart Model is affected
by Distracting. If the Character instead mounts a dragon (Gigantic Height), the Multipart Model is not affected by
Distracting.
21.D.aConditional Application
Personal Protections may only work against certain attacks, which are then stated in brackets after "against". There
may already be some piece of information relative to the rule specified between brackets, as in Aegis (4+). In this
case, the conditions for the rule to work are written in the same brackets, after a comma. This can e.g. be certain
kinds of attacks or attacks with a given Attack Attribute, like Aegis (4+, against Melee Attacks) or Aegis (2+, against
Flaming Attacks).
21.D.bList of Personal Protections
21.D.b.1Aegis (X)
Aegis is a Special Save. A model must reroll successful Aegis Saves against Divine Attacks.
21.D.b.2Cannot be Stomped
For the purposes of Stomp Attacks from enemy models, a model with Cannot be Stomped is never considered to be
of Standard Height.
21.D.b.3Distracting
Close Combat Attacks allocated towards a model with Distracting suffer a −1 to-hit modifier. This to-hit modifier
cannot be combined with any other negative to-hit modifiers.
21.D.b.4Flammable
Flaming Attacks must reroll failed to-wound rolls against a model with Flammable.
21.D.b.5Fortitude (X)
Fortitude is a Special Save. Fortitude Saves cannot be taken against attacks with Lethal Strike that rolled a natural '6'
to wound, or against Flaming Attacks.
21.D.b.6Hard Target (X)
Shooting Attacks targeting a unit that has more than half of its models with Hard Target (X) suffer a −X to-hit modifier.
This rule is cumulative.
21.D.b.7Parry
Parry can only be used against Close Combat Attacks from the Front Facing. The model gains one of the following
effects, whichever would result in a higher Defensive Skill:
-
The model gains +1 Defensive Skill.
-
The model's Defensive Skill is always set to the Offensive Skill of the attacker.
21.EArmour Equipment
There are 2 different types of Armour Equipment. A model can only ever be equipped with one piece of armour
of each type, i.e. an optional Suit of Armour replaces a model's default Suit of Armour if applicable. The types of
armour below are also referred to as mundane armour:
21.E.aSuits of Armour
- Light Armour: +1 Armour.
- Heavy Armour: +2 Armour.
- Plate Armour: +3 Armour.
21.E.bShields
Two-Handed weapons prevent the simultaneous use of a Shield against Melee Attacks (see "Weapons ").
21.FWeapons
Weapons are divided into three categories: Close Combat Weapons, Shooting Weapons, and Artillery Weapons. The
weapons listed in the following pages are also referred to as mundane weapons.
21.F.aClose Combat Weapons
Close Combat Weapons are used in close combat and can confer various benefits and drawbacks to the model's Close
Combat Attacks. The rules for a Close Combat Weapon are only applied when using the weapon in question (i.e. they
don't apply to Special Attacks, such as Stomp Attacks, or when using a different weapon). Mundane Close Combat
Weapons are listed in table 9.
21.F.a.1Choosing a Close Combat Weapon
If a model has more than one Close Combat Weapon, it must choose which one to use in the First Round of Combat,
at step 2 of the Round of Combat Sequence . It must then continue to use the same weapon for the duration of that
combat. All R&F models in a unit must always choose the same Close Combat Weapon, unless they are forced to use
enchanted weapons.
Weapon
Rules
Great Weapon
Two-Handed. Attacks made with a Great Weapon gain +2 Strength, +2 Armour Penetration,
and strike at Initiative Step 0 (regardless of the wielder's Agility).
Halberd
Two-Handed. Attacks made with a Halberd gain +1 Strength and +1 Armour Penetration.
Hand Weapon
All models come equipped with a Hand Weapon as their default equipment. If a model
has any Close Combat Weapon other than a Hand Weapon, it cannot choose to use the
Hand Weapon, unless specifically stated otherwise. Models on foot wielding a Hand
Weapon alongside a Shield gain Parry.
Lance
Attacks made with a Lance and allocated towards models in the wielders' Front Facing
gain Devastating Charge (+2 Strength, +2 Armour Penetration). Infantry cannot
use Lances.
Light Lance
Attacks made with a Light Lance and allocated towards models in the wielders' Front
Facing gain Devastating Charge (+1 Strength, +1 Armour Penetration). Infantry
cannot use Light Lances.
Paired Weapons
Two-Handed . The wielder gains +1 Attack Value and +1 Offensive Skill when using
Paired Weapons. Attacks made with Paired Weapons ignore Parry (while Paired
Weapons are often modelled as two Hand Weapons, they are considered a separate
weapon category for rules purposes).
Spear
Attacks made with a Spear gain Fight in Extra Rank and +1 Armour Penetration.
Attacks made with a Spear gain +2 Agility and an additional +1 Armour Penetration
in the First Round of Combat provided the attacking model's unit is not Charging and
is not Engaged either in its Flank or Rear Facing. Only Infantry can use Spears.
Table 9:Mundane Close Combat Weapons.
21.F.bShooting Weapons
Shooting Weapons are used for making Shooting Attacks. Each model part can normally only use one Shooting
Weapon per phase even if it is equipped with more than one, and all non-Champion R&F models in a unit must use
the same Shooting Weapon. Each Shooting Weapon has a maximum range, a number of shots fired, a Strength, and
an Armour Penetration value, and can have one or more Attack Attributes. Attack Attributes listed for a Shooting
Weapon only apply to the Shooting Attacks made with that weapon. Mundane Shooting Weapons are listed in table
10.
Weapon
Bow
Range
24"
Shots
1
Strength
3
Armour Protection
0
Attack Attributes
Volley Fire
Weapon
Crossbow
Range
30"
Shots
1
Strength
4
Armour Protection
1
Attack Attributes
Unwieldy
Weapon
Handgun
Range
24"
Shots
1
Strength
4
Armour Protection
2
Attack Attributes
Unwieldy
Weapon
Longbow
Range
30"
Shots
1
Strength
3
Armour Protection
0
Attack Attributes
Volley Fire
Weapon
Pistol
Range
12"
Shots
1
Strength
4
Armour Protection
2
Attack Attributes
Quick to Fire
Weapon
Throwing Weapons
Range
8"
Shots
2
Strength
as user
Armour Protection
as user
Attack Attributes
Accurate, Quick to Fire
Table 10: Mundane Shooting Weapons.
21.F.cArtillery Weapons
Artillery Weapons are a special kind of Shooting Weapon. These weapons are often installed on War Machines , but
can on other occasions be carried by Chariots or Gigantic Beasts, or contained within Special Items .
Artillery Weapons are Shooting Weapons that always have the Reload! Attack Attribute, and they may have specific
profiles for range, shots, Strength, Armour Penetration, and other Attack Attributes, which you will find in their
description. Some Artillery Weapons may have further rules as detailed below.
21.F.c.1Cannon
Cannon attacks ignore to-hit modifiers from Soft Cover and Hard Cover. They gain a +1 to-hit modifier when targeting
units consisting entirely of models of Gigantic Height that do not benefit from Cover. On a natural to-hit roll of '1'
a Cannon Misfires: roll on the Misfire Table (table 11) and apply the corresponding result (a to-hit roll
resulting in a Misfire cannot be rerolled).
21.F.c.2Catapult (X×Y)
Catapult attacks ignore to-hit modifiers from Soft Cover and Hard Cover. Resolve Catapult attacks as follows:
-
On a natural to-hit roll of '1', it Misfires: roll on the Misfire Table (table 11) and apply the corresponding
result (a to-hit roll resulting in a Misfire cannot be rerolled).
-
On a successful to-hit roll, the attack gains Area Attack (X×Y) . Resolve the attack with the Strength and Armour
Penetration stated in the Catapult's description.
-
On any other to-hit result, roll to hit with a new Catapult attack, referred to as Partial Hit, and ignore any
Misfire. If it hits, this attack gains Area Attack (X×Y) , but you reduce both X and Y by 1. If either value reaches
0, no hits are inflicted. All hits are at half Strength and half Armour Penetration, rounding fractions up. In
addition, the attack loses all benefits from the Strength, Armour Penetration, and/or Attack Attributes written
in square brackets (if any; see Area Attack). If it misses, no further attack can be generated this way.
21.F.c.3Flamethrower
Flamethrowers do not roll to hit. Instead, roll a D6 (this is not considered a to-hit roll). On a natural roll of '1', it
Misfires: roll on the Misfire Table (table 11) with a −1 modifier and apply the corresponding result. On
any other natural result the attack is successful. Determine which Arc of the target the attacker is Located in:
-
If the attacker is Located in the Front or the Rear Arc, the attack causes D6 hits, +D3 hits for each rank after the
first up to a maximum of +4D3.
-
If the attacker is Located in either Flank Arc, the attack causes D6 hits, +D3 hits for each file after the first up to
a maximum of +=+4D3.
The total number of hits cannot exceed the number of models in the unit.
Some Flamethrowers have a higher Strength, Armour Penetration, and/or additional Attack Attributes stated in
curly brackets (such as Strength 4 {5}, Armour Penetration 1 {2}, {Multiple Wounds (D3)}). If so, use the Strength,
Armour Penetration, and Attack Attributes in curly brackets when shooting at a target within Short Range.
21.F.c.4Volley Gun
The number of shots fired by a Volley Gun is a random number. When rolling for the number of shots for a Volley
Gun attack, if a single natural '6' is rolled (after any reroll), this attack suffers a −1 to-hit modifier; instead, if two or
more natural '6' are rolled, the attack fails and the Volley Gun Misfires: roll on the Misfire Table (table 11)
and apply the corresponding result.
21.F.dThe Misfire Table
A to-hit roll resulting in a Misfire cannot be rerolled. When an Artillery Weapon Misfires, roll a D6 and consult table
11 below (a result of '0' or less may happen when there is a negative modifier to the roll, as for Flamethrowers ).
Result Misfire Effect
Result
Misfire Effect
0
(or less)
Explosion!
All models within D6" of the Misfiring model suffer a hit with Strength 5 and
Armour Penetration 2. The shooting model is then destroyed and removed as a
casualty.
1-2
Breakdown
The model cannot shoot with the weapon for the rest of the game.
3-4
Jammed
The Artillery Weapon may not shoot in the owner's next Player Turn. If the model
is a War Machine , the model is Shaken until the end of the owner's next Player
Turn instead.
5+
Malfunction
The shooting model loses a Health Point with no saves of any kind allowed.
Table 11: Misfire Table.
21.GAttack Attributes
Attack Attributes can be given to a model part, to a weapon, to a spell, or to a Special Attack . Remember that an
Attack Attribute that is given to a unit is automatically given to every model in that unit (see "Units "), and if it
is given to a model, it is automatically given to all model parts of that model (see "Multipart Models ").
Attack Attributes given to a weapon, spell, or Special Attack are always applied to the attacks made with that weapon,
spell, or Special Attack. They are however not applied to any other attacks made by the corresponding model part.
Example: A Character on a Chariot has a a Weapon Enchantment that makes the attacks made with its Hand Weapon
Divine Attacks and Magical Attacks. This means that only the Close Combat Attacks made with the enchanted weapon
become Divine Attacks and Magical Attacks, while all other attacks made by the model (e.g. Impact Hits and Close
Combat Attacks from the horses pulling the Chariot) are not affected.
Attack Attributes are divided into the following sub-categories that define what attacks they affect when given to a
model part. Note that these sub-categories are irrelevant for Attack Attributes given to a weapon, spell, or an attack,
including Special Attacks (so an Attack Attribute with the Close Combat keyword can be given e.g. to a Shooting
Weapon).
Close Combat
A model part with an Attack Attribute with this keyword applies the rules of the Attack Attribute to all its Close
Combat Attacks.
Shooting
A model part with an Attack Attribute with this keyword applies the rules of the Attack Attribute to all its Shooting
Attacks that are not Special Attacks.
Example: A unit is the target of a spell that makes the unit's attacks Divine Attacks and Flaming Attacks. Divine
Attacks has the keyword Close Combat, while Flaming Attacks has the keywords Close Combat and Shooting. This
means that the Close Combat Attacks of all model parts of that unit are now both Divine Attacks and Flaming Attacks,
while the Shooting Attacks of all model parts of the unit are only Flaming Attacks. Any Special Attacks (including
Special Attacks that are Shooting Attacks) or spells from the unit are not affected.
21.G.aConditional Application
Attack Attributes may only work against certain enemies, which are then stated in brackets after "against". There
may already be some piece of information relative to the rule specified between brackets, as in Multiple Wounds (2) .
In this case the conditions for the rule to work are written in the same brackets, after a comma. This can e.g. be all
models from a given Army Book, with a given Model Rule, of a given Height, or of a given Type.
If the Attack Attribute is effective against more than one type of enemy, they are separated by commas. If no comma
but instead "and" is used, this means that the rule works only against enemies that fulfil all criteria. For example,
Multiple Wounds (2, against Large and Beasts, Gigantic) means that Multiple Wounds can be used against models
that are both Large and Beasts, as well as against models that are Gigantic, regardless of the models' Type.
Attack Attributes with Conditional Application can only be applied when the affected attacks are either allocated
towards or distributed onto a Health Pool where all models fulfil the requirements.
21.G.bList of Attack Attributes
21.G.b.1Accurate — Shooting
The attack doesn't suffer the −1 to-hit modifier for shooting at Long Range .
21.G.b.2Area Attack (X×Y)
When the attack hits, determine the position of the attacker's base:
-
In case of a Ranged Attack, determine which Arc of the target the attacker's base is Located in.
-
In case of a Melee Attack, determine which Facing of the target the attacker is Engaged in.
Front or Rear: Choose up to Y different ranks of the target.
Flank: Choose up to Y different files of the target.
For each rank/file selected this way, the unit suffers X hits, to a maximum equal to the number of models in this
rank/file. A single Area Attack can never cause more hits than there are models in the unit.
Some Area Attacks have a higher Strength, Armour Penetration, and/or additional Attack Attributes stated in square
brackets (e.g. Strength 3 [7], Armour Penetration 0 [4], [Multiple Wounds (D3)]). If so, a single hit from this attack,
chosen by the attacker (following the normal rules for Distributing Hits), uses the Strength, Armour Penetration,
and Attack Attributes in brackets. The bracketed values and Attack Attributes are not applied to any other hits.
Figure 41 illustrates examples of different Area Attacks.
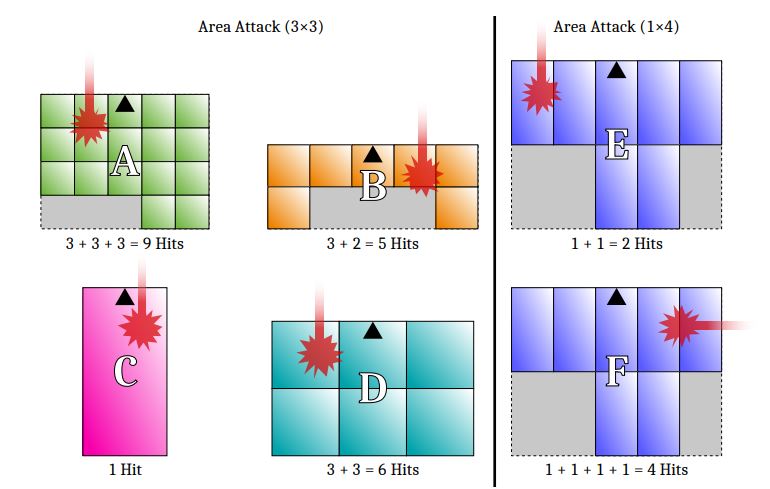
Figure 41: Examples of Area Attacks.
Units A to D are hit by an Area Attack (3×3) from an attacker Located in their Front Arc.
In unit A, there are 3 ranks with more than 3 models. Number of hits: 3 + 3 + 3 = 9.
In unit B, the first rank has more than 3 models, but the second rank only has two models. There is no third rank.
Number of hits: 3 + 2 = 5.
Since unit C is a single model, there will always only be a single rank with a single model. Number of hits: 1.
In unit D, the first and second rank have 3 models. There is no third rank. Number of hits: 3 + 3 = 6.
Unit E is hit by an Area Attack (1×4) from an attacker Located in its Front Arc. The first and second rank have more
than 1 model. There is no third or fourth rank. Number of hits: 1 + 1 = 2.
Unit F is hit by an Area Attack (1×4) from an attacker Located in its Flank Arc. There are more than 4 files with 1 or
more models. Number of hits: 1 + 1 + 1 + 1 = 4.
21.G.b.3Battle Focus – Close Combat
If the attack hits with a natural to-hit roll of '6', the attack causes one additional hit (i.e. usually two hits instead of
one).
In order for Shooting Attacks using Hopeless Shots to cause one additional hit, the first to-hit roll must be a natural
'6' and the second to-hit roll must be successful in order to hit the target.
21.G.b.4Crush Attack – Close Combat
At the end of step 4 of the Round of Combat Sequence (just after issuing and accepting Duels), the model part may
declare that it will use its Crush Attack this Round of Combat. It performs a single Close Combat Attack at Initiative
Step 0, with Strength 10, Armour Penetration 10 (regardless of the user's Agility, Strength, and Armour Penetration),
and Multiple Wounds (D3+1) . The following restrictions apply to Crush Attacks:
-
They cannot be made as Supporting Attacks.
-
They never benefit from any weapons or other Attack Attributes the model part may have.
-
The model part cannot make any other Close Combat Attacks during this Round of Combat (including other
Crush Attacks, but can still use its Special Attacks such as Stomp Attacks or Impact Hits).
21.G.b.5Devastating Charge (X)
A Charging model part with Devastating Charge, or using a weapon with Devastating Charge, gains the Model Rules
and Characteristic modifiers stated in brackets.
For example, a model part with Devastating Charge (+1 Strength, Poison Attacks ) gains +1 Strength and Poison
Attacks when it is Charging.
Remember that Special Attacks cannot be affected by Attack Attributes, so the Model Rules and Characteristic
modifiers gained from Devastating Charge are not applied to Special Attacks, like Impact Hits and Stomp Attacks ,
unless specifically stated otherwise.
This rule is cumulative: a model part with several instances of Devastating Charge applies all Attack Attributes and
Characteristic modifiers from all of them when Charging.
21.G.b.6Divine Attacks – Close Combat
Successful Aegis Saves taken against the attack must be rerolled.
21.G.b.7Fight in Extra Rank – Close Combat
Model parts with Fight in Extra Rank, or using a weapon with Fight in Extra Rank, can make Supporting Attacks
from an additional rank (normally, this means that models with Fight in Extra Rank will be able to make Supporting
Attacks from the third rank). This rule is cumulative, allowing an additional rank to make Supporting Attacks for
each instance of Fight in Extra Rank.
21.G.b.8Flaming Attacks – Close Combat, Shooting
The attack ignores Fortitude Saves and must reroll failed to-wound rolls against models with Flammable.
21.G.b.9Harnessed – Close Combat
Model parts with Harnessed cannot make Supporting Attacks and cannot use weapons. Shooting Weapons carried
by model parts with Harnessed can be used by other model parts of the same model (as long as they do not have
Harnessed or Inanimate). A model with at least one model part with Harnessed is considered to be mounted.
21.G.b.10Hatred – Close Combat
During the First Round of Combat, failed to-hit rolls from attacks with Hatred must be rerolled.
21.G.b.11Inanimate – Close Combat
Model parts with Inanimate cannot make Close Combat Attacks and cannot use Shooting Weapons. Shooting Weapons
carried by model parts with Inanimate can be used by other model parts of the same model (as long as they do not
have Harnessed or Inanimate).
21.G.b.12Lethal Strike – Close Combat
An attack with Lethal Strike that wounds with a natural to-wound roll of '6' has its Armour Penetration set to 10 and
ignores Fortitude Saves.
21.G.b.13Lightning Reflexes – Close Combat
A Close Combat Attack with Lightning Reflexes gains a +1 to-hit modifier. Model parts with this Attack Attribute
wielding Great Weapons do not gain this +1 to-hit modifier, but strike with the Great Weapon at the Initiative Step
corresponding to their Agility instead of always striking at Initiative Step 0.
21.G.b.14Magical Attacks – Close Combat, Shooting
The Attack Attribute doesn't confer any additional effects. However, the Attack Attribute interacts with other rules,
such as Aegis (X, against Magical Attacks).
21.G.b.15March and Shoot – Shooting
March Moving in the same Player Turn does not prevent the attack from being performed, unless the attack is also
subject to Move or Fire.
21.G.b.16Move or Fire – Shooting
The attack may not be used if the attacking model has made an Advance Move, March Move, Random Movement,
Reform, or Pivot during the current Player Turn. Note that the normal limitations still apply (e.g. no shooting after a
Failed Charge Move).
21.G.b.17Multiple Wounds (X) – Close Combat
Unsaved wounds caused by the attacks are multiplied into the value given in brackets (X). If the value is a dice (e.g.
Multiple Wounds (D3)), roll one dice for each unsaved wound from an attack with Multiple Wounds. The amount
of wounds that the attack is multiplied into can never be higher than the Health Points Characteristic of the target
(excluding Health Points lost previously in the battle).
For example, if a Multiple Wounds (D6) attack wounds a unit of Trolls (HP 3) and rolls a '5' for the multiplier, the
number of unsaved wounds is reduced to 3, even if the Troll unit has already lost one or two Health Points previously
in battle.
If Clipped Wings is stated after the X value in brackets, any unsaved wound caused by the attack against a model
with Fly is multiplied into X+1 instead of X.
21.G.b.18Poison Attacks – Close Combat, Shooting
If the attack hits with a natural to-hit roll of '6', it automatically wounds with no to-wound roll needed.
Shooting Attacks using Hopeless Shot automatically wound only if the first to-hit roll is a natural '6'. Note that the
second to-hit roll must still be successful in order to hit the target.
If the attack can be turned into more than one hit (e.g. a hit with Area Attack or Battle Focus ), only a single hit,
chosen by the attacker, automatically wounds. All other hits must roll to wound as normal.
21.G.b.19Quick to Fire – Shooting
The attack doesn't suffer the −1 to-hit modifier for Moving and Shooting.
21.G.b.20Reload! – Shooting
The attack cannot be used for a Stand and Shoot Charge Reaction.
21.G.b.21Toxic Attacks — Close Combat
The attack has its Strength always set to 3 and its Armour Penetration always set to 10.
21.G.b.22Two-Handed
A model using a weapon with Two-Handed cannot simultaneously use a Shield against Melee Attacks.
21.G.b.23Unwieldy – Shooting
The attack suffers an additional −1 to-hit modifier for Moving and Shooting (for a total of −2). When combined with
Quick to Fire, the attack can only ignore the normal −1 to-hit modifier for Moving and Shooting, not the additional −1
to-hit modifier from Unwieldy.
21.G.b.24Volley Fire – Shooting
If at least one model in a unit can draw Line of Sight to the target, then all model parts using Volley Fire in the same
unit ignore all intervening models of their own Height or smaller for Line of Sight and Cover purposes.
In addition, unless making a Stand and Shoot Charge Reaction, models in a unit in Line Formation that has not moved
during this Player Turn may shoot from one additional rank (usually this means that they can shoot from the first
three ranks).
21.G.b.25Weapon Master – Close Combat
At the beginning of each Round of Combat, model parts with Weapon Master may choose which weapon they fight
with. This includes selecting to use a Hand Weapon even if they have other weapons. If armed with a weapon with a
Weapon Enchantment, the model part must still use it.
21.HSpecial Attacks
A model part with Special Attacks can make a special type of attack specified by the corresponding rules. Attacks
made using Special Attacks cannot be affected by weapons or Attack Attributes, unless specifically stated otherwise.
21.H.aList of Special Attacks
21.H.a.1Breath Attack (X)
A model part with Breath Attack can use it only once during the game. If a model has more than one Breath Attack, it
can only use one Breath Attack in a single phase. It can be used either as a Shooting Attack or as a Special Attack
when Engaged in Combat.
-
As a Shooting Attack with March and Shoot: choose a target using the normal rules for Shooting Attacks (it
can be used for a Stand and Shoot Charge Reaction). The attack has a range of 6″. A model part with both a
Breath Attack and a Shooting Weapon can use both in the same Shooting Phase, however only against the same
target.
-
As a Special Attack when Engaged in Combat: the attack is made at the model part's Agility. Declare that you
are using the Breath Attack at the start of the Initiative Step (before rolling to hit), and choose a unit in base
contact as a target.
No matter if it is used as a Shooting or Melee Attack, the target of the Breath Attack suffers 2D6 hits. The Strength,
Armour Penetration, and Attack Attributes (if any) of these hits are given within brackets, such as in Breath Attack
(Str 4, AP 1, Flaming Attacks ). If several models in the same unit have this Special Attack, roll for the number of hits
separately for each model.
21.H.a.2Grind Attacks (X)
A model part with Grind Attacks resolves these attacks at its Agility. It must choose an enemy unit in base contact
with it. The chosen enemy unit suffers a number of hits equal to the value stated in brackets (X). These hits are
resolved with the model part's Strength and Armour Penetration.
If a model has both Grind Attacks and Impact Hits, it may only use one of these rules in the same Round of Combat
(the owner may choose which). If several model parts in a unit have Grind Attacks and if X is a random number (e.g.
Grind Attacks (2D3)), roll for the number of hits separately for each model part.
21.H.a.3Impact Hits (X)
At Initiative Step 10, a Charging model part with Impact Hits must choose an enemy unit that is in base contact with
the attacking model's Front Facing. This unit suffers a number of hits equal to the value stated in brackets (X). These
hits are resolved with the attacking model part's Strength and Armour Penetration.
If a model has both Grind Attacks and Impact Hits, it may only use one of these rules in the same Round of Combat
(the owner may choose which). In case of Multipart Models, only model parts that also have Harnessed or Inanimate
can use Impact Hits. If several models in a unit have Impact Hits, and if X is a random number (e.g. Impact Hits (D6)),
roll for the number of hits separately for each model part.
21.H.a.4Stomp Attacks (X)
At Initiative Step 0, a model part with Stomp Attacks must choose an enemy model of Standard Height in base contact
with it. The chosen model's unit suffers a number of hits equal to the value stated in brackets (X). These hits can only
be distributed onto models of Standard Height (ignore models of a different Height when distributing hits). They are
resolved with the model part's Strength and Armour Penetration.
In case of Multipart Models, only model parts that also have Harnessed can use Stomp Attacks. If several models in
a unit have this Special Attack, and if X is a random number (e.g. Stomp Attacks (D6)), roll for the number of hits
separately for each model part.
21.H.a.5Sweeping Attack
This attack may be used by units containing models with Sweeping Attack. When the unit Advance Moves or March
Moves, you may nominate a single unengaged enemy unit that the unit with Sweeping Attack moved through or
over during this move (meaning their Unit Boundaries were overlapping, even partially). The whole unit makes
the Sweeping Attack against the nominated enemy unit, which is resolved when the March or Advance Move is
completed. Follow the description in the unit entry. These attacks hit automatically and count as ranged Special
Attacks. Each Sweeping Attack can only be performed once per Player Turn.
This chapter is designed as a summary of the Rulebook that you can print out separately and keep at the table when
playing, providing easy access to overviews and summaries of the most important rules. However, it does not replace
the Rulebook. In situations where the summaries are unclear, please refer to the corresponding Rulebook chapters –
the Rulebook always overrules the summaries.
Contents Index 118 Model Rules Summaries
Summaries v2.0
General
Turn
A standard game lasts for 6 Game Turns, each divided
into two Player Turns. Each Player Turn is divided into
five phases, performed in the following order:
1 Charge Phase
2 Movement Phase
3 Magic Phase
4 Shooting Phase
5 Melee Phase
Priority of Modifiers
Priority
Step
Modifier
1
Values set to a certain number and values set to another model’s value. If the
other model’s Characteristic is modified, apply these modifiers before setting the
Characteristic.
2 Multiplication and division. Round fractions up.
3 Addition and subtraction.
4
Rolls always or never succeeding or failing on certain results, and Characteristics
always or never set to a certain value or range of values.
When several modifiers within a group are to be applied to a value or dice roll, apply them in the order
that results in the lowest value or success chance of the dice roll.
Model Type and Height – related Model Rules
Infantry Beast Cavalry Construct
None Swiftstride
Cannot be
Stomped
Swiftstride
Tall
Cannot use
Stomp Attacks
Chariot
Standard Large Gigantic
Model Rules None Stomp Attacks (1)
Fear
Massive Bulk
Stomp Attacks (D6)
Terror
Towering Presence
Full Ranks 5 3 1
Supporting
Attacks
1 3 5
Pre-Game
Pre-Game Sequence
1 Decide on the size of the game
2
Share your Army List with your
opponent
3 Build the Battlefield
4 Determine the Deployment Type
5 Determine the Secondary Objective
6 Determine the Deployment Zones
7 Select Spells
8
Declare Special Deployment
(Ambush, Scout)
9 Deployment Phase
Deployment Phase Sequence
1 Determine who deploys first
2 Take turns deploying units
3 Declare intent to go first or second
4 Deploy remaining units
5
Deploy Scouting units (starting with
the player who finished deploying
first)
6
Move Vanguarding units (starting
with the player who finished deploying
last)
7 Other rules and abilities
8 Roll for first turn
Deployment Types
1 – Frontline Clash
>12″
>12″
2 – Dawn Assault
>12″
>12″
>1/4
(>18″)
>1/4
(>18″)
3 – Counterthrust
>8″
>8″
>20″
4 – Encircle
(>18″)
>9″
>15″
>9″
>15″
Attacker
Defender
>1/4
(>18″)
>1/4
>15″
>9″
5 – Refused Flank
>9″
>9″
6 – Marching Columns
2
4
3 1
5
12″
12″
The player who chooses the Deployment Zone also chooses the short Board Edges for 2, who is the attacker for 4,
and the diagonal for 5.
2 – Dawn Assault: Players may choose up to two units as Ambushers coming from their short Board Edge.
3 – Counterthrust: Players must only deploy a single non-Character unit during their first 3 turns. Units must be
deployed at least 20″ away from enemies.
6 – Marching Columns: Players must only deploy a single non-Character unit during their first 3 turns. Each unit
must be closer to the short Board Edge chosen by the owner than the previous friendly units (War Machines, War
Platforms, Characters, and Scouts ignore this). Possibility to make units Delayed.
Secondary Objectives
1 – Hold the Ground
Have more Scoring Units than your opponent within
6″ of the centre of the board at the end of a Game
Turn (other than the first) to gain a counter.
2 – Breakthrough
Be the player with the most Scoring Units inside
their opponent’s Deployment Zone at the end of the
game (up to 3).
3 – Spoils of War
Three markers on the Centre Line that can be picked
up by Scoring Units by being in contact with them
at the beginning of their Player Turn. At the end of
the game, be the player with the most units carrying
markers.
4 – King of the Hill
After Spell Selection, each player chooses a non-
Impassable Terrain Feature not entirely in their Deployment
Zone. At the end of the game, have Scoring
Units inside your opponent’s Terrain Feature.
5 – Capture the Flags
Destroy more Scoring Units than your opponent.
Each player must have at least 3 Scoring Units; else,
the opponent marks non-Scoring Units to destroy.
6 – Secure Target
Both players place a marker more than 12″ from
their Deployment Zones and 24″ away from the
other marker. Control a marker by having more Scoring
Units within 6″ of it. Be the player controlling
most markers at the end of the game.
The player who chooses the Deployment Zone also starts choosing or placing in 4, 5, and 6.
Summaries v2.0
Charge Phase
Charge Phase Sequence
1 Start of the Charge Phase (and start of the Player Turn)
2 The Active Player chooses a unit and declares a Charge
3
The Reactive Player declares and resolves their Charge
Reaction
4
Repeat steps 2–3 of this sequence until all units that wish
to declare a Charge have done so
5
The Active Player chooses a unit that declared a Charge,
then rolls for Charge Range, and moves the unit
6
Repeat step 5 of this sequence until all units that declared
a Charge have moved
7 End of the Charge Phase
Maximising Contact
Charge Moves must be made so the following conditions are satisfied as best as possible,
in decreasing priority order.
• 1st priority: Make contact with no enemy units other than the one that was Charged.
If it will be unavoidable to make contact with more than one enemy unit, make
contact with as few enemy units as possible. Follow the rules for Multiple Charges.
• 2nd priority: Maximise the total number of Charging units that make contact (note
that this is only applicable when multiple units Charge the same unit).
• 3rd priority: Avoid rotating the Charged unit. If it is unavoidable, rotate the unit
as little as possible. Remember that units Engaged in Combat cannot be rotated.
• 4th priority: Maximise the number of models (on both sides) in base contact with
at least one enemy model (including models fighting across gaps).
Movement Phase
Movement Phase Sequence
1 Start of the Movement Phase
2 Rally Fleeing units and perform any Flee Moves
3
Select one of your units and a type of move (Advance, March,
Reform), then move the unit
4
Repeat step 3, each time choosing a new unit that has not yet
moved in the Movement Phase
5 End of the Movement Phase
Chances to Pass a Charge Range Roll
Probabilities (in percentage) to pass a Charge Range roll depending on the remaining
distance (i.e. the total distance minus the Advance Rate Characteristic):
2 3 4 5 6 7 8 9 10 11 12
Charge 100 97 92 83 72 58 42 28 17 8 3
Charge +
Swiftstride
100 99 98 95 89 81 68 52 36 20 7
Charge +
reroll
100 99 99 97 92 83 66 48 31 16 5
Charge +
Swiftstride
+ reroll
100 99 99 99 99 96 90 77 59 36 14
Terrain
Dangerous Terrain Tests
Dangerous Terrain (DT) Test during March, Charge, Failed Charge, Flee, Pursuit, or Overrun Moves. 1 hit with Armour Penetration 10 that wounds automatically
for each failed roll.
Standard Large Gigantic Chariot
Number of D6 rolled 1 2 3 +1
Infantry Beast Cavalry Construct Notes
Forests DT (1) DT (1) DT (1) for Flying Movement
Ruins DT (1)* DT (1)* DT (2)* DT (2)* *Unless Skirmisher
Water Terrain DT (1)* DT (1)* *Standard Height and on foot only
Walls DT (2)
Other Terrain Rules
Cover and Line of Sight rules described in Shooting Phase.
Rules (not including Cover and Line of Sight)
Fields None
Forests No Steadfast
Infantry with Light Troops are Stubborn (unless Towering Presence or Fly)
Hills Reroll failed Charge Range rolls when Charging from a Hill
Impassable Terrain Models cannot move into or through
Ruins None
Walls Units with Front Facing in contact gain Distracting against Charging enemies
Water Terrain No Steadfast
Lose Flaming Attacks when attacking from or into it with Melee Attacks
Summaries v2.0
Magic Phase
Magic Phase Sequence
1 Start of the Magic Phase
2 Draw a Flux Card
3 Siphon the Veil
4 Cast a spell with one of your models (see “Spell Casting Sequence”)
5 Repeat step 4 for each spell the Active Player wishes to cast
6 End of the Magic Phase
Spell Casting Sequence
A Casting Attempt. If failed, skip steps B–F
B Dispelling Attempt. If successful, skip steps C–F
C
In case of Broken Concentration, skip steps D–E and go directly to
step F
D Resolve the spell effect
E
If applicable, choose target(s) for the Attribute Spell and resolve its
effect
F If applicable, apply the Miscast effect
Casting Attempt
1
The Active Player declares which Wizard is casting which spell and how many Magic Dice will be used. If applicable, they also declare which version of
the spell is used and what its targets are. Between 1 and 5 dice from the Active Player’s Magic Dice pool must be used.
2
The Active Player rolls the chosen number of Magic Dice from the Magic Dice pool and adds the results of the rolled dice and any Casting Modifiers
together. This total is referred to as the total casting roll.
3
The Casting Attempt is passed if the total casting roll is equal to or greater than the spell’s Casting Value. The Casting Attempt fails if the total casting
roll is less than the spell’s Casting Value. Note that the Casting Attempt may Fizzle if 2 or more dice were used (see “Fizzle”).
Dispelling Attempt
1
The Reactive Player declares how many Magic Dice will be used from their pool. The Reactive Player must use at least 1 dice for a Dispelling Attempt.
Note that there is no maximum number of Magic Dice allowed to be used for a Dispelling Attempt.
2
The Reactive Player rolls the chosen number of dice and adds the results of the rolled dice and any Dispelling Modifiers together, to get the total dispelling
roll.
3
The Dispelling Attempt is successful if the total dispelling roll is equal to or greater than the total casting roll. If so, the spell is dispelled and the spell
is not cast. The Dispelling Attempt fails if the total dispelling roll is less than the total casting roll. If so, the spell is successfully cast. Note that the
Dispelling Attempt may Fizzle if 2 or more dice were used (see “Fizzle”).
Bound Spell Casting Attempt
1
The Active Player declares which model will cast which Bound Spell, and whether they will use 2 or 3 Magic Dice. If applicable, the Active Player also
declares the targets of the spell. The spell is always cast with the basic version as Bound Spells cannot be Boosted.
2 The Active Player removes the chosen number of Magic Dice (2 or 3) from their Magic Dice pool (do not roll them).
3 The Casting Attempt is always passed.
Fizzle
When a Casting Attempt or Dispelling Attempt is failed for which 2 dice or more
were used, any Magic Dice that rolled a natural ‘1’ are returned to the Magic
Dice pool they were taken from. Note that this does not apply to passed Casting
Attempts that are then dispelled.
Flux Cards
Flux Card 1 2 3 4 5 6 7 8
Magic Dice 4 5 5 5 5 6 6 7
Veil Tokens 3 2 5 7 9 5 7 7
Miscast Modifiers +1 -1
Miscast
Three of a kind: Miscast Effects (after resolving the spell and Attribute effects, unless 111)
000 or lower No effect.
111 Broken Concentration
The Casting Attempt fails (apply Fizzle as normal).
222 Witchfire
The Caster’s unit suffers 1D6 hits with Armour Penetration 2, Magical Attacks, and a Strength equal to the number of
Magic Dice that were used for the casting roll.
333 Magical Inferno
The Caster’s unit suffers 2D6 hits with Armour Penetration 2, Magical Attacks, and a Strength equal to the number of
Magic Dice that were used for the casting roll.
444 Amnesia
The Caster cannot cast the Miscast spell anymore this game.
555 Backlash
The Caster suffers 2 hits that wound on 4+ with Armour Penetration 10 and Magical Attacks.
666 Implosion
The Caster suffers 4 hits that wound on 4+ with Armour Penetration 10 and Magical Attacks.
777 or higher Breach in the Veil
The Caster’s model is removed as a casualty (no saves of any kind allowed).
Summaries v2.0
Shooting Phase
Shooting Phase Sequence
1 Start of the Shooting Phase
2 Select one of your units and perform a Shooting Attack
3
Repeat step 2 with a different unit that has not performed a Shooting
Attack during this phase yet
4
When all units that can (and want to) shoot have done so, the Shooting
Phase ends
To-Hit Modifiers
Long Range −1 Stand and Shoot −1
(if Accurate) 0 Soft Cover −1
Moving and Shooting −1 Hard Cover −2
(if Quick to Fire) 0 Hard Target (X) −X
(if Unwieldy) −2
(if both) −1
Line of Sight and Cover
Determine Line of Sight, range, and Cover for each shooting model. A model
is considered to have Line of Sight to a unit if it can draw Line of Sight (in the
unit’s Front Arc) to any part of the other unit’s Unit Boundary.
Choose a point on the shooting model’s Front Facing. From the chosen point,
check how large the fraction of the Target Facing is that is behind obstructions.
If half or more of the Target Facing is obscured, the target benefits from Cover.
Models always ignore their own unit and the Terrain Feature they are inside
for Cover purposes.
Selection of Shooting Rules
Each unit can only shoot once per phase. All models in the same unit must
shoot at the same target. Only models in the first and second rank may shoot.
All R&F models except Champions must use the same type of Shooting Attack.
In case of Multipart Models, each model part can make a Shooting Attack in the
same phase.
Hopeless Shots: In order to hit on 7+, hit on 6+ and then roll 4+.
Misfire Table for Artillery Weapons
Result Misfire Effect
0
(or less)
Explosion!
All models within D6″ of the Misfiring model suffer a hit
with Strength 5 and Armour Penetration 2. The shooting
model is then destroyed and removed as a casualty.
1–2
Breakdown
The model cannot shoot with the weapon for the rest of the
game.
3–4
Jammed
The Artillery Weapon may not shoot in the owner’s next
Player Turn. If the model is a War Machine, the model is
Shaken until the end of the owner’s next Player Turn instead.
5+
Malfunction
The shooting model loses a Health Point with no saves of
any kind allowed.
Soft Cover (−1 to hit)
No Cover
Large Large Standard Large
Large
Large
Standard Standard
Standard
Standard Standard Standard
Gigantic
Gigantic Gigantic
Large Large Gigantic Gigantic Large Gigantic
Gigantic Standard Gigantic
All other Height combinations yield either Hard Cover or no Line of Sight, depending on whether the target is completely obscured by the intervening model or not.
Line of Sight Cover
Fields Covering (inside) Soft Cover for non-Towering Presence
Forests Covering (inside or behind) Soft Cover
Hills
Opaque Terrain
Covering (behind)
Soft Cover if partially on
Hard Cover if entirely off
Impassable Terrain Opaque Terrain Hard Cover
Ruins Covering (inside) Hard Cover for non-Towering Presence
Walls Covering (behind and Defending) Hard Cover for non-Towering Presence
Summaries v2.0
Melee Phase
Melee Phase Sequence
1 Start of the Melee Phase
2 Apply any No Longer Engaged
3
The Active Player chooses a combat that has not already been fought
during this Melee Phase
4 Fight a Round of Combat
5 Repeat steps 2–4
6
Once all units that were Engaged in Combat at the start of the phase
have fought, the Melee Phase ends
Combat Score Summary
Health Points Lost by
Enemy Units
+1 for each Health Point
Overkill +1 for each Health Point (maximum +3)
Charge +1
Rank Bonus
+1 for each Full Rank after the first
(maximum +3)
Standard
+1 for each Standard and Battle Standard
Bearer
Flank Bonus +1 or +2
Rear Bonus +2 or +3
Round of Combat Sequence
1 Start of the Round of Combat
2 Choose a weapon
3 Make Way
4 Issue and accept Duels
5 Determine the Initiative Order
6
Roll Melee Attacks, starting with the first Initiative Step:
1. Allocate attacks
2. Roll to hit, to wound, saves, and remove casualties
3. Repeat 1. and 2. for the next Initative Step
7
Calculate which side wins the Round of Combat. Losers roll Break
Tests
8 Roll Panic Tests for units within 6″ of friendly Broken units
9 Decide to Restrain or to Pursue
10 Roll Flee Distances
11 Roll Pursuit Distances
12 Move Fleeing units
13 Move Pursuing units
14 Post-Combat Pivots and Post-Combat Reforms
15 Combat Reforms
16 End of the Round of Combat. Proceed to the next combat
Post-Game
Battle Points
Victory Point Difference Battle Points
Percentage of
Army Points
(if playing with
4500 Army Points)
Winner Loser
0–5% 0–225 10 10
>5–10% 226–450 11 9
>10–20% 451–900 12 8
>20–30% 901–1350 13 7
>30–40% 1351–1800 14 6
>40–50% 1801–2250 15 5
>50–70% 2251–3150 16 4
>70% >3150 17 3
Winning Secondary Objective +3 −3
Scoring Victory Points
Enemy unit VP provided
Removed as a casualty 100% of point cost
Fleeing 50% of point cost
Shattered 50% of point cost
Shattered and Fleeing 100% of point cost
General or BSB removed as
casualties
100% of point cost plus 200 VP each
Shattered: Units at 25% or less of their starting number of Health Points at
the end of the game. Characters are counted separately from the units they
have joined.
Attacks
Attack Sequence
1 Attacker allocates attacks if applicable.
2 Determine number of hits.
3 Attacker distributes hits if applicable.
4 Attacker rolls to wound; if successful, proceed.
5 Defender makes Armour Save rolls; if failed, proceed.
6 Defender makes Special Save rolls; if failed, proceed.
7 Defender removes Health Points or casualties.
8 Defender takes Panic Tests if necessary.
Close Combat To-Hit Table
Offensive Skill minus Defensive Skill Needed roll to hit
4 or more 2+
1 to 3 3+
0 to −3 4+
−4 to −7 5+
−8 or less 6+
To-Wound Table
Strength minus Resilience Needed roll to wound
2 or more 2+
1 3+
0 4+
−1 5+
−2 or less 6+
Armour Saves
Armour minus AP Needed roll to disregard the wound
0 or less No save possible
1 6+
2 5+
3 4+
4 3+
5 or 6 2+
Summaries v2.0
Psychology
Panic Test Triggers
• A friendly unit is destroyed within 6″ of the unit (including Fleeing off
the board).
• A friendly unit Breaks from Combat within 6″ of the unit.
• A friendly unit Flees through the unit’s Unit Boundary.
• In a single phase, the unit suffers Health Point losses equal to or greater
than 25% of the number of Health Points that it had at the start of the
phase. This does not apply to single model units that started the game
as a single model (i.e. with a starting number of 1 model on the Army
List).
Units that fail a Panic Test Flee directly away from the closest enemy unit, or
from the enemy unit which caused the Panic Test (Centre to Centre). Units do
not take Panic Tests if they are Engaged in Combat, if they are already Fleeing,
or if they already passed a Panic Test during this phase.
Shaken
A Shaken model cannot perform any of the following actions:
• Declare Charges
• Pursuit
• Overrun
• Advance Move
• March Move
• Reform (it can Combat Reform and Post-Combat Reform)
• Random Movement
• Shooting Attack
Fleeing
When a unit is Fleeing, it cannot perform any voluntary actions (a voluntary
action is an action that a unit would have the option to not perform). This
includes (but is not limited to):
• Declare Charges
• Charge Reactions other than Flee
• Move in any way other than a Flee Move
• Shoot
• Channel
• Cast spells or activate One use only Special Items which need to be
activated voluntarily
Models cannot receive Commanding Presence or Rally Around the Flag from a
Fleeing model.
Decimated
Units at 25% or less of their starting Health Points (the number taken from
the Army List), including joined Characters, are referred to as Decimated. Decimated
units must take their Rally Test at half their Discipline, rounding fractions
up.
Probabilities
Chances to Pass a Discipline Test
Probabilities (in percentage) to pass a Discipline Test depending on the Discipline value of the unit (after modifiers) and the available rules:
Discipline 2 3 4 5 6 7 8 9 10
2D6 3 8 17 28 42 58 72 83 92
2D6 + reroll 5 16 31 48 66 83 92 97 99
2D6 + Minimised 7 20 36 52 68 81 89 95 98
2D6 + Minimised + reroll 14 36 59 77 90 96 99 99 99
2D6 + Maximised 1 2 5 11 19 32 48 64 80
2D6 + Maximised + reroll 1 4 10 20 35 54 73 87 96
Chances to Successfully Cast a Spell
Probabilities (in percentage) to successfully cast a spell depending on the Casting Value of the spell (after any modifiers to the casting roll) and on the number of
Magic Dice:
Casting Value 3+ 4+ 5+ 6+ 7+ 8+ 9+ 10+ 11+ 12+ 13+ 14+ 15+ 16+ 17+ 18+ Miscast
1D6 67 50 33 17 0 0 0 0 0 0 0 0 0 0 0 0 0
2D6 97 92 83 72 58 42 28 17 8 3 0 0 0 0 0 0 0
3D6 99 99 98 95 91 84 74 63 50 38 26 16 10 5 2 1 3
4D6 98 98 98 98 98 97 94 90 84 76 66 56 44 34 24 16 10
5D6 100 100 100 99 99 99 99 98 97 94 90 85 78 70 60 50 21
24 Alphabetical Index
A | B | C | D | E | F | G | H | I | K | L | M | N | O | P | Q | R | S | T | U | V | W
A
d
Accepting a Duel . . . . . . . . . . . . . . . 70
Accurate . . . . . . . . . . . . . . . . . 62 , 110
Active Player . . . . . . . . . . . . . . . . . . . . 5
Advance Move . . . . . 13 , 51 , 83 , 95
Advance Rate (Adv) . . . . . . . . . . . . 14
Aegis . . . . . . . . . . . . . . . . . . . . 21 , 105
Agility (Agi) . . . . . . . . . . . . . . . 14 , 17
Aim . . . . . . . . . . . . . . . . . . . . . . . . . . . 62
Aligning Units . . . . . . . . . . . . 41 , 101
Allocating Attacks . . . . . . . . . . . . . 68
Ambush . . . . . . . . . . . . . . . . . . . . . . . 93
Arcs (Unit) . . . . . . . . . . . . . . . . . . . . . 9
Area Attack . . . . . . . . . . . . . . . . . . 110
Armour (Arm) . . . 14 , 17 , 20 , 106
Armour Enchantments . . . . . . . 116
Armour Penetration (AP)
. . . . . . . . . . . . . . . . . . . . . . 14 , 18 , 20
Armour Saves . . . . . . . . . . . . . . . . . 20
Army Categories . . . . . . . . . . . . . . . 22
Army Lists . . . . . . . . . . . . . . . . 22 , 31
Army Points . . . . . . . . . . . . . . . . . . . 22
Artefacts . . . . . . . . . . . . . . . . . . . . . 117
Artillery Weapons . . . . . . . . . . . . 108
Attack Attributes . . . . . . . . . . . . . 109
Attack Sequence . . . . . . . . . . . . . . . 19
Attack Value (Att) . . . . . . . . . . 14 , 68
Attacks . . . . . . . . . . . . . . . . . . . . . . . . 18
Attribute Spells . . . . . . . . . . . . . . . . 55
Augment (Spell Type) . . . . . . . . . . 56
Aura (Spell Type) . . . . . . . . . . . . . . 56
B
d
Banner Enchantments . . . . . . . . 116
Base Contact . . . . . . . . . . . . . . . . . . 10
Bases . . . . . . . . . . . . . . . . . . . . . . . . . . . 7
Battle Focus . . . . . . . . . . . . . . . . . . 112
Battle Points . . . . . . . . . . . . . . . . . . 85
Battle Standard Bearer . 71 , 85 , 93
Bearer . . . . . . . . . . . . . . . . . . . . . . . 117
Beast . . . . . . . . . . . . . . . . . . . . . . . . . 87
Being Inside an Arc . . . . . . . . . . . . . 9
Blocked Path . . . . . . . . . . . . . . . . . . 46
Board Edge . . . . . . . . . . . . . . . . . . . . 91
Bodyguard . . . . . . . . . . . . . . . . . . . . 93
Boosted Spells . . . . . . . . . . . . . . . . . 57
Bound Spells . . . . . . . . . . . . . . 56 , 59
Bow . . . . . . . . . . . . . . . . . . . . . . . . . 107
Break Test . . . . . . . . . . . . . 15 , 72 , 99
Breakthrough . . . . . . . . . . . . . . . . . 35
Breath Attack . . . . . . . . . . . . . . . . 114
Broken Concentration . . . . . . . . . 58
Broken Ranks . . . . . . . . . . . . . 90 , 91
Building an Army . . . . . . . . . . . . . . 22
Building the Battlefield . . . . . . . . 33
C
d
Cannon . . . . . . . . . . . . . . . . . . . . . . 108
Cannot be Stomped . . . . . . . . . . . 105
Capture the Flags . . . . . . . . . . . . . . 35
Caster (Spell Type) . . . . . . . . . . . . 56
Caster’s Unit (Spell Type) . . . . . . 56
Casting Attempt . . . . . . . . . . . . . . . 57
Casting Bound Spells . . . . . . . . . . 59
Casting Modifiers . . . . . . . . . . . . . . 58
Casting Spells . . . . . . . . . . . . . . . . . 57
Casting Value . . . . . . . . . . . . . . . . . . 55
Casualties . . . . . . . . . . . . . . . . . . . . . 80
Catapult . . . . . . . . . . . . . . . . . . . . . 108
Cavalry . . . . . . . . . . . . . . . . . . . . . . . 87
Centre of Unit . . . . . . . . . . . . . . . . . . . 8
Champions . . . 68 , 69 , 80 , 95 , 104
Channel . . . . . . . . . . . . . . . 54 , 84 , 93
Character Mounts . . . . . . . . . . . . . 88
Characteristic Profiles . . . . . . . . . 14
Characteristic Test . . . . . . . . . . . . . 15
Characteristics . . . . . . . . . . . . . . . . 14
Characters . . . . . . . . . . . 69 , 95 , 102
Charge Move . . . . . . . . . . . . . . 13 , 41
Charge Phase . . . . . . . . . . . . . . . . . . 39
Charge Range . . . . . . . . . . . . . . . . . 41
Charge Reactions . . . . . . . . . . . . . . 40
Charging a Fleeing Unit . . . . . . . . 43
Charging Downhill . . . . . . . . . . . . . 90
Charging Momentum . . . . . . . . . . 67
Chariot . . . . . . . . . . . . . . . . . . . . . . . . 93
Clipped Wings . . . . . . . . . . . . . . . 113
Close Combat (Attack Attribute)
. . . . . . . . . . . . . . . . . . . . . . . . . . . . 109
Close Combat Attacks . . . . . . . . . . 18
Close Combat Weapons . . . . . . . 106
Close Formation . . . . . . . . . . . . . . . . 8
Combat . . . . . . . . . . . . . . . . . . . . . . . 66
Combat Bonus . . . . . . . . . . . . . . . . . 71
Combat Reforms . . . . . . . 72 , 79 , 99
Combat Score . . . . . . . . . . . . . . . . . 71
Combined Charges . . . . . . . . . . . . . 43
Combined Units . . . . . . . . . . . . . . 102
Command Group . . . . . . . . . . . . . 104
Commanding Presence . . . . . 84 , 94
Construct . . . . . . . . . . . . . . . . . . . . . 87
Counterthrust . . . . . . . . . . . . . . . . . 34
Cover . . . . . . . . . . . . . . . . . . . . . 62 , 89
Covering Terrain . . . . . . . . . . . . . . 89
Crossbow . . . . . . . . . . . . . . . . . . . . 107
Crush Attack . . . . . . . . . . . . . . . . . 112
D
d
D3 . . . . . . . . . . . . . . . . . . . . . . . . . . . . . 6
D6 . . . . . . . . . . . . . . . . . . . . . . . . . . . . . 6
Damage (Spell Type) . . . . . . . . . . . 56
Dangerous Terrain . . . . . . . . . . . . . 89
Dawn Assault . . . . . . . . . . . . . . . . . 34
Decimated . . . . . . . . . . . . . . . . . . . . 84
Declaring Charges . . . . . . . . . . . . . 39
Declaring Intent to Go First . . . . 37
Declaring Special Deployment
. . . . . . . . . . . . . . . . . . . . . . . . . . 32 , 36
Defending a Wall . . . . . . . . . . . . . . 91
Defensive Characteristics . . . . . . 14
Defensive Skill (Def) . . . . . . . 14 , 69
Deploying Remaining Units . . . . 37
Deploying Units . . . . . . . . . . . . . . . 37
Deployment Phase . . . . . . . . . . . . . 37
Deployment Types . . . . . . . . . . . . . 33
Deployment Zones . . . . . . . . . . . . . 36
Determining Number of Hits . . . 19
Devastating Charge . . . . . . . . . . . 112
Dice . . . . . . . . . . . . . . . . . . . . . . . . . . . . 6
Direct (Spell Type) . . . . . . . . . . . . . 56
Direction Dice . . . . . . . . . . . . . . . . . . 6
Discipline (Dis) . . . . . . . . 14 , 15 , 17
Dispelling Bound Spells . . . . . . . . 59
Dispelling Modifiers . . . . . . . . . . . 58
Dispelling Spells . . . . . . . . . . . . . . . 57
Disrupted Ranks . . . . . . . . . . . . . . . 72
Distracting . . . . . . . . . . . . . . . . . . . 105
Distributing Hits . . . . . . . . . 19 , 103
Divine Attacks . . . . . . . . . . . . . . . 112
Dominant . . . . . . . . . . . . . . . . . . . . 117
Doused Flames . . . . . . . . . . . . . . . . 91
Duels . . . . . . . . . . . . . . . . 67 , 69 , 101
Duplicated Model Rules . . . . . . . . 92
Duplication Limits . . . . . . . . . . . . . 24
E
d
Elevated Position . . . . . . . . . . . . . . 90
Enchantments . . . . . . . . . . . . . . . 116
Encircle . . . . . . . . . . . . . . . . . . . . . . . 34
Enemy . . . . . . . . . . . . . . . . . . . . . . . . . 5
Contents Index 125 Model Rules Summaries
Engaged in Combat
. . . . . . . . . . . . . . 40 , 43 , 51 , 61 , 83
Engineer . . . . . . . . . . . . . . . . . . . . . . 94
Excess HP Losses . . . . . . . . . . . . . . 80
F
d
Facings (Unit) . . . . . . . . . . . . . . . . . . 8
Failed Charge . . . . . . . . . . 13 , 41 , 46
Fear . . . . . . . . . . . . . . . . . . . . . . . . . . 94
Fearless . . . . . . . . . . . . . . . . . . . . . . . 94
Feigned Flight . . . . . . . . . . . . . . . . . 94
Fields . . . . . . . . . . . . . . . . . . . . . . . . . 90
Fight in Extra Rank . . . . . . . . . . . 112
Fighting a Duel . . . . . . . . . . . . . . . . 70
First Amongst Equals . . . . . . . . . 104
First Round of Combat . . . . . . . . . 66
First Turn . . . . . . . . . . . . . . . . . . . . . 38
Fizzle . . . . . . . . . . . . . . . . . . . . . . . . . 58
Flamethrower . . . . . . . . . . . . . . . . 108
Flaming Attacks . . . . . . . . . . . . . . 112
Flammable . . . . . . . . . . . . . . . . . . . 105
Flank (Unit) . . . . . . . . . . . . . . . . . . . . 8
Flank Bonus . . . . . . . . . . . . . . . . . . . 71
Flee Charge Reaction . . . . . . 40 , 94
Flee Moves . . . . . . . . . . . . . . . . . . . . 50
Fleeing Units . . . . . . 43 , 50 , 73 , 84
Flux Cards . . . . . . . . . . . . . . . . . . . . . 53
Fly . . . . . . . . . . . . . . . . . . . . . . . . . . . . 94
Flying Movement . . . . . . . . . . . . . . 94
Focused (Spell Type) . . . . . . . . . . . 56
Forests . . . . . . . . . . . . . . . . . . . . . . . . 90
Formations . . . . . . . . . . . . . . . . . . . . . 8
Fortified Position . . . . . . . . . . . . . . 91
Fortitude . . . . . . . . . . . . . . . . 21 , 106
Frenzy . . . . . . . . . . . . . . . . . . . . . . . . 95
Friendly . . . . . . . . . . . . . . . . . . . . . . . . 5
Front (Unit) . . . . . . . . . . . . . . . . . . . . 8
Front Rank . . . . . . . . . . . . . . . . 78 , 95
Frontline Clash . . . . . . . . . . . . . . . . 33
Full Ranks . . . . . . 8 , 71 , 72 , 87 , 97
G
d
Game Turns . . . . . . . . . . . . . . . . . . . . 5
Gaps in Units . . . . . . . . . . . 8 , 10 , 68
General . . . . . . . . . . . . . . . . . . . 24 , 97
Ghost Step . . . . . . . . . . . . . . . . . . . . 96
Gigantic . . . . . . . . . . . . . . . . . . . . . . . 87
Global Characteristics . . . . . . . . . . 14
Grand Armies . . . . . . . . . . . . . . . . . 25
Great Weapon . . . . . . . . . . . . . . . . 107
Grind Attacks . . . . . . . . . . . . . . . . 115
Ground (Spell Type) . . . . . . . . . . . 56
Guerilla Warfare . . . . . . . . . . . . . . . 90
H
d
Halberd . . . . . . . . . . . . . . . . . . . . . . 107
Hand Weapon . . . . . . . . . . . . . . . . 107
Handgun . . . . . . . . . . . . . . . . . . . . . 107
Hard Cover . . . . . . . . . . . . . . . . . . . . 64
Hard Target . . . . . . . . . . . . . . . . . . 106
Harnessed . . . . . . . . . . . . . . . . . . . 112
Hatred . . . . . . . . . . . . . . . . . . . . . . . 112
Health Points (HP) . . . . . . . . . 14 , 21
Health Pools . . . . . . . . . . . . . . . . 8 , 80
Heavy Armour . . . . . . . . . . . . . . . 106
Heights . . . . . . . . . . . . . . . . . . . . . . . 87
Hereditary Spells . . . . . . . . . . . . . . 55
Hex (Spell Type) . . . . . . . . . . . . . . . 56
Hidden Lists . . . . . . . . . . . . . . . . . . . 31
Hills . . . . . . . . . . . . . . . . . . . . . . . . . . 90
Hold (Charge Reaction) . . . . . . . . 40
Hold the Ground . . . . . . . . . . . . . . . 35
Hopeless Shots . . . . . . . . . . . . . . . . 65
I
d
Impact Hits . . . . . . . . . . . . . . . . . . 115
Impassable Terrain . . . . . . . . 13 , 91
Impossible Charge . . . . . . . . . . . . . 46
Inanimate . . . . . . . . . . . . . . . . . . . . 113
Infantry . . . . . . . . . . . . . . . . . . . . . . . 87
Initiative Order . . . . . . . . . . . . . . . . 67
Initiative Step . . . . . . . . . . . . . . . . . 67
Insignificant . . . . . . . . . . . . . . . . . . . 96
Instant . . . . . . . . . . . . . . . . . . . . . . . . 56
Issuing a Duel . . . . . . . . . . . . 67 , 101
K
d
King of the Hill . . . . . . . . . . . . . . . . 35
L
d
Lance . . . . . . . . . . . . . . . . . . . . . . . . 107
Large . . . . . . . . . . . . . . . . . . . . . . . . . 87
Learned Spells . . . . . . . . . . . . . . . . 55
Lethal Strike . . . . . . . . . . . . . . . . . 113
Light Armour . . . . . . . . . . . . . . . . 106
Light Lance . . . . . . . . . . . . . . . . . . 107
Light Troops . . . . . . . . . . . . . . . . . . 97
Lightning Reflexes . . . . . . . . . . . . 113
Line Formation . . . . . . . . . . . . . . . . . 8
Line of Sight . . . . . . . . . . . . . . . . . . . 12
Located in an Arc . . . . . . . . . . . . . . . 9
Lone Characters . . . . . . . . . . 52 , 102
Long Range . . . . . . . . . . . . . . . . . . . 62
Longbow . . . . . . . . . . . . . . . . . . . . 107
Losing Base Contact . . . . . . . . . . . 69
Losing Health Points . . . . . . . 21 , 80
Losing the Last Health Point . . . . 80
M
d
Magic Dice . . . . . . . . . . . . . . . . . . . . 53
Magic Phase . . . . . . . . . . . . . . . . . . . 53
Magic Resistance . . . . . . . . . . . . . . 97
Magical Attacks . . . . . . . . . . . . . . 113
Magical Effects . . . . . . . . . . . . . . . . 59
Magical Move . . . . . . . . . . . . . . . . . . 59
Make Way . . . . . . . . . . . . . . . . . . . 104
March and Shoot . . . . . . . . . . . . . 113
March Move . . . . . . . 13 , 51 , 83 , 95
March Rate (Mar) . . . . . . . . . . . . . . 14
March Test . . . . . . . . . . . . . . . . . . . . 51
March to the Beat . . . . . . . . . . . . 104
Marching Columns . . . . . . . . . . . . . 34
Massive Bulk . . . . . . . . . . . . . . . . . . 97
Matching Bases . . . . . . . . . . . . . . . . 95
Maximised Roll . . . . . . . . . . . . . . . . . 6
Maximising Contact . . . . . . . . . . . . 42
Measuring Distances . . . . . . . . . . . 12
Melee Attacks . . . . . . . . . . . . . 18 , 67
Melee Phase . . . . . . . . . . . . . . . . . . . 66
Minimised Roll . . . . . . . . . . . . . . . . . . 6
Minimum Army Size . . . . . . . . . . . 24
Miscast Modifiers . . . . . . . . . . . . . . 58
Miscast Table . . . . . . . . . . . . . . . . . . 58
Miscasts . . . . . . . . . . . . . . . . . . . . . . 58
Misfire Table . . . . . . . . . . . . . . . . . 109
Mismatching Bases . . . . . . . . . . . . 96
Missile (Spell Type) . . . . . . . . . . . . 56
Mission Impassible . . . . . . . . . . . . 91
Model Arcs . . . . . . . . . . . . . . . . . . . . . 8
Model Classification . . . . . . . . . . . 87
Model Facings . . . . . . . . . . . . . . . . . . 7
Model Heights . . . . . . . . . . . . . . . . . 87
Model Rules . . . . . . . . . . . . . . . . . . . 92
Model Types . . . . . . . . . . . . . . . . . . 87
Models . . . . . . . . . . . . . . . . . . . . . . . . . 7
Modifiers . . . . . . . . . . . . . . . . . . . . . 16
Mounted Models . . . . . . . . . . . . . . . 87
Mounts . . . . . . . . . . . . . . . . . . . . . . . 88
Move or Fire . . . . . . . . . . . . . . . . . 113
Movement Phase . . . . . . . . . . . . . . 50
Moving and Shooting . . . . . . . . . . 62
Moving Chargers . . . . . . . . . . . . . . 41
Moving Fleeing Units . . . . . . 50 , 73
Moving Pursuing Units . . . . . . . . . 73
Moving Single Model Units . . . . . 52
Moving Units . . . . . . . . . . . . . . . . . . 51
Multipart Models . . . . . . . . . . . . . . . 7
Multiple Charges . . . . . . . . . . . . . . 43
Multiple Wounds . . . . . . . . . . . . . 113
Musicians . . . . . . . . . . . . . . . . . . . . 104
N
d
Natural Roll . . . . . . . . . . . . . . . . . . . . 6
No Longer Engaged . . . . . . . . . . . . 66
No More Foes . . . . . . . . . . . . . . . . . 72
Not a Leader . . . . . . . . . . . . . . . . . . 97
O
d
Offensive Characteristics . . . . . . . 14
Offensive Skill (Off) . . . . . . . . 14 , 69
One of a Kind . . . . . . . . . . . . . . . . . . 24
Contents Index 126 Model Rules Summaries
One Turn . . . . . . . . . . . . . . . . . . . . . . 56
One Use Only . . . . . . . . . . . . . . . . 117
Opaque Terrain . . . . . . . . . . . . . . . . 89
Open Lists . . . . . . . . . . . . . . . . . . . . . 31
Open Terrain . . . . . . . . . . . . . . . . . . 90
Ordering the Charge . . . . . . . . . . 104
Overkill . . . . . . . . . . . . . . . . . . . . . . . 71
Overruns . . . . . . . . . . . . . . . . . . . . . . 73
P
d
Paired Weapons . . . . . . . . . . . . . . 107
Panic Test . . . . . . . . . . . . . . . . . . . . . 83
Parry . . . . . . . . . . . . . . . . . . . . . . . . 106
Paths of Magic . . . . . . . . . . . . . 53 , 54
Permanent . . . . . . . . . . . . . . . . . . . . 56
Personal Protections . . . . . . . . . 105
Pistol . . . . . . . . . . . . . . . . . . . . . . . . 107
Pivots . . . . . . . . . . . . . . . . . . . . . . . . . 52
Plate Armour . . . . . . . . . . . . . . . . 106
Player Turn . . . . . . . . . . . . . . . . . . . . . 5
Poison Attacks . . . . . . . . . . . . . . . 113
Post-Combat Pivot . . . . . . . . . . . . . 78
Post-Combat Reform . . . . . . . . . . . 78
Power Level . . . . . . . . . . . . . . . . . . . 59
Pre-Game Sequence . . . . . . . . . . . 32
Priority of Modifiers . . . . . . . . . . . 17
Protean Magic . . . . . . . . . . . . . . . . . 97
Psychology . . . . . . . . . . . . . . . . . . . . 83
Pursuing off the Board . . . . . . . . . 78
Pursuit Moves . . . . . . . . . . . . . . . . . 73
Pursuits . . . . . . . . . . . . . . . . . . . . . . . 73
Q
d
Quick to Fire . . . . . . . . . . . . . . . . . 113
R
d
R&F . . . . . . . . . . . . . . . . . . . . . . . . . . . . 8
Raise Health Points . . . . . . . . . . . . 60
Rally Around the Flag . . . . . . 84 , 97
Rally Test . . . . . . . . . . . . . . . . . . . . . 50
Rallying Fleeing Units . . . . . . . . . . 50
Random Characteristics . . . . . . . . 15
Random Directions . . . . . . . . . . . . . 6
Random Movement . . . . . . . . . . . . 97
Range X″ (Spell Type) . . . . . . . . . . 56
Ranged Attacks . . . . . . . . . . . . . . . . 18
Rank Bonus . . . . . . . . . . . . . . . . . . . 71
Rank-and-File (R&F) . . . . . . . . . . . . 8
Ranks . . . . . . . . . . . . . . . . . . . . . . . . . . 8
Reactive Player . . . . . . . . . . . . . . . . . 5
Rear (Unit) . . . . . . . . . . . . . . . . . . . . . 8
Rear Bonus . . . . . . . . . . . . . . . . . . . . 71
Rear Rank . . . . . . . . . . . . . . . . . . . . . . 8
Recover Health Points . . . . . . . . . 60
Redirecting a Charge . . . . . . . . . . . 41
Reform . . . . . . . . . . . . . . . . . . . . . . . . 51
Refused Flank . . . . . . . . . . . . . . . . . 34
Refusing a Duel . . . . . . . . . . . . . . . . 70
Reload . . . . . . . . . . . . . . . . . . . . . . . 113
Removing as a casualty . . . . . . . . 80
Removing Casualties . . . . . . . . . . . 81
Replicable Spells . . . . . . . . . . . . . . 55
Rerolling Dice . . . . . . . . . . . . . . . . . . 6
Resilience (Res) . . . . . . . . . . . 14 , 20
Resolving Spells . . . . . . . . . . . . . . . 57
Restrain Pursuit Test . . . . . . . . . . 73
Rider . . . . . . . . . . . . . . . . . . . . . . . . . 88
Rolling Dice . . . . . . . . . . . . . . . . . . . . 6
Round Bases . . . . . . . . . . . . . . . . 9 , 11
Round of Combat . . . . . . . . . . . . . . 66
Round of Combat Sequence . . . . 67
Ruins . . . . . . . . . . . . . . . . . . . . . . . . . 91
S
d
Scoring . . . . . . . . . . . . . . . . . . . . . . . 98
Scoring Units . . . . . . . . . . . . . . . . . . 98
Scout . . . . . . . . . . . . . . . . . . . . . . . . . 98
Secondary Objectives . . . . . . 35 , 85
Secure Target . . . . . . . . . . . . . . . . . . 36
Set to a Fixed Number . . . . . . . . . 16
Setting up a Game . . . . . . . . . . . . . 22
Shaken . . . . . . . . . . . . . . . . . . . . . . . . 83
Shield . . . . . . . . . . . . . . . . . . . . . . . 106
Shooting (Attack Attribute) . . . 109
Shooting Attacks . . . . . . . . . . . . . . 18
Shooting Phase . . . . . . . . . . . . . . . . 61
Shooting To-Hit Modifiers . . . . . . 62
Shooting Weapons . . . . . . . . . . . 107
Short Range . . . . . . . . . . . . . . . . . . . 62
Shots . . . . . . . . . . . . . . . . . . . . . . . . . 62
Simultaneous Effects . . . . . . . . . . . . 5
Single Model Units . . . . . . . . . . 8 , 52
Siphon the Veil . . . . . . . . . . . . . . . . 54
Skirmisher . . . . . . . . . . . . . . . . . . . . 98
Soft Cover . . . . . . . . . . . . . . . . . . . . . 63
Spacing . . . . . . . . . . . . . . . . . . . . . . . 13
Spear . . . . . . . . . . . . . . . . . . . . . . . . 107
Special Attacks . . . . . . . . . . . . . . . 114
Special Deployment
. . . . . . . . . . . . 36 , 37 , 93 , 98 , 100
Special Items . . . . . . . . . . . . . . . . . 116
Special Saves . . . . . . . . . . . . . . . . . . 21
Spell Casting . . . . . . . . . . . . . . . . . . 57
Spell Classification . . . . . . . . . . . . . 55
Spell Duration . . . . . . . . . . . . . . . . . 56
Spell Effect . . . . . . . . . . . . . . . . . . . . 55
Spell Properties . . . . . . . . . . . . . . . 55
Spell Selection . . . . . . . . . . . . . . . . . 36
Spell Types . . . . . . . . . . . . . . . . . . . . 56
Spells . . . . . . . . . . . . . . . . . . . . . . . . . 54
Splitting Combat . . . . . . . . . . . . . . . 72
Spoils of War . . . . . . . . . . . . . . . . . . 35
Stand and Shoot . . . . . . . . . . . . . . . 40
Stand Behind . . . . . . . . . . . . . . . . . . 99
Standard (Height) . . . . . . . . . . . . . 87
Standard Bearers . . . . . . . . . 71 , 104
Steadfast . . . . . . . . . . . . . . . . . . . . . . 72
Stomp Attacks . . . . . . . . . . . . . . . 115
Strength (Str) . . . . . . . . . 14 , 18 , 20
Strider . . . . . . . . . . . . . . . . . . . . . . . . 99
Stubborn . . . . . . . . . . . . . . . . . . . . . . 99
Suits of Armour . . . . . . . . . . . . . . 106
Summaries . . . . . . . . . . . . . . . . . . 118
Summoned Units . . . . . . . . . . . . . . 60
Supernal . . . . . . . . . . . . . . . . . . . . . . 99
Supporting Attacks . . . 68 , 87 , 112
Sweeping Attack . . . . . . . . . . . . . 115
Swift Reform . . . . . . . . . . . . . . . . . . 99
Swiftstride . . . . . . . . . . . . . . . . . . . 100
Swirling Melee . . . . . . . . . . . . . . . . 68
T
d
Tall . . . . . . . . . . . . . . . . . . . . . . . . . . 100
Target Facing . . . . . . . . . . . . . . . . . . 63
Terrain . . . . . . . . . . . . . . . . . . . . . . . . 89
Terrain Features . . . . . . . . . . . . . . . 90
Terrain Types . . . . . . . . . . . . . . . . . 89
Terror . . . . . . . . . . . . . . . . . . . . . . . 100
Throwing Weapons . . . . . . . . . . . 107
To-Hit Modifiers . . . . . . . . . . . 62 , 69
To-Hit Rolls . . . . . . . . . . . . . . . . . . . 69
To-Hit Table . . . . . . . . . . . . . . . . . . . 69
To-Wound Rolls . . . . . . . . . . . . . . . 20
To-Wound Table . . . . . . . . . . . . . . . 20
Towering Presence . . . . . . . . . . . 100
Toxic Attacks . . . . . . . . . . . . . . . . . 114
Turns . . . . . . . . . . . . . . . . . . . . . . . . . . 5
Two-Handed . . . . . . . . . . . . . . . . . 114
Types . . . . . . . . . . . . . . . . . . . . . . . . . 87
U
d
Unbreakable . . . . . . . . . . . . . . . . . 100
Undead . . . . . . . . . . . . . . . . . . . . . . 100
Undeployable Units . . . . . . . . . . . . 37
Unit Arcs . . . . . . . . . . . . . . . . . . . . . . . 9
Unit Boundary . . . . . . . . . . . . . . . . . . 8
Unit Entries . . . . . . . . . . . . . . . . . . . 25
Unit Facings . . . . . . . . . . . . . . . . . . . . 8
Unit Spacing . . . . . . . . . . . . . . . . . . . 13
Units . . . . . . . . . . . . . . . . . . . . . . . . . . . 8
Universal (Spell Type) . . . . . . . . . 56
Universal Rules . . . . . . . . . . . . . . . . 93
Unstable . . . . . . . . . . . . . . . . . . . . . 100
Unwieldy . . . . . . . . . . . . . . . . . . . . 114
V
d
Vanguard . . . . . . . . . . . . . . . . . . . . 100
Veil Token Limits . . . . . . . . . . . . . . 54
Veil Tokens . . . . . . . . . . . . . . . . . . . . 54
Victory Conditions . . . . . . . . . . . . . 85
Victory Points (VP) . . . . . . . . . . . . 85
Volley Fire . . . . . . . . . . . . . . . . . . . 114
Volley Gun . . . . . . . . . . . . . . . . . . . 108
Contents Index 127 Model Rules Summaries
W
d
Walls . . . . . . . . . . . . . . . . . . . . . . . . . . 91
War Machine . . . . . . . . . . . . . . . . . 101
War Platform . . . . . . . . . . . . . . . . 101
Warbands . . . . . . . . . . . . . . . . . . . . . 25
Water Terrain . . . . . . . . . . . . . . . . . 91
Weapon Enchantments . . . . . . . 116
Weapon Master . . . . . . . . . . . . . . 114
Weapons . . . . . . . . . . . . . . . . . . . . . 106
Wearer . . . . . . . . . . . . . . . . . . . . . . 117
Wheels . . . . . . . . . . . . . . . . . . . . . . . . 52
Wielder . . . . . . . . . . . . . . . . . . . . . . 117
Winning a Round of Combat . . . . 71
Winning the Game . . . . . . . . . . . . . 85
Wizard Adept . . . . . . . . . . . . . . . . 101
Wizard Apprentice . . . . . . . . . . . 101
Wizard Conclave . . . . . . . . . . . . . 102
Wizard Master . . . . . . . . . . . . . . . 102
Wizards . . . . . . . . . . . . . . . . . . . . . . . 53
Wounds . . . . . . . . . . . . . . . . . . . . . . . 20
Contents Index 128 Model Rules Summaries
d
Contents Index 129 Model Rules Summaries